A Guide on the Versions of QuickBooks that are Compatible with Windows 10

A Guide on the Versions of QuickBooks that are Compatible with Windows 10

Find out which versions of QuickBooks is compatible with Windows 10.

QuickBooks being a most popularly used for all types of business accounts management software, known for its impeccable features related to maintaining records simultaneously, random transactions are calculated based on present instructions, helps to determine cashflow and outflows, etc. Before a user, wants to use QuickBooks 2024, he should first check all the requirements and pre-requisites to see if it is compatible with Windows 10.

The article gives a proper guide on which versions of QuickBooks is Compatible with Microsoft Windows 10 operating system. Read the comprehensive guide to know all facts related to it.

Windows 10 – Latest Updates

Let us first look at the latest updates and features of Microsoft Windows 10, before proceeding on the QuickBooks version which are compatible with Windows 10:

  • The start menu of Window 7 and Windows 10 are similar.
  • Windows 10 is complimenting Latest update of Internet Explorer 11, i.e., specifically EDGE, with more enhanced features.
  • Task switcher of Windows 10 is commendable, which is a virtual desktop. You can change the names of virtual desktops.
  • The .NET Framework4.6, latest version for Window 10, is capable for finishing multiple tasks simultaneously. It’s a fact that because of latest version of .NET Framework 4.6, reason for its biggest sale.
  • Update options can be configured in new versions.
  • Task manager contains GPU temperature and disc type.
  • Uses a Linux Kernel with WSL2.
  • Limitations on bandwidth updating.
  • Ease in control of optional updates.

Methods to Search QuickBooks Software Compatibility with your Windows 10

It is necessary to check and install only the version of QuickBooks which is compatible with the latest version of the Windows 10 operating system. This is to access most of the QuickBooks impeccable features, which QuickBooks releases on its official website. Though Windows 10 latest version has enabled the no requirement of updating operating system every time.

Thus, follow the methods to check if your Windows 10 is compatible with the latest version of QuickBooks:

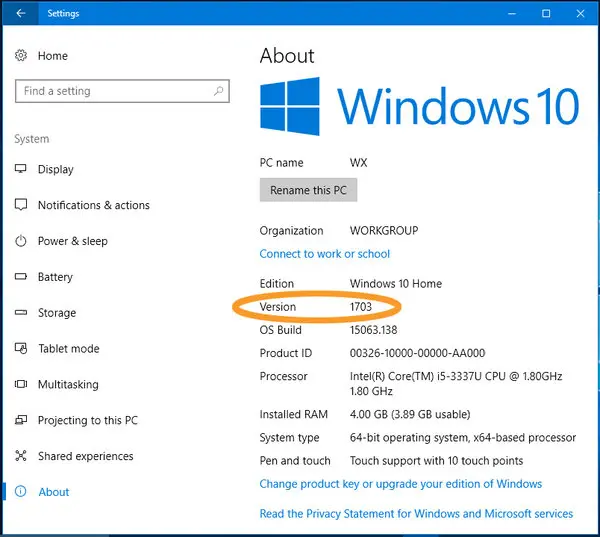
  1. Go to Start menu > then click on ‘About your PC’ in search box.
  2. A Windows Specification window opens.
  3. Scroll down the window and check Windows version.
  4. See if this version number is certified and compatible with QuickBooks version.

Need of QuickBooks Desktop Compatible with Windows 10

Reasons for the need of QuickBooks 10 to be compatible with Windows 10 version are:

  1. Bill tracker is supported by Windows 10.
  2. Advanced Reporting features.
  3. Capability of removing multiple transactions with the bulk clear send forms.
  4. Able to update new version of company files.

Supported Versions of Windows 10 for Desktop Pro, Enterprise and Premier

The users who want to use QuickBooks should know which version of Windows 10 is compatible with the software. Let’s look at the supported versions for QuickBooks Desktop Pro, Premier, and Enterprise with Windows 10.

Supported Windows 10 version are as follows:

Windows 10 Version 1809- Microsoft Corporation of Windows 10 Version 1809 supports all QuickBooks versions (Pro, Premier and Enterprise). It is the newest and second release of Microsoft. It is also compatible with Version 1803.

Windows 10 Version 1709- Inuit company always updates their products for the user requirements and to be compatible with Windows. Released version of QuickBooks Desktop Pro, Premier, and Enterprise between 2017-2020, all support Windows 10 Version 1709.

Refer to the table for Windows10- QuickBooks Compatibility:

Windows 10 VersionsQuickBooks Compatibility
Windows 10, Version 1809QuickBooks 2020
Windows 10, Version 1803QuickBooks 2017, 2018, 2019, and 2020
Windows 10, Version 1709QuickBooks 2017, 2018, 2019, and 2020
Windows 10, Version 1507, 1511, 1607, and 1703Not Compatible with QuickBooks

Windows 10, Version 1507, 1511, 1607, and 1703 (Unsupported Versions)

These versions are not compatible with QuickBooks. QuickBooks Pro, Premier, and Enterprise do not work properly with the outdated versions of Windows 10. So it is recommend to use only the latest updates of Windows 10 to access distinct features.

QuickBooks Versions that Run on Windows 10

Every latest QuickBooks version has its own necessities and distinct features from the old versions.

which versions of QuickBooks is compatible with Windows 10

This information is necessary for the user, as he / she can download the exact suitable version, so that there is no technical glitches which may hamper the performance of the QuickBooks. Here is a list of QuickBooks Desktop versions which are compatible with Windows 10, it comes with different specifications:

QuickBooks Desktop 2024

QuickBooks Desktop 2023

QuickBooks Desktop 2022

QuickBooks Desktop 2021

QuickBooks Desktop 2020

QuickBooks Desktop 2019

QuickBooks Desktop 2018

QuickBooks Desktop 2017

Here is table which gives a clear view for the QuickBooks Versions which are compatible with Windows 10. This table provides an insight to the compatibility status of 2014, 2015, 2016 and 2019 QuickBooks Pro version with Windows 10.

QuickBooks VersionCompatibility With Windows 10
QuickBooks 2010Not Compatible
QuickBooks 2011Not Compatible
QuickBooks 2012Not Compatible
QuickBooks 2013Not Compatible
QuickBooks 2014Not Compatible
QuickBooks 2015Compatible
QuickBooks 2016Compatible
QuickBooks 2017Compatible
QuickBooks 2018Compatible
QuickBooks 2019Compatible
QuickBooks 2020Compatible
QuickBooks 2021Compatible
QuickBooks 2022Compatible
QuickBooks 2023Compatible
QuickBooks 2024Compatible

Experts suggest to always keep your Windows and QuickBooks versions updated to avoid any kind of disruption. If you are using 2014 or earlier version of QuickBooks, then you need to enable Microsoft .NET Framework 3.5 which will make it compatible with Windows 10.

Following are the compatibility requirements by Windows 10 to work with QuickBooks effectively. These are some steps helps you to update and improve the recent software available on your PCs.

QuickBooks Desktop 2022

The following is available for download in various versions, such as Pro Plus 2022, Pro Plus 2022 Payroll, Premier Plus 2022, Premier Plus 2022 Payroll, Accountant, Mac Plus 2022, and Enterprise 22.

Features:

The latest features of QuickBooks Desktop 2022 are as follows:

  1. Uploading documents
  2. Procedure for approving bills
  3. Automated Invoice Entry and personalised Invoice pay slips
  4. Webgility – the QuickBooks biggest channel for online sellers and , provides an e-commerce platform.
  5. Invoices are scheduled timely and quick payments.
  6. Quick deposits
  7. Advanced power processor of 64-bit.
  8. Recommended by many consumers
  9. Payment links

Requirements:

  • Operating system such as Windows 8.1 and Windows 10.
  • Windows server 2011, Windows Server 2012 R2, Windows Server 2016 and Windows Server 2019
  • Internet Explorer 11- 32 bit with stable network connection
  • Processor with clock speed of 2.4 GHz required
  • Minimum RAM of 4GB, recommended 8 GB RAM
  • Free storage space – 2.5 GB
  • An Optical Drive; 4X DVD-ROM drive for CD installation.
  • Two extended monitors, screen resolution- 1280*1024 or above required.
  • Microsoft Office 2010, Office 2013, Office 2016, and Office 2019 are all provided.

QuickBooks Desktop 2021

It is for all users such as Pro 2021, Mac, Enterprise 21.0, Premier, and Accountant, QuickBooks 2021 is available for download with latest features, error fixes, enhanced performance, etc.

Features

The features of QuickBooks 2021 are created enabling time management and efficiency. Some of the features are:

  • Merchant Services Payments are reconciled.
  • Automated Statements/Payment Reminders
  • QuickBooks Tool Hub
  • Advanced Bank Feed
  • Automated Receipt Processing
  • Customer Groups Defined by Rules
  • Configuration of Payment Receipts
  • Email templates which are reusable.

Requirements

  • Operating Systems such as Windows 8.1 and Window 10
  • Windows server 2011, Windows Server 2012 R2, Windows Server 2016 and Windows Server 2019
  • Internet Explorer 11- 32 bit with stable network connection
  • Processor with clock speed of 2.4 GHz required
  • Minimum RAM of 4GB, recommended 8 GB RAM
  • Free storage space – 2.5 GB
  • An Optical Drive; 4X DVD-ROM drive for CD installation.
  • Two extended monitors, screen resolution- 1280*1024 or above required.
  • Microsoft Office 2013, Office 2016, and Office 2019 are all provided.

QuickBooks Desktop 2020

All editions of QuickBooks 2020 is available, which includes Desktop Pro, Premier, Accountant, Mac, and Enterprise 20.

Features

The Edition of QuickBooks 202 with new advanced features are given below:

  • Payment Reminders via Email
  • Searching Up Company Files
  • Automatic addition of consumer purchase orders to invoice mails
  • Ease in Admin password reset.
  • Clients opted for direct deposit-Payroll Status
  • Collapse of column reports.
  • Accessibility Improvised
  • Combine multiple mails

Requirements

  •  Operating Systems such as Windows 7 SERVICE PACK 1, Windows 8.1 and Window 10
  • Windows Server 2008 R2 SERVICE PACK 1, Windows server 2011, Windows Server 2012 R2, Windows Server 2016 and Windows Server 2019
  • Internet Explorer 11- 32 bit with stable network connection
  • Processor with clock speed of 2.4 GHz required
  • Minimum RAM of 4GB, recommended 8 GB RAM
  • Free storage space – 2.5 GB
  • An Optical Drive; 4X DVD-ROM drive for CD installation.
  • Two extended monitors, screen resolution- 1280*1024 or above required.
  • Microsoft Office 2010, Office 2013, Office 2016, and Office 2019 are all provided.

QuickBooks Desktop 2019

Included all editions of QuickBooks 2019, such as Pro Premier, Accountant, Mac, and Enterprise are available for download.

Features

  • Customer Credit Transfer
  • Preparation of Repots and Tax returns
  • There is a tool provided by QuickBooks to maintain invoice transactions, i.e., Invoice Status Tracker.

Requirements

  • Operating Systems such as Windows 8.1 and Window 10
  • Windows server 2011, Windows Server 2012 R2, Windows Server 2016 and Windows Server 2019
  • Internet Explorer 11- 32 bit with stable network connection
  • Processor with clock speed of 2.4 GHz required
  • Minimum RAM of 4GB, recommended 8 GB RAM
  • Free storage space – 2.5 GB
  • An Optical Drive; 4X DVD-ROM drive for CD installation.
  • Two extended monitors, screen resolution- 1280*1024 or above required.
  • Microsoft Office 2010, Office 2013, Office 2016, and Office 2019 are all provided.

QuickBooks Desktop 2018

It includes all versions of QuickBooks 2018 such as Pro, Premier, Mac, and Enterprise which can be downloaded from official website Inuit.

Features

  • Inventory Mobile Scanner
  • Stamp unpaid due
  • Completing Sales Order has been improvised
  • Toggle the cash
  • Finding Chart of Accounts

Requirements

  • Operating Systems such as Windows 8.1 and Window 10
  • Windows Server 2011, Windows Server 2012 R2, Windows Server 2016
  • Internet Explorer 11- 32 bit with stable network connection
  • Processor with clock speed of 2.4 GHz required
  • Minimum RAM of 4GB, recommended 8 GB RAM
  • Free storage space – 2.5 GB
  • An Optical Drive; 4X DVD-ROM drive for CD installation.
  • Two extended monitors, screen resolution- 1280*1024 or above required.
  • Microsoft Office 2010, Office 2013, Office 2016 are all provided.

QuickBooks Desktop 2017

The edition of QuickBooks 2017 is available for download for Pro, Premier, Accountant Plus, Mac, and Enterprise.

 Features

Let us look at the features of QuickBooks 2017:

  • Filter for customer and vendor
  • Reporting Schedule
  • Smart Lookup
  • Username can be removed from Audit trail
  • Report Filters available
  • Multiuser mode
  • Visual Reminder maintains deposits transactions

Requirements

  • Operating Systems such as Windows 7 SERVICE PACK 1, Windows 8.1 and Window 10
  • Windows Server 2008 R2, Windows server 2011, Windows Server 2012 R2
  • Internet Explorer 11- 32 bit with stable network connection
  • Processor with clock speed of 2.4 GHz required
  • Minimum RAM of 4GB, recommended 8 GB RAM
  • Free storage space – 2.5 GB
  • An Optical Drive; 4X DVD-ROM drive for CD installation.
  • Two extended monitors, screen resolution- 1280*1024 or above required.
  • Microsoft Office 2010, Office 2013, Office 2016 are all provided

QuickBooks Desktop 2016 R7 and Later

With the QuickBooks 2016 R7 you won’t face any compatibility issues and switch to the Windows 10 operating system. But if the user is using R7 version of QuickBooks, upgrade it to the latest version from Inuit website of QuickBooks for using most advanced features of Bookkeeping.

Features

Following are the features of QuickBooks 2016 R7 for Pro, Premier, Accountant and Enterprise:

  • QuickBooks Statement Writer
  • Send Forms by Batch
  • Continuous Feed Label Printer Support
  • Streamlined Updates
  • Autofill Ship-to-Address
  • Payments Search Options
  • Fiscal Year to Last Month Report Filter

Requirements

  • Operating Systems such as Windows 7, Windows 8.1, Windows Vista
  • Windows Server 2003 SP2, Windows Server 2008, Windows Server 2008 R2, Small Business Server 2008, Windows Small Business Server 2011, Windows Server 2012
  • Internet Explorer 11- 64 bit with stable network connection
  • Processor with clock speed of 2.4 GHz required
  • Recommended 8 GB RAM, Minimum RAM of 4GB required
  • Free storage space – 2.5 GB
  • An Optical Drive; 4X DVD-ROM drive for CD installation.
  • Two extended monitors, screen resolution-1024*768 or above required.
  • Microsoft Office 2010, Office 2013 are all provided.

QuickBooks Desktop 2015 & 2016 (Release 1-6)

Following are the features of QuickBooks version 2015 & 2016 for Desktop versions such as Pro, Premier, Accountant and Enterprise:

  • Online payments are updated.
  • Updated Reminder window
  • Home window has insights tab
  • Pinned notes
  • New Report Formatting
  • Income Tracker updates

Requirements

  • Operating Systems such as Windows 7, Windows 8, Windows Vista, Windows 10
  • Windows Server 2003 SP2, Windows Server 2008, Windows Server 2008 R2, Small Business Server 2008, Windows Small Business Server 2011, Windows Server 2012
  • Internet Explorer 11- 64 bit with stable network connection
  • Processor with clock speed of 2.4 GHz required
  • Minimum RAM of 2GB required
  • Free storage space – 2.5 GB
  • An Optical Drive; 4X DVD-ROM drive for CD installation.
  • Two extended monitors, screen resolution-1024*768 or above required.

QuickBooks Desktop 2014 or Earlier

From the QuickBooks version 2015 and later, all are compatible with Windows 10 Operating System. QuickBooks version before 2014 are not able to work with the Windows because the software features would not align with the Operating system. So, it is recommended by professionals and experts to always update QuickBooks to latest versions 2015 and later.

Differences between QuickBooks Software Versions (2015 and 2016)

Inuit keeps updating its products, especially QuickBooks, known for its distinct performance in Business Bookkeeping and accounting for all type of entrepreneurs. But some users who want to update their QuickBooks 2015 to version 2016 and are bit anxious about it. Look at the table below making comparison of the features of QuickBooks versions 2015 and 2016:

FeaturesQuickBooks 2015QuickBooks 2016
ReportingDoes not support advanced reportingSupport advanced reporting
Update Company FileProvides feature to update company file to new versionProvides feature to update company file for new version
Bill TrackerNot supported in QuickBooks 2015 Pro, premium and Enterprise It has the feature of Bill tracker.
Supports Bulk Clear Send FormsIt does not have bulk clear send forms.It supports bulk clear send forms.

Ways to Enable .NET Framework 3.5 (QuickBooks 2015)

With the .NET Framework 3.5, you can make QuickBooks 2015 compatible with Window 10 Operating System. Its is essential because if you try to access QuickBooks 2015 without the Framework, it will not execute successfully.

  .NET Framework is by default turned off by Microsoft, and you can experience the functionality of OS. Inspite of QuickBooks 2015 can be used with Windows 10, it may not function properly. So, it is suggested that to enable before using QuickBooks. Follow the steps to enable:

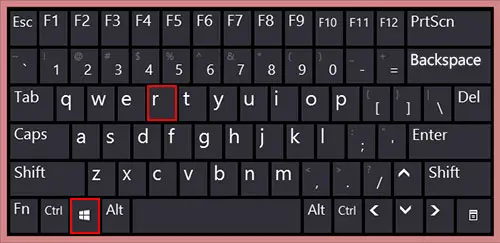
  • Go to Start menu > press Windows + R.
  • A Run window will open. Type their Control Panel and click OK button.
  • Select Uninstall a Program from list options.
  • Next go to Turn Windows features ON or OFF option.
  • A dialogue box open showing .NET Framework 3.5 and .NET Framework 4.5.
  • See if the option is turned ON. After this, restart your PC and run QuickBooks.

Ways to make QuickBooks Desktop Compatible with Windows 10

To make QuickBooks compatible with Windows 10 ensure .NET Framework is ON, follow the steps below:

  • Click on Start Button > click on Turn Windows features- ON or OFF.
  • A dialog box opens and see the option for .NET Framework 3.5 and the .NET Framework 4.5.
  • Check if .NET Framework is ON, if not, then click on checkbox to enable it.
  • Finally save and finish the task.

Conclusion

From the following article, we conclude the knowledge of QuickBooks version compatibility with Windows 10. It is a complete guide which tells about the different versions of QuickBooks which can work with Windows 10, what all is required to install and download a specific QuickBooks version on your Desktop.

For more information you can live chat with the QuickBooks support experts or contact the helpline number +1-844-926-4607.

Other related topics:

Methodologies to Fix Missing Employee in QuickBooks Desktop

Learn the Procedure to Merge list Entries in QuickBooks Desktop

How to Troubleshoot QuickBooks Payroll Error 9000

How To Troubleshoot QuickBooks Payroll Error 9000?

The article highlights the ways for debugging Error 9000 which is a QuickBooks Payroll Error. The QuickBooks Payroll Error 9000 depicts that you are not able to send the Payroll information or try to make a deposit through checks in their respective accounts. This is because you are not able to connect or retrieve information from QuickBooks server database, where all the information has been stored of respective QuickBooks’ user account.

Normally, this occurs due to poor networking with QuickBooks desktop or Online to another system server. This will obstruct you to proceed further and delays your work as the error message ‘ Error 9000 QuickBooks has encountered a problem and needs to close.’ This technical glitch will refrain you from performing other tasks too.

QuickBooks Payroll Error 9000

Symptoms when you will face the QuickBooks Error 9000 in your system:

  • System will be experiencing crashing, freezing and performance will be sluggish.
  • Frequent display of error messages
  • Task disruption
  • Tax tables won’t get updates.
  • Refrained from QuickBooks services like upgradation, validation of data and transactions.
  • Requested files won’t get fetched.
  • Delays in clients or employees’ payment

Further in the article you will come across reasons behind QuickBooks Payroll Error 9000 and 10 best debugging solutions to overcome the issue. But before you troubleshoot, check the following things, for no trouble is faced by the user while executing them. Such as:

  • Maintain backup for avoiding loss of data.
  • Keep your Windows Drivers updated.
  • Check recent version and updates of QuickBooks are installed.
  • Confirm is the router is connected for internet connection, else troubleshoot from Network and Sharing center in Control Panel.

What are the Causes of QuickBooks Payroll Error 9000

To resolve the QuickBooks Error code 9000, you need to follow the procedures to ensure that your SSL setting of your system are changed so that you can send and receive your payroll and funds transfer to accounts. You must follow each step so that the issue of Error code 9000 gets resolved with the change in browser settings. These steps will help you to make QuickBooks compatible. The steps are:

  • First check if the browser you are using is the default opening browser of your computer system.
  • Now the next step is to click on Tool  > select the Internet options to look for Connection tab where you can alter your LAN settings.
  • Just see where Automated Detected Settings is, ensure that your proxy server field is empty.
  • Check SSL 2.0 and SSL 3.0 are marked as ticked. Keep the TSL 1.2 null.

To resolve the problem of QuickBooks Payroll Error 9000, it is better to know the root cause behind the disruption. This will help to analyze and debug the problem. Here are the following causes:

Outdated QuickBooks

The expired version of QuickBooks or subscription plan is finished. Also, when your QuickBooks features and services are not updated.

Connectivity Issue

Bad internet connection due to router settings, LAN connectivity problem, low uploading per Mbps or network settings.

Network Layer settings are Incorrect

When your Secure Sockets Layer(SSL) or Transport Layer Security(TSL), which are encrypted protocols which protect data transfer over internet, settings are not correct.

Company files issue

When the company files are corrupted or damaged of QuickBooks.

Other software settings or viruses issues

  • Due to security software like antivirus and firewalls can disrupt the sending of payroll and create QuickBooks Payroll Error 9000. Also, because of some viruses like malware or worms can hamper the functioning of QuickBooks unable to fetch the request sent.
  • May be the setup issue is prevailing, which is causing Error 9000.
  • The applications are not compatible with the system, there may be conflicting software.
  • Your system date and time does not coincide with the current date and time.

10 Debugging Methods For QuickBooks Payroll Error 9000

To debug or fix the QuickBooks Payroll Error 9000, let us follow the 10 essential methods to eliminate the problem of inconvenience in sending payroll or direct deposits checks to the user and employees, resulting in delay of work and data cannot be validated. The following 10 steps involved are:

Method 1: Correct the Security Socket Layer Settings(SSL) of your system

To resolve the QuickBooks Error code 9000, you need to follow the procedures to ensure that your SSL setting of your system are changed so that you can send and receive your payroll and funds transfer to accounts. You must follow each step so that the issue of Error code 9000 gets resolved with the change in browser settings. These steps will help you to make QuickBooks compatible. The steps are:

  • First check if the browser you are using is the default opening browser of your computer system.
  • Now the next step is to click on Tool  > select the Internet options to look for Connection tab where you can alter your LAN settings.
  • Just see where Automated Detected Settings is, ensure that your proxy server field is empty.
  • Check SSL 2.0 and SSL 3.0 are marked as ticked. Keep the TSL 1.2 null.

Method 2: Configure your firewall settings

Windows-Firewall-setting

Firewall settings, due to security reasons, block your QuickBooks to get updates or access the server. Alteration in the setting can fix the error which is causing issues in the functionality of QuickBooks and interrupting system performance.

To resolve this QuickBooks Payroll Error 9000, follow the steps:

  • Under the Window Firewall program, open from the start menu, head to the Advanced Settings.
  • Next step for the user is to right click the Inbound Rules, under advanced settings and then click on QuickBooks option and hit Next.
  • Under the Program Path option, from the different file names select the heads ‘qbw32.exe’ and ‘qbupdate.exe’, see if the permissions are allowed to them.
  • Finally, you must hit Next, then click on Allow Action Button. Wait for completion of the process.

Method 3: Download and Utilize QuickBooks Tool Hub

The QuickBooks Tool Hub is an important tool which contains the error fixings options like Install Diagnostic Tool, QuickBooks File Doctor, Quick Fix My Program Tool, etc. to fix the errors related to QuickBooks. Though QuickBooks Tool Hub is compatible with QuickBooks desktop version of 2016 of Windows, not QuickBooks Online. Follow the required procedures, for fixation of the QuickBooks Payroll Error 9000:

quick-fix-my-program-from-tools-hub
  • Login into your QuickBooks Desktop and then head towards the file menu.
  • Move to the Utilities option where you will file Repair file and sub option as Network Problems options.
  • From there you can access company files of your QuickBooks.
  • Under the Advanced settings section select Error Code 9000 to fix from the drop-down menu.
  • Now re-login QuickBooks with your user account, then again try to send the payroll and direct transfers on arrival of checks.

Method 4: Remove junk files from the system

Clean-Your-Systems-Junk-Files

Junk files are hex for the computer systems as they occupy unnecessary storage space and lead to frequent disruptions in the functioning. It also may be the cause of QuickBooks Error 9000. Let us remove theses files to ensure that the error gets eliminated:

  • The first step to remove junk files is to go to Start > then type cmd or simply type ‘command prompt’.
  • Press the keys together Ctrl+Shift, tap enter key on keyboard.
  • When your screen displays Permission Dialogue Box, press on YES. This will initiate disk cleanup task, where you can select by yourself the files you want to remove.
  • Hit the finish button, then OK.

Method 5: Modify system Date and Time

For the smooth functioning, one should ensure that the computers date and time coincide with the software server on other computers. This will avoid QuickBooks Payroll Error 9000. Follow the steps to change date and time of the system:

  • From Window Taskbar, choose Date and Time Settings, where you will see a window oopen up displaying time(hh:mm:ss), date(dd) and year(yyyy). Modify the date and time accordingly.
  • Now restart the PC to see if the Error code 9000 is resolved.

Method 6: Cancellation of Publishers Certificate of Invalid Version

Sometimes when the user is using the unauthorized version of QuickBooks, it is important for ‘Revocation of Publishers Certificate’ means one needs to cancel the invalid subscription. To do the following, perform the steps:

  • When you open your browser, tap on the Tools menu > go to Internet option from the list and then select Advanced option.
  • From the Security head under Advanced option, unmark the ‘Publisher Certification Revocation Box’.
  • Then you should try to reboot the PC, now reopen QuickBooks.

Method 7: Try to Restore your System

To restore your system, follow the steps:

  • Under the Control Panel, you must search for System Restore section, where you first need to click on it and then you have to fill out the Admin Credentials to restore your system.
  • You have to find a Restore point, after that click on Next button, this will start restoration process.
  • Follow the upcoming instructions given in the Restoration Process wizard one-by-one, then you have completed the process by clicking on the finish button.

Method 8: Take help of Clean Install Tool

QuickBooks provides a tool which is used to resolve the problems occurring while you are installing updates in your QuickBooks. This tool is known as Clean Install Tool, which helps in debugging errors caused while installing QuickBooks and their updates. We will use this tool to debug QuickBooks Payroll Error 9000. The steps to use Clean Install Tool are:

  • From the Inuit website of QuickBooks, download and install Clean Install Tool.
  • After storing it in a specific location, access .exe file of the Clean Install Tool and follow the procedure for installation.
  • Some wizards or dialog boxes get open, proceed with them.
  • After finishing use the tool to remove Payroll error 9000.

Method 9: Flush DNS

Due to system updating activities, there are some files which are generated by other programs while they get updated from online itself. They take up storage and also conflict in the path of QuickBooks upgradations and send requests to fetch payroll files and deposit the amount in the particular accounts. For this you need to delete DNS from the system. To do so, follow steps:

  • From the start menu you need to type ‘Command prompt’ in the search field.
  • Now in the command prompt window, where you can see the insert symbol, type the following ‘ipconsigns/flushdns’ and you need to press Enter key.
  • Let the process take place to remove/flush dns.

Method 10: Upgrade Recent Tax Tables of QuickBooks Payroll

To upload latest tax tables in your QuickBooks system to resist Error code 9000, follow the steps:

  • While you open your QuickBooks Desktop, the user need to head towards the Employee Section.
  • From there you will get  Payroll Update option, then you need to download it.
  • The user needs to download the recent updates from there.
  • When this is done, information will be displayed for completion.

If the problem still prevails, follow the steps:

  • Upgradation of QuickBooks Desktop improves performance.
  • The head ‘State Unemployment Insurance Rate’ needed to be validated manually by the user itself.
  • Now complete the configuration of ‘New State Taxes’ and now task is completed.

Conclusion

The purpose of the article is to resolve QuickBooks Payroll Error 9000, which an error caused by bad connectivity and file fetch requests for accessing payroll and transfer funds to the accounts are restricted. Here server fails to connect. The article talks about symptoms, causes and methods to resolve QuickBooks Payroll Error 9000.

Anyhow you are not able to fix this issue, contact our QuickBooks Error support or dial number +1-844-926-4607.

Recommended to read:

How to Resolve QuickBooks Error 15276?

7 Easy Solutions to solve QuickBooks Error 179

How to Convert QuickBooks File into an Older Version

How to Convert your QuickBooks File into an Older Version?

Sometimes the company’s preferring to use older versions of QuickBooks for their account managing services required as per preferences. So, for the users who want to downgrade QuickBooks file to an older version from the currently they are working in, here’s a quick guide. There will be no modifications and damage to your company files and data stored when you covert QuickBooks file to an older version.

How can you use the data of latest version in old version?

Though we cannot convert the file of QuickBooks latest edition to the older version format. But we can create a backup file to access the data.

  • If you are using a particular latest version company file for instance, QuickBooks 2018, so you need your backup file to be of same 2018 version.
  •   While you are opening the backup file in the old version, save it in another name and relocate it.

QuickBooks Subscription Plan to Demote from Latest Version

By mistake, if you have taken the costlier version of QuickBooks whose features are not compatible with your current managing system then QuickBooks provides a subscription plan to change back to the older version. The user requires to take in following considerations:

  • Failure in connectivity with other programs and applications.
  • Failure in ‘Recurring Transactions’
  • Deprive from discount availed with QuickBooks subscription.
  • Deprived from the user support services
  • Failure in inventory management
  • Failure in multi-currency function

Conversion process to downgrade QuickBooks file to an older version

Here are the steps given to demote your QuickBooks:

  • Ensure while you are upgrading or downgrading, your internet connectivity and speed is stable for no error occurrence. Now move to Accounts and Section field under Setting head.
  • Check if your accounting information is recently validated, now head towards the option of Billing & Subscription. From there you choose Downgrade, then tap on the button Proceed.
  • Next step in the process is to click on New Plan. Now see the things which will be removed while demotion/ downgrading.
  • When everything is done, hit on Change Plan.

Losing the QuickBooks User Support

As the QuickBooks provides support to it users of different versions, you need to see if while downgrading you are an abled user and doesn’t lose support services of QuickBooks.

The 2019 customer support eligible users are:

  • An Invoiceable user with two firms of accounting.
  • Two accountable firms with three Invoiceable users sharing QuickBooks Essential.
  • QuickBooks Plus which are shared by 5 Invoiceable users with two accounting firms.
  • QuickBooks advanced shared by 25 Invoiceable users and 3 firms.

Note– Remember to delete users from the plan you are Downgrading your QuickBooks.

Loss of features while you are Downgrading QuickBooks

Features lost while QuickBooks downgradation are:

Recurring Billing and Payments Transactions

Before Downgrading, the user needs to off or halt the settings of Recurring Transaction templates. In the QuickBooks Online Simple Start, recurring transactions are not there, otherwise, you must track the proceedings related to payments and invoices by yourself.

Third-Party Applications

While you are demoting your QB desktop, check from the head of My Apps, what all applications and programs are connected to your QuickBooks, which may be get affected.

Multi-Currency

QuickBooks Online Simple Start does not assist multi-currency function, if you are downgrading the latest version of QuickBooks Desktop to QuickBooks Online Simple Start. It will restrict the following process to take place.

Inventory Tracking feature

Only the QuickBooks versions Advanced and Online Plus has the feature of the Inventory tracking, so when you are downgrade, you need to halt that feature as older version cannot support it.

Downgrade QuickBooks Subscription

To downgrade your subscription of QuickBooks:

  • Login as authentic user in the QB Online. When logged in, under the Settings sections you have to move to Account and Settings options.
  • Next move is towards the head in QuickBooks window Billing and Subscription, be sure to make payments timely.
  • The user now must select the option of Downgrade and make choice for the subscription plan you want.
  • If still you are not able to find downgrade option then, next step is you have to login as registered account holder at the site: QuickBooks Online Login: Sign in to Access Your QuickBooks Account (intuit.com).
  • Carefully examine and make contrasts of versions and the features which may be compatible for your system.
  • To modify, features like Turning Off Recurring Transactions, follow required instructions on screen.
  • Hit on Change Plan for completion. If still want to switch to other previous versions, wait for 24 hours for Downgrade option to get.

Procedure to Convert QuickBooks File to an Older Version

Follow steps to downgrade:

  1. Be sure you are the administrator, login and click on File > then select the option of Open or Restore Company.
  2. The next step is to choose Open a Company File, then hit on the button Next.
  3. When dialog box gets opened search for expired company files and double click on them. You will get some details. A prompt appears stating ‘change in file will make it incompatible with old versions, mark the checkbox below.
  4. After this, the next step is to hit the click on Update Now, it will ask for Backup options, follow required instructions.
  5. At last, hit yes.

Comprehensive Process on Downgrading QuickBooks Desktop

Downgrading QuickBooks is done mainly because of cost and convenience factors. Process for the following is:

Process 1: Maintain Company File Backup

Making backup of company file protects it from losing data. Follow the steps:

  • Get started with QuickBooks, login with credentials and move to the file menu.
  • Now the very next step is to hit Switch to Single-user Mode. Again, head towards file menu and choose Backup Company from the list of options.
  • To create a backup file, select the option of Create Local Backup and then tap on Next button on the screen.
  • Windows pops up where you need to click on Local Backup head and again click on Next button to proceed.
  • A Local Backup Only is shown on the screen on browse to save the file on a particular folder or place.
  • Run a speedy security scan, then ok.
  • Final steps are hit on Save it now, then Next. A message of completion gets displayed.

Restoring company files backup

  • The user must first, restore file from local backup, select Restore the Company under menu bar.
  • You must save a backup copy, then hit on Restore a Backup copy option.
  • Hit Next.

Process 2: Demote your QuickBooks

  • From the Inuit site, move to Help section.
  • The very next step is tap on Manage my License.
  • Tap on to Switch to tab, where you need to select your version of QuickBooks.
  • Enter License and product number, and other credentials, then click on Ok.
  • Downgrading process will be initiated.

Process 3: Change from QuickBooks Desktop to QuickBooks Online

  • First download and install the new QuickBooks from Inuit website. After that you have to create company file backup and remove unnecessary data.
  • After you have sign in with your registered credentials and product & license number, head towards Company tab > choose the option Export Company File to QuickBooks Online.
  • After you have proceeded with Start your Export, visit QuickBooks website again.
  • Enter as Admin from Chose Online Company, select any company.
  • Continue and write “Agree”.
  • Tap on to replace button now, hit on “ yes go ahead and replace the data”.
  • Finally tap on Replace Again and let the process complete.

Conclusion

The article finally ends with the complete guide on how you can convert or downgrade QuickBooks file to an older version. Also, it tells how you can switch from desktop to QuickBooks Online mode.

For QuickBooks support experts advice and live chat visit our website qbookserrorsolutions.com or contact QuickBooks customer support at +1-844-926-4607.

Recommended to read:

How To Move Books To QuickBooks Online Through QuickBooks Migration Tool?

What is QuickBooks Auto Data Recovery Tool?

How to Open .QBM Files in QuickBooks

How to Open .QBM Files in QuickBooks?

Learn the procedure to open .QBM Files in QuickBooks

In terms of accounting software, QuickBooks has proven its place among entrepreneurs and businesses, where managing data and keeping transactional records are an important aspect. Due to QuickBooks business operations can be implemented in ease with maintenance of company’s database includes sales order, purchases, client’s information, payment details, bills etc. Sometimes the information is stored in QuickBooks .QBM files. It does not open in one click.

QBM-File

QBM file refers to file which contain all data stored on the QuickBooks. The data is stored in compressed form as backup (.QBB-QuickBooks Backup files). It is very useful in terms of data loss, where due to its compressed form you can share the .QBM file across the network via Emails. The blog is about the ways to open .QBM file in QuickBooks by the user. It gives detailed steps to follow to open. QBM.

Ways to Open .QBM Files on different Operating Systems

Let us look at some procedure or approaches for opening .QBM files on different type of desktops such as QuickBooks, Windows and Mac:

Approach for QuickBooks Desktop

  • Open QuickBooks desktop.
  • At the top left side, click File option and then select Open or Restore Company.
  • Click on ‘Restore a portable file’, hit Next.
  • Select ‘Open Portable Company File’ option> choose location where .QBM file is stored.
  • Click on specific .QBM file, then open.

Approach for Windows

Follow the below instructions to open .QBM file for windows.

  • Download and install QuickBooks Pro on your windows desktop.
  • From download folder, find the .QBM file you want to open.
  • Right click on the file, select open with, then click on ‘Intuit QuickBooks Pro’.
  • Click on OK, file gets open.

Approach for Mac

  • Download and install QuickBooks Pro on your MacBook.
  • From download folder, find the .QBM file you want to open.
  • Right click on the file, select open with, then click on ‘Intuit QuickBooks Pro for Mac’.
  • Click on the OK button when the task is completed.

Procedure for Importing .QBM File

Here are some procedures to import QuickBooks .QBM file:

  • Click on Company menu > select ‘Export Company File to QuickBooks Online’.
  • With your username and password, login as QuickBooks user or signup.
  • Select a file to import.
  • Click on Continue option > hit on OK button > then click on ‘Got it’.
  • After completion of the task, a confirmation mail is sent to your registered email.

Conclusion!

.QBM file being a crucial part of QuickBooks as it stores the all data, is an essential in the times of data loss. In order to retrieve data, it is important to know how you can open these files in different versions of Operating system like Mac, Windows and QuickBooks Desktop. Also, the blog tells us about importing the .QBM file. For further information visit our website qbookserrorsolutions.com or call us at +1-844-926-4607.

Other topics to read:

How to Troubleshoot QuickBooks Error Code 176?

How to Import Data From QuickBooks Desktop to QuickBooks Online?

QuickBooks Data Recovery Services

How to Resolve QuickBooks Requires that you Reboot Loop Error

How to Resolve QuickBooks Requires that you Reboot Loop Error?

QuickBooks is popular accounting software with distinct features to handle and perform certain required calculations on company data and keeps track record of ingoing and outgoing transactions, i.e., Cash flow. Sometimes due to unexpected problems the QuickBooks software goes into situations where the system asks for reboot your personal computer again and again. Due to this problem QuickBooks is restricted from installation and updating latest versions or features. Also, many tasks are left pending due to the continuous occurrence and time consuming because of the error message ‘QuickBooks Requires that you Reboot Loop Error‘. This problem is most common is QuickBooks 2023.

The article gives an overview of the QuickBooks Reboot Loop Error, where the system is forced to reboot the system repeatedly. Also, we will come across causes and solutions to the problem that occurred. The user is advised to follow the steps carefully and check all instructions.

Read the related article: How to Resolve QuickBooks Online Error code 1000?

Reasons for QuickBooks Requires that you Reboot Loop Error

The Reboot Loop Error pops up in QuickBooks when you try to use the software. Error obstructs you to work on QuickBooks which leads to delays, transactions can be recorded, loss of data and there are changes that the files get damaged. Let’s quickly look at the causes which has caused this error:

1: User Account Problems

The error occurs when Windows have not allowed all permissions to user accounts. This hampers QuickBooks to function properly.

2: Corrupted or Damaged Company File

The company file you are trying to access is corrupted or damaged, then the loop error related to ‘QuickBooks Requires that you Reboot’ occurs. That’s why it is always recommended to scan the company files and repair them if damaged.

3: Another Software is Restricting

Sometimes we have some software in our PC systems which obstructs the path of installation of the QuickBooks software. QuickBooks is not able to perform properly resulting in this error.

4: Corrupted Version of QuickBooks installation

The user has may downloaded the corrupted version of QuickBooks from an unofficial website and that has put the QuickBooks in the Reboot Loop Error.

5: Old Version of QuickBooks

The user might have not updated the latest version of QuickBooks and is using the old version of it. Due to the expired version, the ‘QuickBooks Requires that you Reboot’ issue pops up.

Now read this also: How to Fix Sync Error 324 in QuickBooks Online?

Pre-Requisites Steps to Fix QuickBooks that you Reboot Loop Error

When an error occurs, you can follow certain preliminary steps to overcome the problem. Some of these are listed below:

  • Check if you have downloaded latest version of QuickBooks software from official site Inuit.
  • The QuickBooks Reboot Error you are facing on the version you are currently working can be restrained.
  • Rename ND and TLG files by adding suffix as .old.
  • Check if you have turned off hosting settings on your PC.
  • Try troubleshooting steps on the QuickBooks software on your Desktop.

Methods To Fix QuickBooks Requires That You Reboot Loop Error

The following are the methods given to resolve the Reboot Loop Error:

Method 1: Upgrade QuickBooks to Latest Version

For this method you need to upgrade the latest version of QuickBooks 2024. To do so, follow the necessary steps:

Updating-QuickBooks-Image
  • Click on Update Now and proceed according to the instructions appearing on the screen of QuickBooks to update.

Method 2: Try Rebooting the Computer System

Sometimes you need to reboot your PC, where you want to install QuickBooks. The user needs to stop all the ongoing tasks and programs and reboot the computer system.

You may also read: How to Troubleshoot QuickBooks Error Code 176?

Method 3: Use Install Diagnostic Tool to fix Reboot Loop Error

You need to Download and Install the QuickBooks Install Diagnostic Tool to fix the ‘QuickBooks Requires that you Reboot Loop Error and follow the essential instructions that displays on your screen to process the repair.

Method 4: Again, download and install QuickBooks

Sometimes the user needs to Delete the current QuickBooks version and download the new one. For this follow the steps:

  • Go to Control Panel from start, then uninstall QuickBooks.
  • From the official Inuit website, download the latest version of QuickBooks.
  • Download and install the new QuickBooks.

You may check this also: Fixing QuickBooks Error Code 108 – A Complete Guide

Method 5: Search for Conflicting Software

You need to find the conflicting software which is not allowing QuickBooks to function. For example, software like antivirus software, firewall, Windows Defender wall, etc are obstructing the path and leads QuickBooks to reboot repeatedly.

Method 6: Restore and fix Company files

  • Open QuickBooks> file menu.
  • Click on Utilities > select ‘Verify Data’ or ‘ Rebuild Data’, whatever the case maybe.
Utilities-Verifying-the-Data-or-Rebuild-Data-Screenshot.png
  • Follow the steps for selected option appearing on the computer screen.

Now check this also: How to Set Up Firewall and Security Settings for QuickBooks Desktop?

Method 7: Create new Windows account

When your user account is not valid or does not contain full permissions to access the QuickBooks or the account is outdated, then also QuickBooks Reboot Loop Error occurs on the screen. To avoid this, try to make a new account of Windows and check if the issue gets fixed.

Method 8: Implement QuickBooks in Selective Startup Mode

Sometimes when some other program is running it may disrupt the QuickBooks operations to be implemented. We can use Selective Startup mode for this purpose, here are some steps:

  • Press Windows+R. It will open the Run window.
Windows-R-keys
  • Type in the window msconfig.
MSConfig
  • Click OK to open the System Configuration Window.
  • Go to General tab > Selective Startup mode option.
  • Click on Disable all and uncheck the ‘hide all Microsoft Services’ option.
  • Select the Windows Installer checkbox from the services.
  • Click the OK button.
  • At last, restart and reboot the system. Try to open QuickBooks and install the update, when done switch back to Normal mode.

To switch back to normal mode:

  • Press Windows+R. It will open the Run window.
  • Type in the window msconfig and open System Configuration.
  • From General tab, select normal startup mode.
  • Click on the OK button and click on restart to reboot your PC.

Similar blog: How to Deposit Payments in Undeposited Funds Account in QuickBooks?

Method 9: Use Quick Fix My Program

You can use Quick Fix My Program to resolve the ‘QuickBooks Requires that you Reboot’ Loop Error. Follow the steps:

  • Close QuickBooks software and update QuickBooks Tool Hub.
  • In the tool hub window, under ‘Program Problems’ tab > select Quick Fix My Program button.
quick-fix-my-program-from-tools-hub
  • Run QuickBooks and try to open data files.
  • Finally, reboot the system.

Method 10: Retrieve Company File from different Location

  • To open Windows Explorer by pressing Windows+E.
  • Search for the file with extension .QBW.
  • For the Network server file, you must check in Network Drive.
  • When you get the file, right click to copy the file.
  • First create a new folder named : QBTest and paste it in the folder.
  • Open QuickBooks and along with it hold the CTRL button on keyboard.
  • Now access or retrieve the company files.

Read also: How to Import Data From QuickBooks Desktop to QuickBooks Online?

Method 11: Change the name of ND and TLG files

Rename-the-.TLG-and.ND-files-Screenshot

ND(Network Data) and TLG(Transaction Log) files are the essential components required to run QuickBooks application. The user needs to check if the files are corrupted or damaged. If they are ‘QuickBooks Requires that you Reboot’ Loop Error occurs. The solution to fix the files is to rename them using .old at the end of the file names. It will recreate the ND and TLG files. Make sure the newly recreated files are only being accessed then the damaged ones, while you are installing QuickBooks.

Method 12: Modify Temporary Folder Permissions

When the file permissions while performing an update is limited, then also QuickBooks Requires that you Reboot Loop error occurs. To resolve this, follow the steps:

  • Press the Windows key and type ‘%temp%’ in the search box.
  • When temp folder opens, right click and select properties from drop down menu.
  • Under Windows Username, click on the checkbox for full access. Click on allow button.
  • When the next prompts pops, twice click on OK button.
  • After completing, again install QuickBooks, run and check if the issue occurs again.

Conclusion!

The article provides us the information regarding how you can Fix QuickBooks Requires that you Reboot Loop error. We also came across the causes which are responsible for this error such as corrupted files, outdated version, problem with windows account, etc. Also, we get to know the solution for the problem such as repairing files, renaming them, updating, etc. The user reading this manual can get to know about this Reboot Loop error.

If still you are not able to resolve this Error, then you may seek QuickBooks support advice. You can contact through helpline number +1-844-926-4607.

More blogs to read:

How to Resolve QuickBooks Online Error 350?

How to Troubleshoot QuickBooks Online Error 400?

Fixing QBCFMonitorService Not Running On This Computer Error in QuickBooks

Troubleshooting Guide: Fixing “QBCFMonitorService Not Running On This Computer” Error in QuickBooks

QuickBooks is defined as a useful application that can be applied in small and even middle-sized companies since it provides tools for different kinds of accounts that can help to organize work and make certain job easier – for example, the application of the service for the payroll, for taxations, and for keeping track of the inventory. Despite the efficiency, it is not rare to experience certain errors that hinder the QuickBooks operations. One of them is the QBCFMonitorService not running on this computer issue which is also quite widespread.

This error can turn slow down QuickBooks operations particularly when it is being used in multi-user mode. This is the kind of question that this blog will address what causes this error, and the correct way to fix it while ensuring your files are not corrupted. 

You may also read: Methods to read QuickBooks Error 15276

Understanding the “QBCFMonitorService Not Running On This Computer” Error:

 The QBCFMonitorService is a very important component in QuickBooks hence it is responsible for helping QuickBooks to run in multi-user mode by allowing workstations to connect to the main server and access company files. If this service is not commenced, then you may come across the aforementioned error. The main causes of this error may be firewall restrictions, improper server settings, outdated software versions, malware presence, and system conflicts. 

8 Easy Solutions to Fix “QBCFMonitorService Not Running On This Computer” Error

1: Check Firewall Settings

Windows-Firewall-setting-

You need to check and ensure that third-party firewalls or even Windows Defender is not interfering with the QBCFMonitorService especially in multi-user mode. 

 2: Verify Server Configuration

First of all, check and make sure that the servers that host QuickBooks are well configured so that the other workstation in the network can be able to connect and communicate with the QuickBooks server smoothly. 

Read this also: Download and Install QuickBooks Tool Hub

 3. Update QuickBooks

Update-QuickBooks

It is very important that QuickBooks should be updated to the latest version. It may avoid compatibility problems and other related errors. 

 4. Scan for Malware

Users need to scan computer to avoid malwares, viruses, because it may affect or infect your computer and may cause the problem with the QBCFMonitorService. 

You may also check: How to Fix QuickBooks error code 179?

 5. Resolve System Conflicts

There should be a check for any other related applications or processes which interpose and interfere with the correct functioning of the QBCFMonitorService. 

 6. Repair Windows Registries

Fix any corrupted or damaged windows registries that may have any effect on both QuickBooks and the QBCFMonitorService. 

7. Reinstall QuickBooks

In order to correct the problem, you need to Install QuickBooks again to guarantee that all elements are or correctly Installing. 

 8. Restore QBCFMonitorService exe

This QBCFMonitorService exe file should be restored from a valid source if it has been lost or removed so that the process can run as required. 

Check this also: Methodologies to Fix Missing Employee in QuickBooks Desktop Payroll

Things to Consider Before Resolving the Error

 1. Check that you have all the installation CD’s, license numbers and all the windows installation CD’s if necessary. 

 2. This will ensure that, in case of any data loss while undergoing the troubleshooting phase, your financial data is safe. 

Easy Methods to solve “QBCFMonitorService not running on this computer” issue in Quickbook. 

Method 1: On a computer used to manage QuickBooks and QBCF Monitor Service, shut down both of them. 

Close-Quickbooks-and-QBCF-Monitor-Service

 The very first way to approach the specific issue with the “QBCFMonitorService keeps stopping” is to close down QuickBooks as well as all associated services and start over. Follow these steps: 

  • Shutdown all the running processes related to QuickBooks and all opened files on your system. 
  • To do this, include pressing the Alt +Ctrl + Delete to open the windows task manager, switching to the process tab. 
  • Go to the bottom of the screen
  • And then find QBCFMonitorService in the column,
  • After that right-click it and then click on “End task”. 
  • For confirmation select for ‘Yes. ’ 
  • Go back to the main QuickBooks screen and take a look if the error still appears to continue at the same process if it does then close QuickBooks and reopen it to confirm.

Method 2: Re-launch QuickBooks Database Server Manager 

For all the problems considered to be linked to the QuickBooks database server manager, the restart of operations is critical. Follow these instructions for Windows and Linux systems: Follow these instructions for Windows and Linux systems: 

 Windows: 

  •  This keyboard shortcut: Press Windows key+R, and type service. msc then press OK. 
Windows-R-keys
  •  To do this one has to search for QuickBooksDBXX in the services list where XX stands with the QuickBooks version number. 
  •  To execute this, go to the Services window by pressing Win + R and typing services. msc Then right click on the particular service or service you want to restart and select Restart option or in case a service is stopped you can choose Start. 

 Linux: 

  •  Just go to the terminal
  • And then simply type “sudo service QuickbooksDBXX stop” in order to stop the service. 
  •  Type: sudo service QuickbooksDBXX start. To restart the service. 

See the related topic: How to Merge list Entries in QuickBooks Desktop?

Method 3: Change the QBDBMGRN and QuickBooks application 

The conflict arising from the compatibility of QuickBooks and QuickBooks Database Server Manager can be solved by upgrading. Follow these steps to update:

  • To get QuickBooks Desktop up to date, open the application
  • Then go to the “Help” tab
  • And then click on the “Update QuickBooks” option. 
Updating-QuickBooks-Image
  • In the QuickBooks, the Databases Server Manager can be updated by going to the help on the top right corner and clicking on update company, where there is a window that appears that shows that the company is up to date.

Method 4: As a result, Firewall modifications to allow the program to be downloaded is the solution. 

 To prevent firewall restrictions from hindering QuickBooks operations, configure firewall settings:

  •  Go to the settings of your Firewall and make QuickBooks an exempted program. 
  •  Some QuickBooks depend on ports that should not be restricted by the firewall hence making communication with the servers smooth.

Similar blog: How to Resolve Backup Company File issues in QuickBooks Desktop?

Method 5: Check for Multi-user Hosting on QuickBooks. 

Stop-Hosting-Multi-User-Access

Deactivate QuickBooks if it is hosting multiple users to solve the error. Log off all users and check if it was fixed in single user mode. 

Method 6: The reasoning of the subsequent steps is to check windows registries. 

Remove the QBCF Monitor service-related entries and make a backup for solving the registry issues in fixing QuickBooks since the error has been created due to Windows registries.

Read other blog: How to Set up Folder and Windows Access Permissions to Share Company Files?

Method 7: The following steps should be taken: 

 Scan for threats in the entire system and specifically the QuickBooks files to eliminate the threat that is causing the QBCFMonitorService. 

Method 8: It refer to to the process of pinging your server system from the workstation 

Make sure workstation and server systems are connected to the server using the ping command with the server’s IP address. Check successful transfer of packets to eliminate connectivity problems. 

Conclusion!

QBCFMonitorService Not Running On This Computer error must be fixed using a mix of security precautions, updates, and technical examinations. Hopefully adhering to the above instructions will make your work easy. Anyhow fixing this issue is difficult for you, then you need to reach us at QuickBooks Error Support Services by dialing helpline number +1-844-926-4607.

Recommended to read:

How to Resolve IIF Import Error in QuickBooks Desktop?

Methods to Fix Delivery Server Down Error in QuickBooks

How To Resolve QuickBooks Migration Failed Unexpectedly

How To Resolve QuickBooks Migration Failed Unexpectedly?

Facing issue “QuickBooks Migration failed unexpectedly”? Learn the solutions to fix it.

QuickBooks, a popular accounting management tool for businesses of all types whether on small or large scale, is promising software which provides all business accounting related tools. These tools include payroll, sales and purchase record, bill receivables and payables, expenditures, incomes, recording invoices related transactions, monetary transactions, assets, liabilities etc.

QuickBooks always release updated versions and essential features related updates. Sometimes when you do upgrades your QuickBooks version, the user needs to migrate the files from old version to new version. While we are doing this process, user may encounter the problem of ‘QuickBooks migration failed unexpectedly.’  It is an error caused while moving information from old QuickBooks to another. The article gives a solution to how you can Fix Migration failed unexpectedly error.

You may also read: What are the Process to Fix Error 15276 in QuickBooks?

Causes Of QuickBooks Migration Failed Unexpectedly

Let’s see the causes behind the Migration Failed Unexpectedly:

  • File Size is large-Due to the file of large size, there is problem in transferring from one version to another and that’s why the error related to Migration Failed Unexpectedly occurs.
  • Limited Permission-  When you are not granted full permissions while transferring files from one version to another of QuickBooks, it also can cause error. Due to permissions not fully granted some files access to migrate are not allowed.
  • Old QuickBooks Version- If the version of QuickBooks is expired, then also error related to migrating data occurs. 
  • Network Problems- If your internet connection frequently interrupts or loses connection then also migration of data failure occurs.

You may also check: How to Download, Install and Use QuickBooks Tool Hub to Fix Errors?

Solution To Fix QuickBooks Migration Failed Unexpectedly

To resolve the problem of migration failure in QuickBooks, lets look at some useful solutions to fix it, here they are:

Solution 1: Look for Internet Connection

Always see if your internet connection is stable before you migrate your files from one QuickBooks to another. Prefer to use a high-speed LAN Wi-Fi connection to proceed with the migration. If still you are encountering internet connectivity, try to troubleshoot from Network and Sharing center in Control Panel, else check the router or your modem. If you are using ethernet connection, always make the wires check for any faults.

Solution 2: Scan company files

For this step, you need to scan the files and folders of QuickBooks which you want to migrate. Either you can use an antivirus software to scan specific files, or you can use Window+R, from start of windows. You will get the files which are corrupted or damaged.

Windows-R-keys

Let’s see some steps when this problem encounters:

  1. You need to download QuickBooks File Doctor Tool from Inuit website and install the following.
  2. Run it to diagnose company files.
  3. The tool will repair the damaged and corrupted company files of QuickBooks.

Related article: How to resolve Potential Data Issues in QuickBooks Desktop?

Solution 3: QuickBooks must be updated

It is important to update latest version of QuickBooks from official website. This is because most of the times error occur due to non- updating of the latest version of the software, as it is not able to possess or be compatible with the requirements. Follow the steps to update:

Updating-QuickBooks-Image
  1. Go to QuickBooks > Help.
  2. Click on Update QuickBooks Desktop.
  3. Follow the instructions for download of latest version and installation of QuickBooks.

Solution 4: Check permissions while transferring

Sometimes errors occur due to you not having valid permissions from the administrator to transfer the data from one QuickBooks to another. If you are the user and such situation occurs, Contact QuickBooks administrator for the purpose. He will grant you access to migrate your data from one QuickBooks to another.

Read this also: How to Troubleshoot QuickBooks Banking Error 179?

Solution 5: Create segments of company files

When the file is large and QuickBooks is generating error for migration failed unexpectedly, try to divide the files into different segments or smaller batches. By making smaller files, the migration process becomes seamless, with no interruptions.

Conclusion

At last, we came across all the causes and steps to resolve the problem of QuickBooks Migration Failed Unexpectedly. We came across reasons which not able to let us transfer the data files from one QuickBooks to another such as expired QuickBooks version, Corrupted files, bad connections, file size is large, etc. Also, we got remedial steps for Window 11 and above to resolve the issue by taking essential steps, for example, segmentation of files, internet stability, permission access, upgradation of QuickBooks, etc. So, the user with these steps can Fix this error.

If you are still not able to solve the issue then you need to contact QuickBooks Support by dialing the helpline number +1-844-926-4607.

Recommended to read:

How to Recover your Data in QuickBooks Online?

Resolving QuickBooks Unrecoverable Error in QuickBooks Desktop

How to Create and Send Invoices in QuickBooks

How to Create and Send Invoices in QuickBooks?

QuickBooks with its advance features and extensive services provided, allows businesses to create and send invoices in QuickBooks to their customers. This feature has eased the path for generating and managing these invoices, which at same time can be recorded in QuickBooks database.

The article gives an overview for the QuickBooks users that how they can create and send invoices in QuickBooks. It gives a detailed procedure which the user must follow step by step.

Features of QuickBooks Invoicing Software

Following are the features of using QuickBooks Invoicing software for business purposes:

1. Create Professional Invoices

QuickBooks allows you to create customized professional invoices, in which you can include details about products and services in which your business is engaged. You can also do branding and specify the payment methods.

2. Electronic Invoices can be send

As QuickBooks allow to create invoices, also these invoices can be directly sent through emails. You can review unpaid invoices and track their status of the customers.

3. Payments are Faster

QuickBooks feature of Payment integration within software allows customers to pay through internet banking, debit/credit cards, NEFT bank transfers, and ach Bank payment, securely. This QuickBooks service is four times faster than traditional paper bills.

4. Real Time Tracking

As we can maintain seamless invoice transactions and payments at one place. Either they are online transactions or on site payments, QuickBooks has every solution.

5. Customization and Convenience

QuickBooks allows users to create invoices in different and currency. The user registered account can be accessed through mobile application also.

You may also read: How to Fix QuickBooks Error 15276?

Components of QuickBooks Invoicing Software

Theses are important components of QuickBooks Invoices:

Invoice Number

It’s a unique serial number given to an invoice generated. It is a unique identifier which help in organizing and tracking records.

Date

Date in invoices represent when it was issued, it is to keep track record of timing.

Business Contact Information

This is an important as it shows business details of the company such as Name, logo, contact number, address and email.

Description of Goods and Services

It describes the items or services provided to the customer which includes item names, quantities, unit prices and tax applicable.

Payment Terms

Shows payment related information like due date, payment method accepted, and late fees, if any. This clarifies payment which is accepted by the business.

Read this also: Dependent System Error in QuickBooks

Merits of QuickBooks Invoicing

The advantages of QuickBooks Invoices are:

Ease In Creating Invoices

QuickBooks Invoices has user friendly interface which enables user to design the invoices and apply formatting such as fonts colors, logo, styles and including a personalized message on behalf of the company.

Invoice Tracking Is Efficient

As every invoice transaction and payment are stored at one place at QuickBooks, it’s easy to keep a track on it. When you create an invoice, it reflects in sales as income amount and liability in customer account. It also facilitates payment methods links and automated emails, to keep a reminder of payments due or made.

Convenient Design Options

QuickBooks provides various invoice designs so that you can format any time you want to. This feature is cost friendly and create layouts quickly. The modification applied to once invoice, will be reflected in others also

Accounting Integration

The QuickBooks has accounting feature which eliminates primitive manual data entry. Invoices can directly be sent from mobile app or cloud software. Information related to sales or transactions made automatically gets updated with an entry, and conversion of estimates to invoice are seamless.

Instant Delivery

Creation and sending the invoices is faster, can be delivered in minutes, eliminating postal or mail delays, thus, faster payments. As invoices gets on time to the customer, improved cash flow of the business.

Easy Tracking

QuickBooks keeps the tracks if the mail has received, and it is opened by the customer. This ensures the smooth functioning and no negligence by the customer, when it’s time for payment. Hence, making convenient for the users.

Faster Payments

With the QuickBooks, you can add payment hyperlinks in the online system. Customers can easily pay through this system and professionals who want time efficient payments appreciate this method.

Check this also: Download and Install QuickBooks Tool Hub

Methods to Create Invoice In QuickBooks Desktop

Here’s the method to creating invoice from scratch:

creating invoice from scratch - Create and Send Invoices in QuickBooks
  • In QuickBooks, go to Customer menu > Create Invoices.
  • Choose either existing customer or customer job from ‘Customer: Job’ dropdown menu.
  • To add new customer, click Add New.
  • Fill in the details such as date sent, due date, invoice number, recipient details and other terms.
  • Save and close, when completed.

Note: When creating an invoice, according to the settings, description and amount fields automatically gets filled. Though you have liberty of flexibility to remove or add these fields as you want.

Create Invoice for Sales Order

Create Invoice for Sales Order

Here is the process to create invoices in two different ways:

From Sales Orders Window

  • Open ‘Sales Orders’ section.
  • Click on ‘Create Invoice’.
  • To create invoice there are two ways-
  • In the invoice, select all items under sales order, then select ‘Create Invoice for all of the sales order(s).’
  • For selected items, select ‘Create Invoice for selected items.’
  • Make necessary adjustments to invoice, save and close.

From Invoice Window

  • In QuickBooks, go to Customer menu >Create Invoices.
  • Choose either existing customer or customer job from ‘Customer: Job’ dropdown menu.
  • Select one or more sales order that you want to show in the customer’s invoice.
  • See if you need to make required changes.
  • Save and Close.

Create an Invoice From Estimate

From Estimate Window

  • Open desired estimate.
  • At the top of the form, click on Create Invoice.
  • If progress invoicing gets enabled, a prompt asking product details and quantity will be displayed on the screen.
  • Makes necessary changes, save and close.

From Invoice window

  • Go to Customer menu > Create Invoices.
  • Choose either existing customer or customer job from ‘Customer: Job’ dropdown menu.
  • Estimates window will appear.
  • Select estimate which you want to appear in the invoice. We can select one estimate at a time in QuickBooks.
  • Save and close.

Related article: How to Resolve QuickBooks Error code 179?

Creating Invoices in QuickBooks Online

Here are steps to Create Invoices in QuickBooks Online, similar as desktop version:

Invoice Creation options

You can either create invoices from scratch or estimate but QuickBooks lacks the feature of Sales order. If the prepared estimate is confirmed by the customer, then you can convert in invoice.

Entering invoice details

You can enter invoice details manually or you can use the pre-set rates for products, services or sales tax.

Note– QuickBooks online doesn’t support feature of sales levy tax but you can directly enter in the invoice of the individual customer.

Efficient Email System

QuickBooks Online provides facility to directly sent invoices to your customers. If you are using QuickBooks payment, the user will notice payment link directly gets added to the invoices, streaming collection process.

Create an Invoice Without an Estimate

The QuickBooks Online allows you to use blank invoice screen with either of the following methods-

From the dashboard

  • Click on + icon on top right corner of QuickBooks screen.
  • Select invoice from customer menu on left side of the drop down box.

From the Sales menu

Create an Invoice Without an Estimate
  • Click on sales > invoices on left Toolbar.
  • Select any one option either you choose:

First option directly takes you to blank invoice screen. Or, Second option, you will see list of invoices.

To Create a new invoice, follow the steps:

Choose a customer

  • Select Customer from drop down menu.
  • Or create a new customer by clicking on Add New from drop down menu.

Customer email

  • If there is already email address on customer file, it will automatically gets filled in the customer email field.
  • Else, add it manually. You can add multiple emails separated by commas. You can also use cc or bcc in invoice.

Send Later

  • Select Send Later checkbox to batch invoice for email delivery later.

Payment Options

  • To enabled QuickBooks payment options on invoice, just click on toggle switch ON/OFF.

Billing Address

  • If the billing address is on the customer file, it will automatically gets auto filled, else you can enter it manually.

Payment Terms

  • Select payment terms from drop down menu.

Invoice Date

  • Current date will be added as default on the invoice when generated, you can also modify it by yourself.

Due Date

  • Date based on invoice terms, also you can adjust manually.

Choose your Template

  • You can select the template of your choice, which will determine your custom fields. To change template, click on Customize at the bottom of the screen.

Product/service field(similar to QuickBooks Desktop)

  • The fields get autofilled if you have already present products and services, or you can add new products manually.
  • The description gets filled automatically according to the product;you can modify later.

Quantity field (Qty)

  • It contains number of items or hours for a product or service, respectively.

Rate field

  • Rate is normally set to previous rates adjusted in QuickBooks; else you can change it manually.

Amount Field

  • Calculated automatically, multiplying rate by Quantity of the item.
  • You can adjust manually, by changing price the amount gets change or the quantity.

TaxCheckbox

  • For taxable items, click the Checkbox.
  • If not, sales tax will not be applied to those items.

Adding More Lines

  • If you are run out of place, click on Add Lines button to add extra items.
  • You can also clear unnecessary lines, which are not required, add subtotals to organise different items.

Custom Messages

  • You can add messages to invoice or statement manually in QuickBooks.

Discount and Tax Calculations

  • Caution: Circle with two arrows indicates tax to be applied after or before tax.
  • Based on current tax laws, you can adjust the invoice.

Sales Tax rate selection

  • Select sales tax rate for the employees.
  • Or select ADD NEW to create new tax rates.
  • Manually calculate sales tax for the invoice and type it in the field.

Discount Application

  • You can either select % or flat dollar amount for the discount, if applying to an invoice.

Attachments

To add attachments,

  • Drag drop files in selected area.
  • Orclick icon and browse for attachments.
  • Select Checkbox next to file after uploading, this will send the invoice to customer.

Abandoning the invoice

To discard the invoice,

  • Click Cancel button on the screen bottom.
  • Unlink desktop button, it is placed always from save.

Preview and Recurring invoices

  • Click link at bottom centre of the screen.
  • To set up Recurring invoice, click Make Recurring.
  • Save invoice before beginning.

Frequent Saving

  • Click on save button on bottom of the screen, to prevent data loss due to connection failure.

Create Invoice From Estimate

To create invoice from Estimate in QuickBooks Online, follow the steps:

Start from Estimate

  • If you are using progress billing, begin your invoice process from project estimate.
  • Hover sales link on left Toolbar, then click on Customers.

Select Customer

  • Next click on customer name from the list, or use find to search for customer through credentials.

Locate the Estimate

  • Search for estimate you want to apply for invoice.
  • Click on create invoice link on Action column.

Invoice screen with estimate details

  • When invoice screen gets opened, it gets autofilled with details.
  • If you are using progress invoicing, select either to create invoice for percentage or specific quantity of overall estimate.

Similar topic: How to Fix Missing Employee in QuickBooks Desktop?

Send Invoice In QuickBooks Online

  • When you have created your invoice, and selected to send it later, click on save on right side of the screen.
  • To check preview or print the invoice before saving or sending it. Click on Print and Preview button on bottom bar of the invoice screen.
  • Select appropriate option from drop down menu.
  • Click on Print or Preview to see how invoice appears.
  • If ready, send it and proceed next.
  • To instantly send invoice, click save and send.
  • QuickBooks creates e-mail based on default settings you have set.
  • You can modify default email settings for the invoice.
  • Finally, click on green send and close button when you are ready to send.
  • A notification comes confirming that the invoice is been send to the customer.

Review Unpaid Invoices In QuickBooks

The invoices which payments have not been received from the customers, QuickBooks keeps a track of it. It is reflected in accounts receivables of the user. This is also represented in balance sheet and other financial reports. If you want to see your invoices, go to Sales and select Invoices. Check Status column to trace invoices stand in the sales process.

The following are the statuses, you may come across:

  1. Due in (Days):  Invoice still needs to be emailed
  2. Due in (Days) sent: Invoice is sent to customer
  3. Due (Days)Viewed: Customer has viewed
  4. Deposited: Customer has paid the invoice
  5. Overdue (Days): Invoice is past due and unpaid
  6. Overdue (Days) viewed: Customer has viewed but did not pay
  7. Delivery issues: Invoice has not delivered to customer, check email and send again.
  8. Voided: Invoice cancelled.

See this related blog: How to Merge list Entries in QuickBooks Desktop?

How to Convert an Estimate to an Invoice in QuickBooks Online

To ensure accurate bookkeeping, convert estimates to invoices and link them. QuickBooks automatically fills the information from estimates, saving time and efforts of the users. If you using old or new estimates, QuickBooks facilitates streamline process for efficient invoice in QuickBooks online. Follow the steps:

Navigate to sales

Go to Sales sections in QuickBooks Online.

Locate the estimate

Find the estimate you want to convert.

Update status (if required)

If the status columns shows rejected, update status to pending or accepted.

  • Convert to invoice
  • In Action column, select Convert to Invoice.
  • Make important changes in invoice.
  • Save the invoice.

Conclusion!

From the following article, we conclude that how can we create and send invoices in QuickBooks. This is useful in various businesses and individual entrepreneurs who wants to keep records of there clients and payment received or due. It is also helpful in calculations of various accounts and thus, keep management of the databases of the company. By following these steps, you can easily generate and send invoices to customers in no time, eliminating manual work.

Quick Guide to Give your Customer a Credit or Refund QuickBooks Desktop for Windows

Quick Guide to Give your Customer a Credit or Refund In QuickBooks Desktop for Windows

In businesses, which uses QuickBooks for maintaining records of Bill receivables or payables as well as employee data, it is important to maintain every record of monetary related transactions. Sometimes what happens is the customer asks for refunds or credits which may increase or decrease the monetary amount stored in QuickBooks. The user who is handling such records should know how to give customer a credit or refund in QuickBooks Desktop for Windows. This not only helps in maintaining records but also provides transparency in case such issues arise with a customer. The amount, which is credited in customer account, is debited from the user QuickBooks record.

The article aims to provide aguide to the users who want to give customer a credit or refund in QuickBooks Desktop for Windows. The user is suggested to follow each step carefully so that you won’t get stuck while processing, if still then seek experts.

You may also read: How to Fix QuickBooks Error 15276?

Process to Give Customer a Credit or Refund in QuickBooks Desktop for Windows

The following provides the guide to the QuickBooks User to how to initiate the Credit or Refund to a customer in QuickBooks Windows. By following these simple steps, the user can perform the following:

Step 1: Create a Credit Note

  • First you need to select Create credit notes/ refund from the customer menu.
  • After that select Customer from customer drop down menu.
  • Enter the name of the items you are giving credit for and then save and close.

Step 2: Choose how you want to handle the credit

The Available Credit Window gives you option to select any of these which are available as following given below:

Retain as an available credit

In the account receivables of QuickBooks, the credit note is shown as debited or deductible amount, when customer chooses to retain the amount. It is shown in the payment window for customers as it can be used to purchase other items with these credits available. The credits can be used for other items and the transaction will be recorded against it.

Read this also: How to Troubleshoot QuickBooks Banking Error 179?

Steps to retain available credits

The users can retain the credits of their customers in their registered accounts. For this they will see the receive payments window. Follow the steps to do-

  • Go to Customer tab > Receive Payments option.
  • Select Customer under the received from drop down menu.
  • Choose Discounts and Credits Icons.
  • Under Credits tab , choose how much you must avail credits, then done.
  • After you tap on the Yes button a prompt comes for confirmation, confirm it and the user will see the amount gets automatically added against the customer you have avail credits. It will be reflected in the invoice.

Initiate Refund to the Customer

  • If the user doesn’t want to retain the payment as credits in the Customer Payment window, the customer may ask for refund of the payment of the transaction. It is shown as deductible or negative amount against QuickBooks receivables account. The refund may be cheque or cash, also customer may opt for internet banking options or credits/debit card to transfer the amount in Bank account.

Check this also: How to Fix Missing Employee in QuickBooks Desktop?

Steps to Give Refund to the Customer    

Give-a-refund-Image - give customer a credit or refund in QuickBooks Desktop for Windows

To provide refund to a customer against an invoice in QuickBooks Desktop for Windows, follow the steps:-

Option 1:

  • Go to Customers menu>Credit Memos/ Refunds in the QuickBooks.
  • In the Customer: Job selects the customer you want to refund.
  • Enter the products or Service you need to refund.
  • After this save and Close.

Option 2:

  • When you click the Ok button, the details of the cheque fill outautomatically.
  • Link cheque to overpayment. Then go to Customers menu >Received Payments.
  • From Received drop down menu, select Customers.
  • Click on Discount and Credit icon.
  • In the available credit section, select the cheque you made against the customer, then done.
  • User will see prompt to confirm transfer. Click on the Yes tab.
  • Amount will be applied automatically to selected invoice.
  • Save and close.

Read the related topic: How to Merge list Entries in QuickBooks Desktop?

Apply credit to Invoice/Bill of the customer

To apply a credit to anyone invoice, the QuickBooks Accounting software lets you apply credit. In the Invoice window, select in which invoice/bill you want to add credits.

Steps to apply credits to the Invoice/Bill of the Customer

The user can apply credits against the invoice/bill directly to the customer account in QuickBooks Desktop Windows  This will enable the customer to purchase anything or service in return of credits which has company availed in place of refund. The steps to perform this are :

  • The first thing is to select Customer: Job when you create a credit note.
  • Apply credit to Invoice windows will get open from this.
  • After this choose the amount of credit you want to apply against the customer bill, then click on done.
  • You will see credit gets applied on the customer’s invoice.

Conclusion

The article related to Give customer a credit or refund in QuickBooks Desktop for Windows, gives a comprehensive guideline to the QuickBooks users with step-by-step instructions that how you can use the following features. When the customer asks for credit or refund, the guide gives all related information either you can avail credits for some other product or service or if the customer wants to refund you can initiate that.

If still the user is not able to provide credit or refund to a customer through QuickBooks Desktop, the person may seek QuickBooks Support. Contact through helpline number +1-844-926-4607.


Recommended to read:

How to Troubleshoot Backup Company File issues in QuickBooks Desktop?

Set up Folder and Windows Access Permissions to Share Company Files