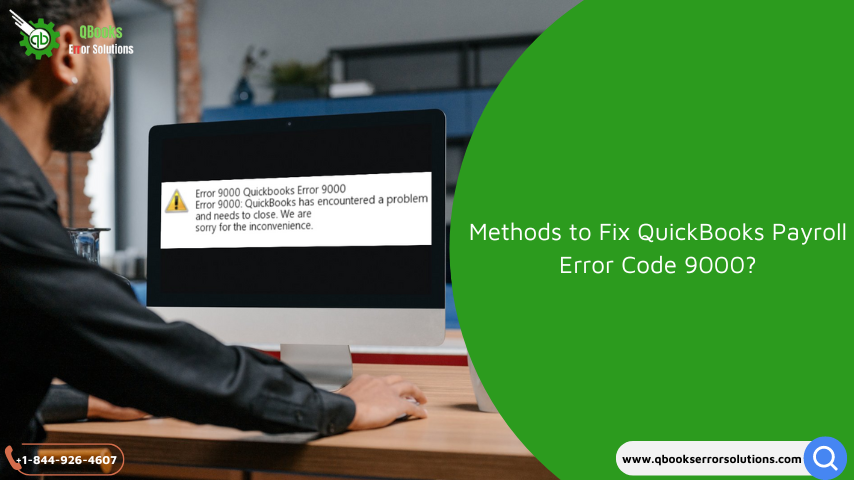
The article highlights the ways for debugging Error 9000 which is a QuickBooks Payroll Error. The QuickBooks Payroll Error 9000 depicts that you are not able to send the Payroll information or try to make a deposit through checks in their respective accounts. This is because you are not able to connect or retrieve information from QuickBooks server database, where all the information has been stored of respective QuickBooks’ user account.
Normally, this occurs due to poor networking with QuickBooks desktop or Online to another system server. This will obstruct you to proceed further and delays your work as the error message ‘ Error 9000 QuickBooks has encountered a problem and needs to close.’ This technical glitch will refrain you from performing other tasks too.

Symptoms when you will face the QuickBooks Error 9000 in your system:
- System will be experiencing crashing, freezing and performance will be sluggish.
- Frequent display of error messages
- Task disruption
- Tax tables won’t get updates.
- Refrained from QuickBooks services like upgradation, validation of data and transactions.
- Requested files won’t get fetched.
- Delays in clients or employees’ payment
Further in the article you will come across reasons behind QuickBooks Payroll Error 9000 and 10 best debugging solutions to overcome the issue. But before you troubleshoot, check the following things, for no trouble is faced by the user while executing them. Such as:
- Maintain backup for avoiding loss of data.
- Keep your Windows Drivers updated.
- Check recent version and updates of QuickBooks are installed.
- Confirm is the router is connected for internet connection, else troubleshoot from Network and Sharing center in Control Panel.
What are the Causes of QuickBooks Payroll Error 9000
To resolve the QuickBooks Error code 9000, you need to follow the procedures to ensure that your SSL setting of your system are changed so that you can send and receive your payroll and funds transfer to accounts. You must follow each step so that the issue of Error code 9000 gets resolved with the change in browser settings. These steps will help you to make QuickBooks compatible. The steps are:
- First check if the browser you are using is the default opening browser of your computer system.
- Now the next step is to click on Tool > select the Internet options to look for Connection tab where you can alter your LAN settings.
- Just see where Automated Detected Settings is, ensure that your proxy server field is empty.
- Check SSL 2.0 and SSL 3.0 are marked as ticked. Keep the TSL 1.2 null.
To resolve the problem of QuickBooks Payroll Error 9000, it is better to know the root cause behind the disruption. This will help to analyze and debug the problem. Here are the following causes:
Outdated QuickBooks
The expired version of QuickBooks or subscription plan is finished. Also, when your QuickBooks features and services are not updated.
Connectivity Issue
Bad internet connection due to router settings, LAN connectivity problem, low uploading per Mbps or network settings.
Network Layer settings are Incorrect
When your Secure Sockets Layer(SSL) or Transport Layer Security(TSL), which are encrypted protocols which protect data transfer over internet, settings are not correct.
Company files issue
When the company files are corrupted or damaged of QuickBooks.
Other software settings or viruses issues
- Due to security software like antivirus and firewalls can disrupt the sending of payroll and create QuickBooks Payroll Error 9000. Also, because of some viruses like malware or worms can hamper the functioning of QuickBooks unable to fetch the request sent.
- May be the setup issue is prevailing, which is causing Error 9000.
- The applications are not compatible with the system, there may be conflicting software.
- Your system date and time does not coincide with the current date and time.
10 Debugging Methods For QuickBooks Payroll Error 9000
To debug or fix the QuickBooks Payroll Error 9000, let us follow the 10 essential methods to eliminate the problem of inconvenience in sending payroll or direct deposits checks to the user and employees, resulting in delay of work and data cannot be validated. The following 10 steps involved are:
Method 1: Correct the Security Socket Layer Settings(SSL) of your system
To resolve the QuickBooks Error code 9000, you need to follow the procedures to ensure that your SSL setting of your system are changed so that you can send and receive your payroll and funds transfer to accounts. You must follow each step so that the issue of Error code 9000 gets resolved with the change in browser settings. These steps will help you to make QuickBooks compatible. The steps are:
- First check if the browser you are using is the default opening browser of your computer system.
- Now the next step is to click on Tool > select the Internet options to look for Connection tab where you can alter your LAN settings.
- Just see where Automated Detected Settings is, ensure that your proxy server field is empty.
- Check SSL 2.0 and SSL 3.0 are marked as ticked. Keep the TSL 1.2 null.
Method 2: Configure your firewall settings

Firewall settings, due to security reasons, block your QuickBooks to get updates or access the server. Alteration in the setting can fix the error which is causing issues in the functionality of QuickBooks and interrupting system performance.
To resolve this QuickBooks Payroll Error 9000, follow the steps:
- Under the Window Firewall program, open from the start menu, head to the Advanced Settings.
- Next step for the user is to right click the Inbound Rules, under advanced settings and then click on QuickBooks option and hit Next.
- Under the Program Path option, from the different file names select the heads ‘qbw32.exe’ and ‘qbupdate.exe’, see if the permissions are allowed to them.
- Finally, you must hit Next, then click on Allow Action Button. Wait for completion of the process.
Method 3: Download and Utilize QuickBooks Tool Hub
The QuickBooks Tool Hub is an important tool which contains the error fixings options like Install Diagnostic Tool, QuickBooks File Doctor, Quick Fix My Program Tool, etc. to fix the errors related to QuickBooks. Though QuickBooks Tool Hub is compatible with QuickBooks desktop version of 2016 of Windows, not QuickBooks Online. Follow the required procedures, for fixation of the QuickBooks Payroll Error 9000:
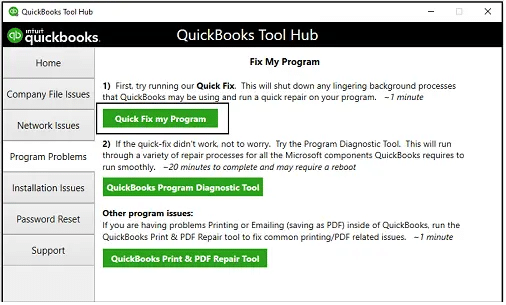
- Login into your QuickBooks Desktop and then head towards the file menu.
- Move to the Utilities option where you will file Repair file and sub option as Network Problems options.
- From there you can access company files of your QuickBooks.
- Under the Advanced settings section select Error Code 9000 to fix from the drop-down menu.
- Now re-login QuickBooks with your user account, then again try to send the payroll and direct transfers on arrival of checks.
Method 4: Remove junk files from the system
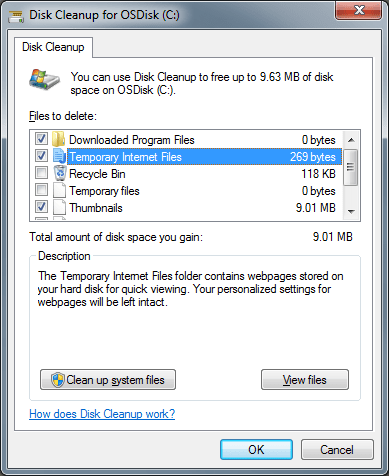
Junk files are hex for the computer systems as they occupy unnecessary storage space and lead to frequent disruptions in the functioning. It also may be the cause of QuickBooks Error 9000. Let us remove theses files to ensure that the error gets eliminated:
- The first step to remove junk files is to go to Start > then type cmd or simply type ‘command prompt’.
- Press the keys together Ctrl+Shift, tap enter key on keyboard.
- When your screen displays Permission Dialogue Box, press on YES. This will initiate disk cleanup task, where you can select by yourself the files you want to remove.
- Hit the finish button, then OK.
Method 5: Modify system Date and Time
For the smooth functioning, one should ensure that the computers date and time coincide with the software server on other computers. This will avoid QuickBooks Payroll Error 9000. Follow the steps to change date and time of the system:
- From Window Taskbar, choose Date and Time Settings, where you will see a window oopen up displaying time(hh:mm:ss), date(dd) and year(yyyy). Modify the date and time accordingly.
- Now restart the PC to see if the Error code 9000 is resolved.
Method 6: Cancellation of Publishers Certificate of Invalid Version
Sometimes when the user is using the unauthorized version of QuickBooks, it is important for ‘Revocation of Publishers Certificate’ means one needs to cancel the invalid subscription. To do the following, perform the steps:
- When you open your browser, tap on the Tools menu > go to Internet option from the list and then select Advanced option.
- From the Security head under Advanced option, unmark the ‘Publisher Certification Revocation Box’.
- Then you should try to reboot the PC, now reopen QuickBooks.
Method 7: Try to Restore your System
To restore your system, follow the steps:
- Under the Control Panel, you must search for System Restore section, where you first need to click on it and then you have to fill out the Admin Credentials to restore your system.
- You have to find a Restore point, after that click on Next button, this will start restoration process.
- Follow the upcoming instructions given in the Restoration Process wizard one-by-one, then you have completed the process by clicking on the finish button.
Method 8: Take help of Clean Install Tool
QuickBooks provides a tool which is used to resolve the problems occurring while you are installing updates in your QuickBooks. This tool is known as Clean Install Tool, which helps in debugging errors caused while installing QuickBooks and their updates. We will use this tool to debug QuickBooks Payroll Error 9000. The steps to use Clean Install Tool are:
- From the Inuit website of QuickBooks, download and install Clean Install Tool.
- After storing it in a specific location, access .exe file of the Clean Install Tool and follow the procedure for installation.
- Some wizards or dialog boxes get open, proceed with them.
- After finishing use the tool to remove Payroll error 9000.
Method 9: Flush DNS
Due to system updating activities, there are some files which are generated by other programs while they get updated from online itself. They take up storage and also conflict in the path of QuickBooks upgradations and send requests to fetch payroll files and deposit the amount in the particular accounts. For this you need to delete DNS from the system. To do so, follow steps:
- From the start menu you need to type ‘Command prompt’ in the search field.
- Now in the command prompt window, where you can see the insert symbol, type the following ‘ipconsigns/flushdns’ and you need to press Enter key.
- Let the process take place to remove/flush dns.
Method 10: Upgrade Recent Tax Tables of QuickBooks Payroll
To upload latest tax tables in your QuickBooks system to resist Error code 9000, follow the steps:
- While you open your QuickBooks Desktop, the user need to head towards the Employee Section.
- From there you will get Payroll Update option, then you need to download it.
- The user needs to download the recent updates from there.
- When this is done, information will be displayed for completion.
If the problem still prevails, follow the steps:
- Upgradation of QuickBooks Desktop improves performance.
- The head ‘State Unemployment Insurance Rate’ needed to be validated manually by the user itself.
- Now complete the configuration of ‘New State Taxes’ and now task is completed.
Conclusion
The purpose of the article is to resolve QuickBooks Payroll Error 9000, which an error caused by bad connectivity and file fetch requests for accessing payroll and transfer funds to the accounts are restricted. Here server fails to connect. The article talks about symptoms, causes and methods to resolve QuickBooks Payroll Error 9000.
Anyhow you are not able to fix this issue, contact our QuickBooks Error support or dial number +1-844-926-4607.
Recommended to read: