
Company file is also available as Portable file which is way easier to move as compared to the conventional Company file. Portable company files can be considered as the compact counterparts of your company file that are useful when you are going for sharing of accounting data to other systems. Such file can be shared through emails or transferred to the USB. Follow the guidelines in this article to know the procedure to create and open portable company file in QuickBooks desktop.
Steps to Create and Open Portable Company File in QuickBooks Desktop
The steps for the creation and opening of such Company file are elaborated below:
Step 1: Get QuickBooks Updated
The first step should be to update QuickBooks to the newest available version rolled out by Intuit. The steps for the same are:
- Launch QuickBooks and then go for the Help tab.
- This should unravel a list of options, which shall include “Update QuickBooks Desktop”. You need to click on this option.
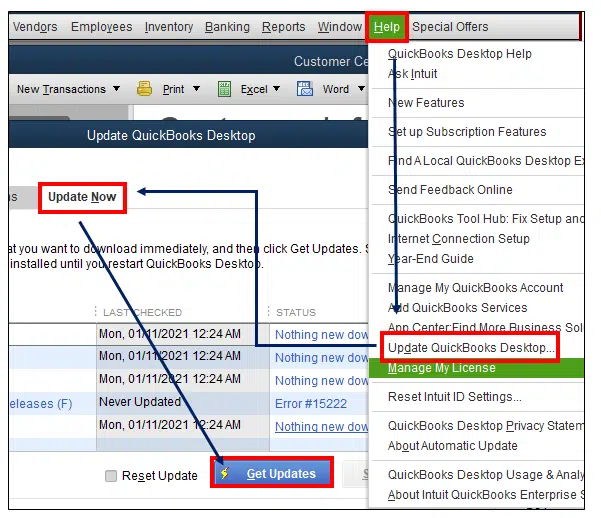
- Soon after clicking on it, a new window shall open. Here, you need to click on Update Now, then mark the Reset Update box, and finally click on Get Update.
- The updates may take a while to get downloaded, and once the process reaches an end, you should re-run QuickBooks and get the updates installed by a simple click on Yes on the onscreen prompt displayed on the screen. Once the QuickBooks updates are completed, you can then move on to the next step.
Users may also read: Resolve potential data Issues in QuickBooks desktop
Step 2: Create Backup
Portable Company file are an effective and easy way for transferring accounting data in instances when the full backup is not necessitated. Notably, a portable company file does not include logos, templates for messages, or images. Even the Loan Manager or Statement Writer files are not included in the Portable Company files. To get the backup of the company file done, the steps to be done are:
- Go for the File menu, and after that, the next step should be to click on backup company file.
- You should then go for the option to Create Local Backup, and soon after, click on Next.
- You can now choose the destination where you want the backup file to be saved. For this click on Browse and then make a choice of the location.
- Click on Ok to get the backup done.
Step 3: Creating Portable Company File
- Creation of Portable Company file requires launching of QuickBooks as an admin. As the accounting program shows up, go for the File menu.
- Afterwards, you should click on the Create Copy option and this should be followed by a click on Portable Company File.
- Then, click on Next and choose a suitable distinct name for the file. Also, choose a destination for the file and then you can click on Save and followed by Ok.
Related topic: Fix delivery server down error in QuickBooks online
Step 4: Opening the Portable Company File
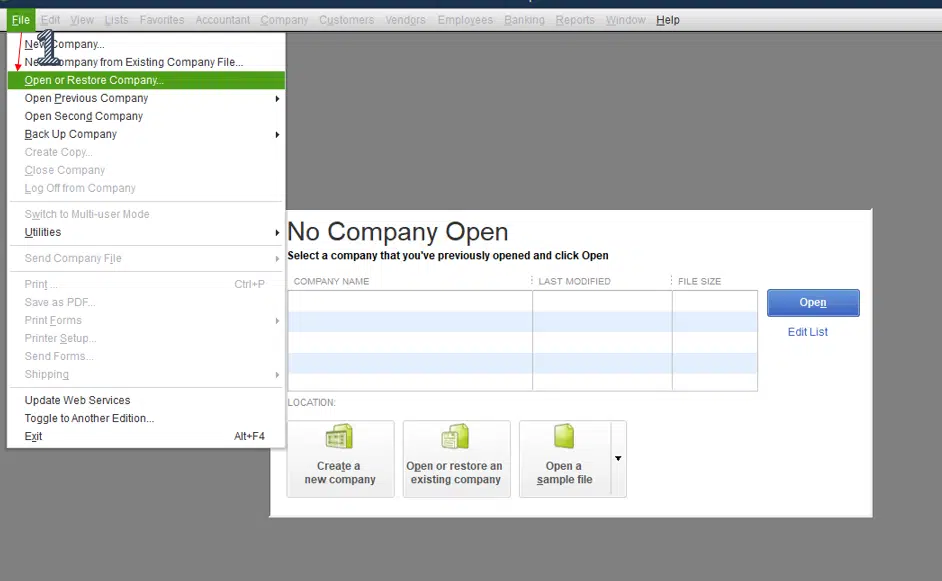
- The initial step requires running QuickBooks as admin and then going for the File menu.
- Afterwards, click on the option to Open or Restore Company.
- This step should then be followed by a click on Restore a Portable File and then the Next tab.
- Choose the Portable Company File with the .qbm extension.
- Now, click on Open.
- You need to then choose the location where you want the file to be saved. Upon choosing the location, click on Next and then finally you can click on Save.
Summing up!
This blog contained all the necessary information readers need to create and open Portable Company File in QuickBooks Desktop. If you have any queries to share with our dedicated team of QuickBooks experts, you can always reach us out through the Live Chat Support.
Recommended to read:
How to Resolve IIF Import Error In QuickBooks Desktop?