QuickBooks with its advance features and extensive services provided, allows businesses to create and send invoices in QuickBooks to their customers. This feature has eased the path for generating and managing these invoices, which at same time can be recorded in QuickBooks database.
The article gives an overview for the QuickBooks users that how they can create and send invoices in QuickBooks. It gives a detailed procedure which the user must follow step by step.
Features of QuickBooks Invoicing Software
Following are the features of using QuickBooks Invoicing software for business purposes:
1. Create Professional Invoices
QuickBooks allows you to create customized professional invoices, in which you can include details about products and services in which your business is engaged. You can also do branding and specify the payment methods.
2. Electronic Invoices can be send
As QuickBooks allow to create invoices, also these invoices can be directly sent through emails. You can review unpaid invoices and track their status of the customers.
3. Payments are Faster
QuickBooks feature of Payment integration within software allows customers to pay through internet banking, debit/credit cards, NEFT bank transfers, and ach Bank payment, securely. This QuickBooks service is four times faster than traditional paper bills.
4. Real Time Tracking
As we can maintain seamless invoice transactions and payments at one place. Either they are online transactions or on site payments, QuickBooks has every solution.
5. Customization and Convenience
QuickBooks allows users to create invoices in different and currency. The user registered account can be accessed through mobile application also.
You may also read: How to Fix QuickBooks Error 15276?
Components of QuickBooks Invoicing Software
Theses are important components of QuickBooks Invoices:
Invoice Number
It’s a unique serial number given to an invoice generated. It is a unique identifier which help in organizing and tracking records.
Date
Date in invoices represent when it was issued, it is to keep track record of timing.
Business Contact Information
This is an important as it shows business details of the company such as Name, logo, contact number, address and email.
Description of Goods and Services
It describes the items or services provided to the customer which includes item names, quantities, unit prices and tax applicable.
Payment Terms
Shows payment related information like due date, payment method accepted, and late fees, if any. This clarifies payment which is accepted by the business.
Read this also: Dependent System Error in QuickBooks
Merits of QuickBooks Invoicing
The advantages of QuickBooks Invoices are:
Ease In Creating Invoices
QuickBooks Invoices has user friendly interface which enables user to design the invoices and apply formatting such as fonts colors, logo, styles and including a personalized message on behalf of the company.
Invoice Tracking Is Efficient
As every invoice transaction and payment are stored at one place at QuickBooks, it’s easy to keep a track on it. When you create an invoice, it reflects in sales as income amount and liability in customer account. It also facilitates payment methods links and automated emails, to keep a reminder of payments due or made.
Convenient Design Options
QuickBooks provides various invoice designs so that you can format any time you want to. This feature is cost friendly and create layouts quickly. The modification applied to once invoice, will be reflected in others also
Accounting Integration
The QuickBooks has accounting feature which eliminates primitive manual data entry. Invoices can directly be sent from mobile app or cloud software. Information related to sales or transactions made automatically gets updated with an entry, and conversion of estimates to invoice are seamless.
Instant Delivery
Creation and sending the invoices is faster, can be delivered in minutes, eliminating postal or mail delays, thus, faster payments. As invoices gets on time to the customer, improved cash flow of the business.
Easy Tracking
QuickBooks keeps the tracks if the mail has received, and it is opened by the customer. This ensures the smooth functioning and no negligence by the customer, when it’s time for payment. Hence, making convenient for the users.
Faster Payments
With the QuickBooks, you can add payment hyperlinks in the online system. Customers can easily pay through this system and professionals who want time efficient payments appreciate this method.
Check this also: Download and Install QuickBooks Tool Hub
Methods to Create Invoice In QuickBooks Desktop
Here’s the method to creating invoice from scratch:
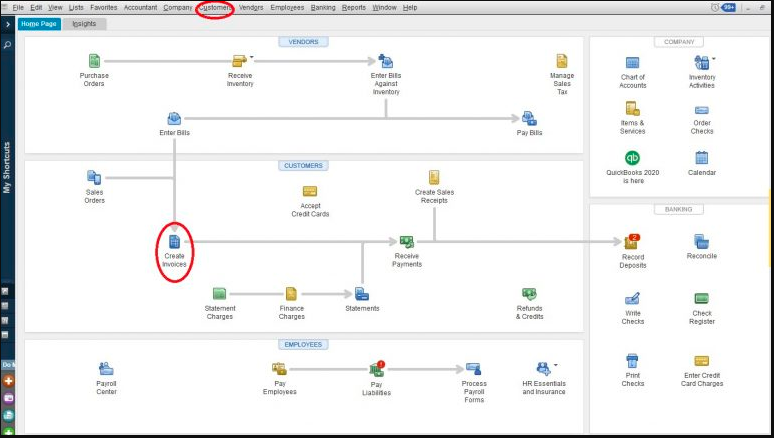
- In QuickBooks, go to Customer menu > Create Invoices.
- Choose either existing customer or customer job from ‘Customer: Job’ dropdown menu.
- To add new customer, click Add New.
- Fill in the details such as date sent, due date, invoice number, recipient details and other terms.
- Save and close, when completed.
Note: When creating an invoice, according to the settings, description and amount fields automatically gets filled. Though you have liberty of flexibility to remove or add these fields as you want.
Create Invoice for Sales Order
Here is the process to create invoices in two different ways:
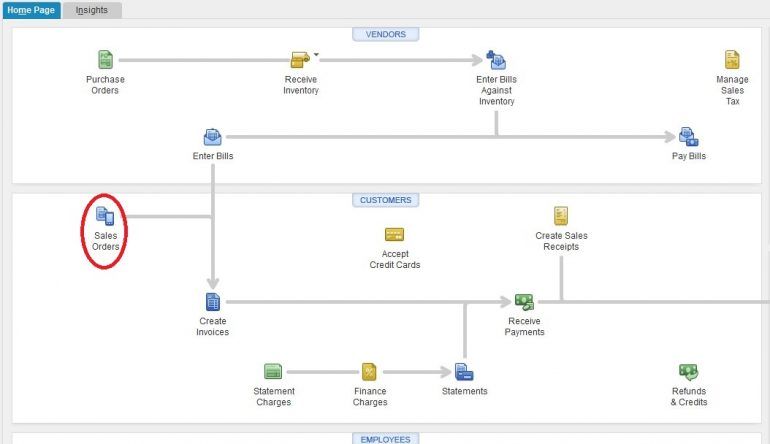
From Sales Orders Window
- Open ‘Sales Orders’ section.
- Click on ‘Create Invoice’.
- To create invoice there are two ways-
- In the invoice, select all items under sales order, then select ‘Create Invoice for all of the sales order(s).’
- For selected items, select ‘Create Invoice for selected items.’
- Make necessary adjustments to invoice, save and close.
From Invoice Window
- In QuickBooks, go to Customer menu >Create Invoices.
- Choose either existing customer or customer job from ‘Customer: Job’ dropdown menu.
- Select one or more sales order that you want to show in the customer’s invoice.
- See if you need to make required changes.
- Save and Close.
Create an Invoice From Estimate
From Estimate Window
- Open desired estimate.
- At the top of the form, click on Create Invoice.
- If progress invoicing gets enabled, a prompt asking product details and quantity will be displayed on the screen.
- Makes necessary changes, save and close.
From Invoice window
- Go to Customer menu > Create Invoices.
- Choose either existing customer or customer job from ‘Customer: Job’ dropdown menu.
- Estimates window will appear.
- Select estimate which you want to appear in the invoice. We can select one estimate at a time in QuickBooks.
- Save and close.
Related article: How to Resolve QuickBooks Error code 179?
Creating Invoices in QuickBooks Online
Here are steps to Create Invoices in QuickBooks Online, similar as desktop version:
Invoice Creation options
You can either create invoices from scratch or estimate but QuickBooks lacks the feature of Sales order. If the prepared estimate is confirmed by the customer, then you can convert in invoice.
Entering invoice details
You can enter invoice details manually or you can use the pre-set rates for products, services or sales tax.
Note– QuickBooks online doesn’t support feature of sales levy tax but you can directly enter in the invoice of the individual customer.
Efficient Email System
QuickBooks Online provides facility to directly sent invoices to your customers. If you are using QuickBooks payment, the user will notice payment link directly gets added to the invoices, streaming collection process.
Create an Invoice Without an Estimate
The QuickBooks Online allows you to use blank invoice screen with either of the following methods-
From the dashboard
- Click on + icon on top right corner of QuickBooks screen.
- Select invoice from customer menu on left side of the drop down box.
From the Sales menu
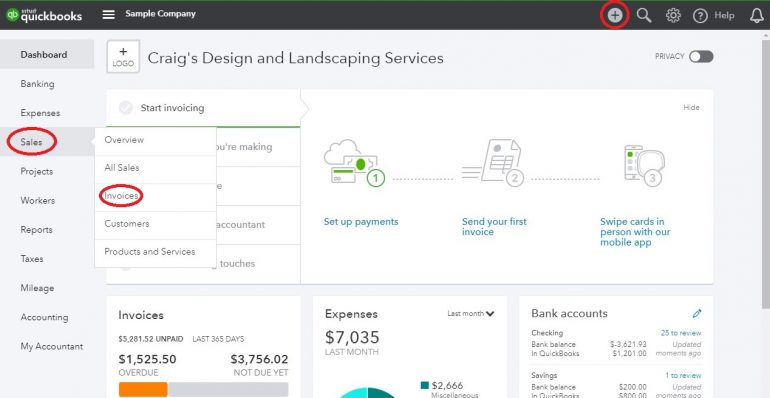
- Click on sales > invoices on left Toolbar.
- Select any one option either you choose:
First option directly takes you to blank invoice screen. Or, Second option, you will see list of invoices.
To Create a new invoice, follow the steps:
Choose a customer
- Select Customer from drop down menu.
- Or create a new customer by clicking on Add New from drop down menu.
Customer email
- If there is already email address on customer file, it will automatically gets filled in the customer email field.
- Else, add it manually. You can add multiple emails separated by commas. You can also use cc or bcc in invoice.
Send Later
- Select Send Later checkbox to batch invoice for email delivery later.
Payment Options
- To enabled QuickBooks payment options on invoice, just click on toggle switch ON/OFF.
Billing Address
- If the billing address is on the customer file, it will automatically gets auto filled, else you can enter it manually.
Payment Terms
- Select payment terms from drop down menu.
Invoice Date
- Current date will be added as default on the invoice when generated, you can also modify it by yourself.
Due Date
- Date based on invoice terms, also you can adjust manually.
Choose your Template
- You can select the template of your choice, which will determine your custom fields. To change template, click on Customize at the bottom of the screen.
Product/service field(similar to QuickBooks Desktop)
- The fields get autofilled if you have already present products and services, or you can add new products manually.
- The description gets filled automatically according to the product;you can modify later.
Quantity field (Qty)
- It contains number of items or hours for a product or service, respectively.
Rate field
- Rate is normally set to previous rates adjusted in QuickBooks; else you can change it manually.
Amount Field
- Calculated automatically, multiplying rate by Quantity of the item.
- You can adjust manually, by changing price the amount gets change or the quantity.
TaxCheckbox
- For taxable items, click the Checkbox.
- If not, sales tax will not be applied to those items.
Adding More Lines
- If you are run out of place, click on Add Lines button to add extra items.
- You can also clear unnecessary lines, which are not required, add subtotals to organise different items.
Custom Messages
- You can add messages to invoice or statement manually in QuickBooks.
Discount and Tax Calculations
- Caution: Circle with two arrows indicates tax to be applied after or before tax.
- Based on current tax laws, you can adjust the invoice.
Sales Tax rate selection
- Select sales tax rate for the employees.
- Or select ADD NEW to create new tax rates.
- Manually calculate sales tax for the invoice and type it in the field.
Discount Application
- You can either select % or flat dollar amount for the discount, if applying to an invoice.
Attachments
To add attachments,
- Drag drop files in selected area.
- Orclick icon and browse for attachments.
- Select Checkbox next to file after uploading, this will send the invoice to customer.
Abandoning the invoice
To discard the invoice,
- Click Cancel button on the screen bottom.
- Unlink desktop button, it is placed always from save.
Preview and Recurring invoices
- Click link at bottom centre of the screen.
- To set up Recurring invoice, click Make Recurring.
- Save invoice before beginning.
Frequent Saving
- Click on save button on bottom of the screen, to prevent data loss due to connection failure.
Create Invoice From Estimate
To create invoice from Estimate in QuickBooks Online, follow the steps:
Start from Estimate
- If you are using progress billing, begin your invoice process from project estimate.
- Hover sales link on left Toolbar, then click on Customers.
Select Customer
- Next click on customer name from the list, or use find to search for customer through credentials.
Locate the Estimate
- Search for estimate you want to apply for invoice.
- Click on create invoice link on Action column.
Invoice screen with estimate details
- When invoice screen gets opened, it gets autofilled with details.
- If you are using progress invoicing, select either to create invoice for percentage or specific quantity of overall estimate.
Similar topic: How to Fix Missing Employee in QuickBooks Desktop?
Send Invoice In QuickBooks Online
- When you have created your invoice, and selected to send it later, click on save on right side of the screen.
- To check preview or print the invoice before saving or sending it. Click on Print and Preview button on bottom bar of the invoice screen.
- Select appropriate option from drop down menu.
- Click on Print or Preview to see how invoice appears.
- If ready, send it and proceed next.
- To instantly send invoice, click save and send.
- QuickBooks creates e-mail based on default settings you have set.
- You can modify default email settings for the invoice.
- Finally, click on green send and close button when you are ready to send.
- A notification comes confirming that the invoice is been send to the customer.
Review Unpaid Invoices In QuickBooks
The invoices which payments have not been received from the customers, QuickBooks keeps a track of it. It is reflected in accounts receivables of the user. This is also represented in balance sheet and other financial reports. If you want to see your invoices, go to Sales and select Invoices. Check Status column to trace invoices stand in the sales process.
The following are the statuses, you may come across:
- Due in (Days): Invoice still needs to be emailed
- Due in (Days) sent: Invoice is sent to customer
- Due (Days)Viewed: Customer has viewed
- Deposited: Customer has paid the invoice
- Overdue (Days): Invoice is past due and unpaid
- Overdue (Days) viewed: Customer has viewed but did not pay
- Delivery issues: Invoice has not delivered to customer, check email and send again.
- Voided: Invoice cancelled.
See this related blog: How to Merge list Entries in QuickBooks Desktop?
How to Convert an Estimate to an Invoice in QuickBooks Online
To ensure accurate bookkeeping, convert estimates to invoices and link them. QuickBooks automatically fills the information from estimates, saving time and efforts of the users. If you using old or new estimates, QuickBooks facilitates streamline process for efficient invoice in QuickBooks online. Follow the steps:
Navigate to sales
Go to Sales sections in QuickBooks Online.
Locate the estimate
Find the estimate you want to convert.
Update status (if required)
If the status columns shows rejected, update status to pending or accepted.
- Convert to invoice
- In Action column, select Convert to Invoice.
- Make important changes in invoice.
- Save the invoice.
Conclusion!
From the following article, we conclude that how can we create and send invoices in QuickBooks. This is useful in various businesses and individual entrepreneurs who wants to keep records of there clients and payment received or due. It is also helpful in calculations of various accounts and thus, keep management of the databases of the company. By following these steps, you can easily generate and send invoices to customers in no time, eliminating manual work.