
Learn the easy ways to set up folder permissions in QuickBooks desktop.
Company files can be considered as the nucleus of all the operations in QuickBooks. While it contain all the important information, sharing it to business professional becomes indispensable at times. This is where network sharing can prove to be extremely helpful. But users need to set up folder and Windows Access permissions to share Company Files. If you are new to all this, and are looking for the right steps to set up folder and Windows Access Permissions to share Company files, then this article shall be very helpful to you. Just make sure to read all the comments till the end.
Necessary Pointers to Note
The crucial points related to the Folder sharing and Windows Permissions that need to be kept in mind are:
- The Installation directories should have accurate permissions.
- Furthermore, for users who are using the Microsoft Windows version, Security tab might be inaccessible or unavailable in the default Normal mode. Such a situation can be tackled by switching to the Safe mode. The steps for using the Safe mode include:

- Starting the system and then pressing the F8 key while still on the boot screen.This action immediately leads to the Advanced Boot Options from where you can use the arrow keys to select Safe mode with Networking option.
- Once the tab has been highlighted, press the Enter key to start Windows in this specific mode.
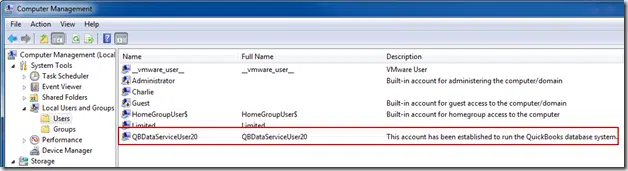
- Also, QBDataServiceUserXX service should be running without any errors.
You may also read: Troubleshoot QuickBooks Banking Error 179
Procedure to Set up Folder permissions in QuickBooks desktop
Permissions for Folder and Windows can be easily established by using the below-given steps:
- The first step is to go for the Windows Key at bottom left corner of the keyword (Third key from the bottom left).
- When the list shows, the next move should be typing File Explorer and then move to the Company file folder. In the default case, this folder is in the Intuit folder located in the C drive.
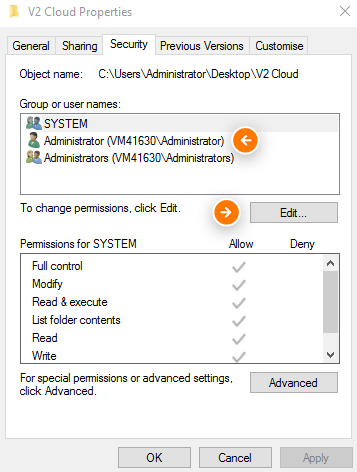
- When the folder is identified, the next step is to right-click the same and then choose the Properties option.
- Afterwards, the next step should be making a choice for Advanced in the Security tab.
- Now, go for a click on the QBDataServiceUserXX and afterwards choose the Edit tab.
- The next step requires setting the following settings:
- List folder/read data
- Create folders/ append data
- Write attributes
- Write extended attributes
- Traverse folder/Execute file
- Read permissions
- Read attributes
- Read Extended attributes
- Create files/ write data
- In case the permissions aren’t set, following steps should be performed:
- The folder with the Company files should be chosen and then a right-click should be done followed by clicking on Properties.
- This action should then be followed by a click on Securities tab, which should afterwards be followed by a click on the Edit tab.
- Herein, the QBDataServiceUserXX should be opted for and the next move should be to click on Full Control, followed by Allow tabs.

- The final step requires a click on Apply and then Ok.
How to Share an Existing folder?
An existing folder can be shared by performing the following steps:
- The folder o be shared should be chosen and then the same should be right-clicked.
- This should be followed by a click on Properties.
- Afterwards, a click on Sharing tab should be done and then you need to click on Share This Folder.
- The next process is to visit the Share name field and here, name the shared folder by entering some name.
- Now, a visit should be made to the Security tab, and this step should be followed by Permissions option.
- You should now set permissions for all users and then click on Apply, and then Ok.
You may also know: Fixing Potential Data Issues In QuickBooks Desktop
How can a new shared folder be created?
A new shared folder can be easily created by the use of the Create a Shared Folder Wizard. The steps for the same are:
- From the Start menu you first require to open Run window and then type the command “shrpubw.exe” in the Run command window.
- This should be followed by a click on Ok.
- The instructions on the screen should be followed to complete the process of creating a newly shared folder.
How can access to a shared folder be stopped?
A folder can be prevented from being shared anymore by doing the following:
- The user should right-click the folder, and this should be followed by a click on Give access to option.
- Then, choose the option to Remove Access.
- This will prevent folder sharing.
Related topic: How to Download and Install QuickBooks Tool Hub?
Steps for Configuring folder permissions within QuickBooks
Folder permissions can be adjusted by resorting to the following set of steps:
- Go for Windows Start menu and from there, you need to right-click the following folder:
- C:\Program Data\Intuit\Entitlement Client\v8
- C:\Program Data\Intuit\Entitlement Client\v6.0
- C:\Program Data\Intuit\Entitlement Client\v5
- C:\Program Data\Intuit\Entitlement Client\v3
- C:\Program Data\Intuit\Entitlement Client
- C:\Program Data\Intuit\QuickBooks Enterprise Solutions X.0 (X = version) or C:\Program Data\Intuit\QuickBooks 20XX (XX = year)
- C:\Program Data\COMMON FILES\INTUIT
- C:\Program Data\COMMON FILES\INTUIT\QUICKBOOKS
- C:\Users\Public\Public Documents\Intuit\QuickBooks\FAMXX (XX = year)
- C:\Users\Public\Public Documents\Intuit\QuickBooks\Company Files
- C:\Users\Public\Public Documents\Intuit\QuickBooks\Sample Company Files\QuickBooks Enterprise Solutions X.0 (X = version) or C:\Users\Public\Public Documents\Intuit\QuickBooks\Sample Company Files\QuickBooks 20XX (XX = year)
- The folder should be right-clicked and this should be followed by a selection of Properties.
- Then, choose Everyone, or else choose Add and then click on Everyone. Following that click on Ok.
- Choose the Full Control option and this should be followed by Apply and then Ok.
Procedure to Set Windows Permissions for Sharing the Company Files (Windows 8 and 10)
For Windows 8 and 10 users
- Users first need to click on the Start button, from where the File Explorer should be opened.
- One should then right-click and click on Properties, followed by clicking on Add.
- Now, a choice for QBDataServiceUserXX should be done and finally a selection should be made to Set the permissions of both the users to Full Control.
- The final step should be to click on the Share tab.
For Windows 8.1 users
Step 1: Taking Full ownership of the file
- The first requirement is to take the full ownership of the file. For this, first open the File Explorer, and then the folder should be chosen and then the Share option needs to be selected.
- The next step should be to make choice for the Advanced Security, followed by a click on Change. This should be followed by choosing Find now tab, and then selecting User, and Ok.
Step 2: Now, Grant Full Control
- Again visit the File Explorer, and once again chose the Folder, then select Share.
- This should be followed by making a choice for Advanced Security tab, and then selecting a Principal.
- The Advanced tab should be checked into, followed by a selection of Find now.
- User should then be chosen and this should be followed by a click on the Ok tab.
- Now, Full control should be granted and afterwards, Ok tab should be selected.
Read also: How to Troubleshoot QuickBooks Online Dependent System Error?
Winding up!
The present discussion revolved around the guidelines on how to set up folder permissions in QuickBooks desktop and Windows Access Permissions to Share Company files. Technical problems are ever-evolving, but we have problems for all your QuickBooks issues. You can simple reach us out through the chat support or by simply giving us a call at out helpline.
Recommended to read:
How to Fix QuickBooks Error 15276?