
In businesses, which uses QuickBooks for maintaining records of Bill receivables or payables as well as employee data, it is important to maintain every record of monetary related transactions. Sometimes what happens is the customer asks for refunds or credits which may increase or decrease the monetary amount stored in QuickBooks. The user who is handling such records should know how to give customer a credit or refund in QuickBooks Desktop for Windows. This not only helps in maintaining records but also provides transparency in case such issues arise with a customer. The amount, which is credited in customer account, is debited from the user QuickBooks record.
The article aims to provide aguide to the users who want to give customer a credit or refund in QuickBooks Desktop for Windows. The user is suggested to follow each step carefully so that you won’t get stuck while processing, if still then seek experts.
You may also read: How to Fix QuickBooks Error 15276?
Process to Give Customer a Credit or Refund in QuickBooks Desktop for Windows
The following provides the guide to the QuickBooks User to how to initiate the Credit or Refund to a customer in QuickBooks Windows. By following these simple steps, the user can perform the following:
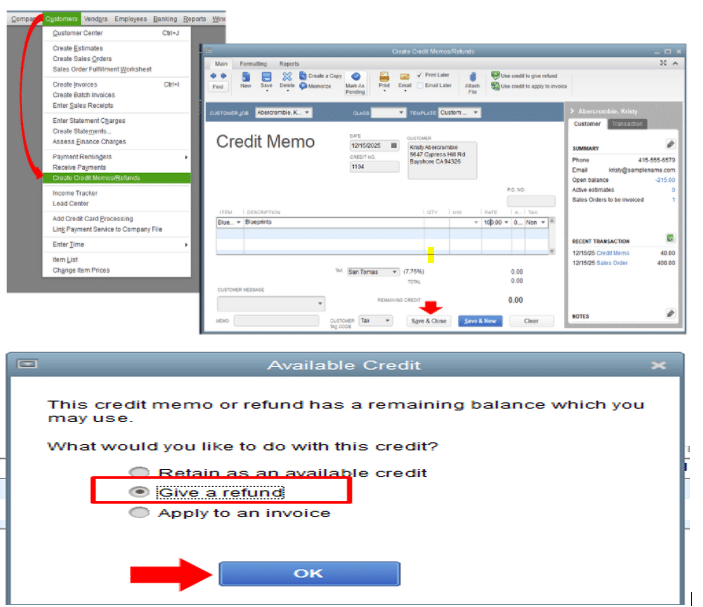
Step 1: Create a Credit Note
- First you need to select Create credit notes/ refund from the customer menu.
- After that select Customer from customer drop down menu.
- Enter the name of the items you are giving credit for and then save and close.
Step 2: Choose how you want to handle the credit
The Available Credit Window gives you option to select any of these which are available as following given below:
Retain as an available credit
In the account receivables of QuickBooks, the credit note is shown as debited or deductible amount, when customer chooses to retain the amount. It is shown in the payment window for customers as it can be used to purchase other items with these credits available. The credits can be used for other items and the transaction will be recorded against it.
Read this also: How to Troubleshoot QuickBooks Banking Error 179?
Steps to retain available credits
The users can retain the credits of their customers in their registered accounts. For this they will see the receive payments window. Follow the steps to do-
- Go to Customer tab > Receive Payments option.
- Select Customer under the received from drop down menu.
- Choose Discounts and Credits Icons.
- Under Credits tab , choose how much you must avail credits, then done.
- After you tap on the Yes button a prompt comes for confirmation, confirm it and the user will see the amount gets automatically added against the customer you have avail credits. It will be reflected in the invoice.
Initiate Refund to the Customer
- If the user doesn’t want to retain the payment as credits in the Customer Payment window, the customer may ask for refund of the payment of the transaction. It is shown as deductible or negative amount against QuickBooks receivables account. The refund may be cheque or cash, also customer may opt for internet banking options or credits/debit card to transfer the amount in Bank account.
Check this also: How to Fix Missing Employee in QuickBooks Desktop?
Steps to Give Refund to the Customer
To provide refund to a customer against an invoice in QuickBooks Desktop for Windows, follow the steps:-
Option 1:
- Go to Customers menu>Credit Memos/ Refunds in the QuickBooks.
- In the Customer: Job selects the customer you want to refund.
- Enter the products or Service you need to refund.
- After this save and Close.
Option 2:
- When you click the Ok button, the details of the cheque fill outautomatically.
- Link cheque to overpayment. Then go to Customers menu >Received Payments.
- From Received drop down menu, select Customers.
- Click on Discount and Credit icon.
- In the available credit section, select the cheque you made against the customer, then done.
- User will see prompt to confirm transfer. Click on the Yes tab.
- Amount will be applied automatically to selected invoice.
- Save and close.
Read the related topic: How to Merge list Entries in QuickBooks Desktop?
Apply credit to Invoice/Bill of the customer
To apply a credit to anyone invoice, the QuickBooks Accounting software lets you apply credit. In the Invoice window, select in which invoice/bill you want to add credits.
Steps to apply credits to the Invoice/Bill of the Customer
The user can apply credits against the invoice/bill directly to the customer account in QuickBooks Desktop Windows This will enable the customer to purchase anything or service in return of credits which has company availed in place of refund. The steps to perform this are :
- The first thing is to select Customer: Job when you create a credit note.
- Apply credit to Invoice windows will get open from this.
- After this choose the amount of credit you want to apply against the customer bill, then click on done.
- You will see credit gets applied on the customer’s invoice.
Conclusion
The article related to Give customer a credit or refund in QuickBooks Desktop for Windows, gives a comprehensive guideline to the QuickBooks users with step-by-step instructions that how you can use the following features. When the customer asks for credit or refund, the guide gives all related information either you can avail credits for some other product or service or if the customer wants to refund you can initiate that.
If still the user is not able to provide credit or refund to a customer through QuickBooks Desktop, the person may seek QuickBooks Support. Contact through helpline number +1-844-926-4607.
Recommended to read:
How to Troubleshoot Backup Company File issues in QuickBooks Desktop?
Set up Folder and Windows Access Permissions to Share Company Files