
Easy ways to fix QuickBooks multi-user mode not working error
QuickBooks offers many advantages in the form of features and tools never seen before. One such feature worth a mention is the QuickBooks Multiuser mode . This mode allows many users of QuickBooks to access the program simultaneously. But this feature is fraught with multiple issues that prevent the feature from working uninterruptedly. This blog will help you through the issue to make sure multiple users have the ability to use the accounting program simultaneously.
What causes QuickBooks Multi-user mode not working error?
Issues in the multi-user mode can be caused by various reasons, which comprise the following:
- The hosting settings set up might be incorrect.
- Antivirus running in the background having blacklisted crucial QuickBooks files relevant to the multi-user mode functioning.
- QuickBooks not being set on the server
- Company files which you are trying to access in the multi-user mode may be damaged.
- Insufficient privileges to the present user.
You may also read: Fix Missing Employee in QuickBooks Desktop
Different Solutions to fix QuickBooks Multi-user mode not working error
The troubleshooting walkthrough for fixing this error is discussed in the form of multiple solutions below:
Solution 1: Make changes to the file name of the Network and Transaction Log files
- For this you need to go to the QuickBooks folder in the C drive.
- Therein, you should search for the ND and TLG files. These are regular company files with .nd and .tlg extensions.
- You simply need to rename these files and add “.old” extension at the end of each of these files.
- Once that is done, give the multiuser mode one more try. This should fix QuickBooks multi-user mode not working error.
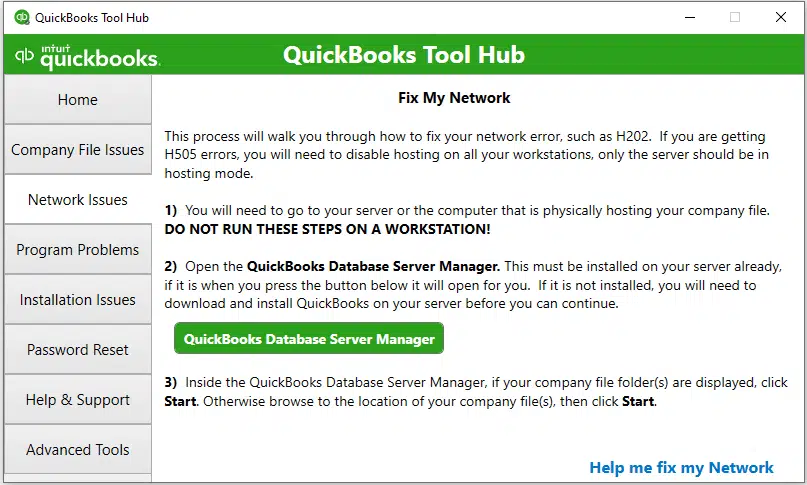
Solution 2: Installing QuickBooks Database Server Manager
You need to give a check on whether your system has QuickBooks Database Server Manager set up. For this, you should download the same from Intuit and open the exe file for installing the same. Just you need to make sure that you make a choice for Custom or Network option in the Install type. If QB Database manager is already set up, the same shall be overwritten on your system, but the company files wont be overwritten with this process.
- In case, you want QB Database Server Manager and QB Desktop on the same server system, you should go for the option “I will be using QuickBooks Desktop on this computer, and I will be storing the company file so that the same can be shared over the network”.
- On the other hand, if you only want QB Database Server manager on the server computer, you can choose “I will not be using QuickBooks Desktop on this computer”.
- You can subsequently click on the option “Install”.
Read also: Merge list Entries in QuickBooks Desktop
Solution 3: Granting permissions to the User
Multi-user issues in QuickBooks can also be a result of insufficient permissions granted to the present user. For this, the following steps can be implemented:
Steps for creation of Local User Account
- You need to first click on Start and then go for Settings.
- Now, you can opt for Accounts and after that, hit on Family and Other Users.
- You then need to click on the option to Add other user, then choose the Add Account option.
- You can then choose the option “I do not have this person’s sign-in information”. You can now choose the option for adding a user without Microsoft account on the page that follows.
- Make sure to enter the correct login credentials before clicking on Next.
Steps for Enabling Local user Account to Administrative Account
- You need to click on Start, followed by Settings and then Accounts.
- After that, you need to click on Family and Other Users. And then make a choice for the account owner name. You then need to click on the option to change the account type.
- Make sure to choose Administrative option under the Account type. After that, you should click on Ok.
- Following the completion of the process, you can now sign in to the admin account.
Check also: How to Troubleshoot Backup Company File issues in QuickBooks Desktop?
Solution 4: Setting the Folder permissions correctly
Incorrect setting of folder permissions could also contribute to QuickBooks multiuser errors. The fix for the same is possible as under:
- In the beginning, you need to go for the Start menu, and from there go to File Explorer. A short approach is to use the keys “Win + E”.
- From here, you should reach out to your Company file and go for the Properties option.
- Now, you should click on Security, then opt for Advanced. Then, choose QBDataServiceUserXX and then hit on Edit.
- You now need to accommodate the database server settings to “Allowed” mode.
- This should fix the error preventing you from using the QuickBooks Multiuser mode.
You can confirm the effectiveness of this method by opening the same company file again in QuickBooks through the multi-user mode which was previously showing errors while trying to open.
Solution 5: Configuration of Multiuser access hosting settings
Configuration of the multiuser access host settings has also proven effective in fixing the Multiuser mode error in QuickBooks. The same can be done as:
- First run QuickBooks using a workstation already having Multi-user setup installed on it.
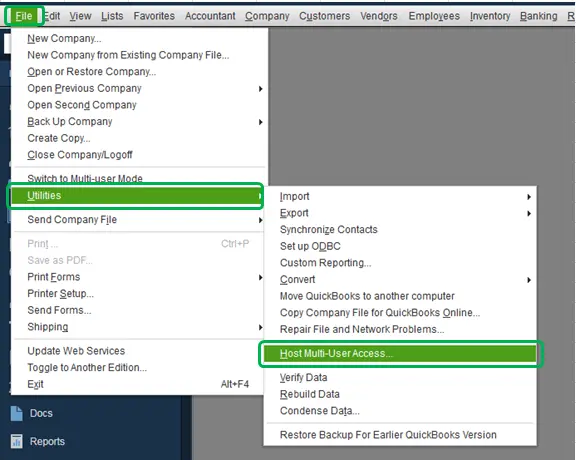
- The next move should be to go to File and then to Utilities.
- This should follow with clicking the option to Stop Hosting Multi-User Access. If the option for starting the same is available, make sure not to click on that option.
- You just need to make sure that all these steps are implemented on the other workstations as well for the effective resolution of QuickBooks Multi-user mode not working error.
- You should afterwards head for the system which is acting as the Server.
- Open QuickBooks in it, then head for the File menu, and the Utilities.
- You need to choose the option to Host Multiuser access, while if the option to stopping it is showing up, don’t click on it.
Must read: Update Your QuickBooks Desktop to the Latest Release
Solution 6: Verification of the Services in the Server system
- First, you need to click on Windows Start key and then type “Services”. Open the same.
- Opening the same, you should search for QuickBooksDBXX service. Head for the General section and then you can view the Service Status.
- You need to Stop it in case its showing running.
- Then, click on Automatic option available under the Startup type.
- Following that, the next move should be heading to Log on and tapping on Local System Account.
- Then, head for Recovery and choose the option to restart the Service for the following – First failure, Second failure, and Subsequent failures.
- Then head back to General and click on Start. This will start QuickBooks Database Server Manager.
Solution 7: Configuration of Firewall Ports
The firewall ports should be properly configured for the multiuser mode to work properly. The steps to make sure that these ports are properly configured are explained below:
- Go to Windows Start menu and this should be followed by a search for “Firewall”.

- Then, head for Advanced Settings and after right-clicking Inbound Rules, you should choose the New Rule option.
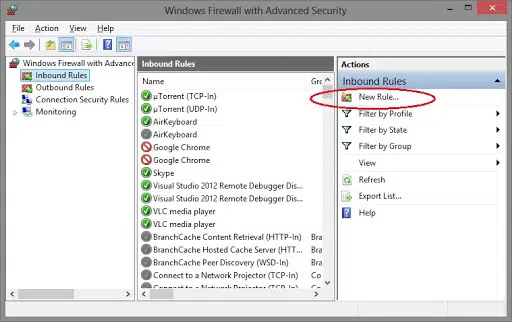
- You then need to click on Port and click on Next.
- The TCP option should be chosen. Also, for Specific ports, following are the ports you need to enter corresponding to the particular QuickBooks version which you are using:
- QuickBooks Desktop 2020 and later: 8019, XXXXX
- QuickBooks Desktop 2019: 8019, XXXXX
- QuickBooks Desktop 2018: 8019, 56728, 55378-55382.
- QuickBooks Desktop 2017: 8019, 56727, 55373-55377.
- You can acquire the dynamic port number and then hit on Next.
- Also, make sure to click on the option to Allow the Connection and then hit on Next.
- All the profiles should be chosen before clicking on Next.
- Also, you can go for the creation of a new rule named “QBPorts(Year)” and then click on Finish.
- Again head for the Firewall settings and head for Inbound rules. Create a new Inbound rule and go for the Program option, followed by Next.
- Afterwards, go for the choice of “This Program Path” followed by a click on Browse.
- Choose the location of the QuickBooks folder and hit on the option to Allow Connection.
- Then, hit on Next and establish a new rule named “QBFirewallException(name.exe)”.
Winding up!
The multiple solutions explained in this article should help you in fixing QuickBooks Multi-user mode not working errors. If you need further assistance in case of unresolved errors, you can always reach us out through the helpline +1-844-926-4607 or using the Live chat option on our website.
Recommended to read:
How to Set up Folder Permissions in QuickBooks Desktop?