Different Techniques to Fixing QuickBooks Error H505

Different Techniques to Fixing QuickBooks Error H505

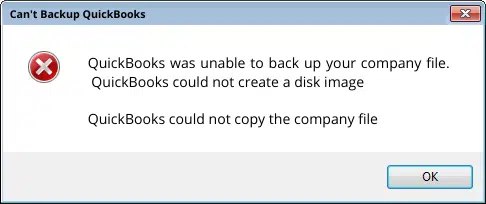
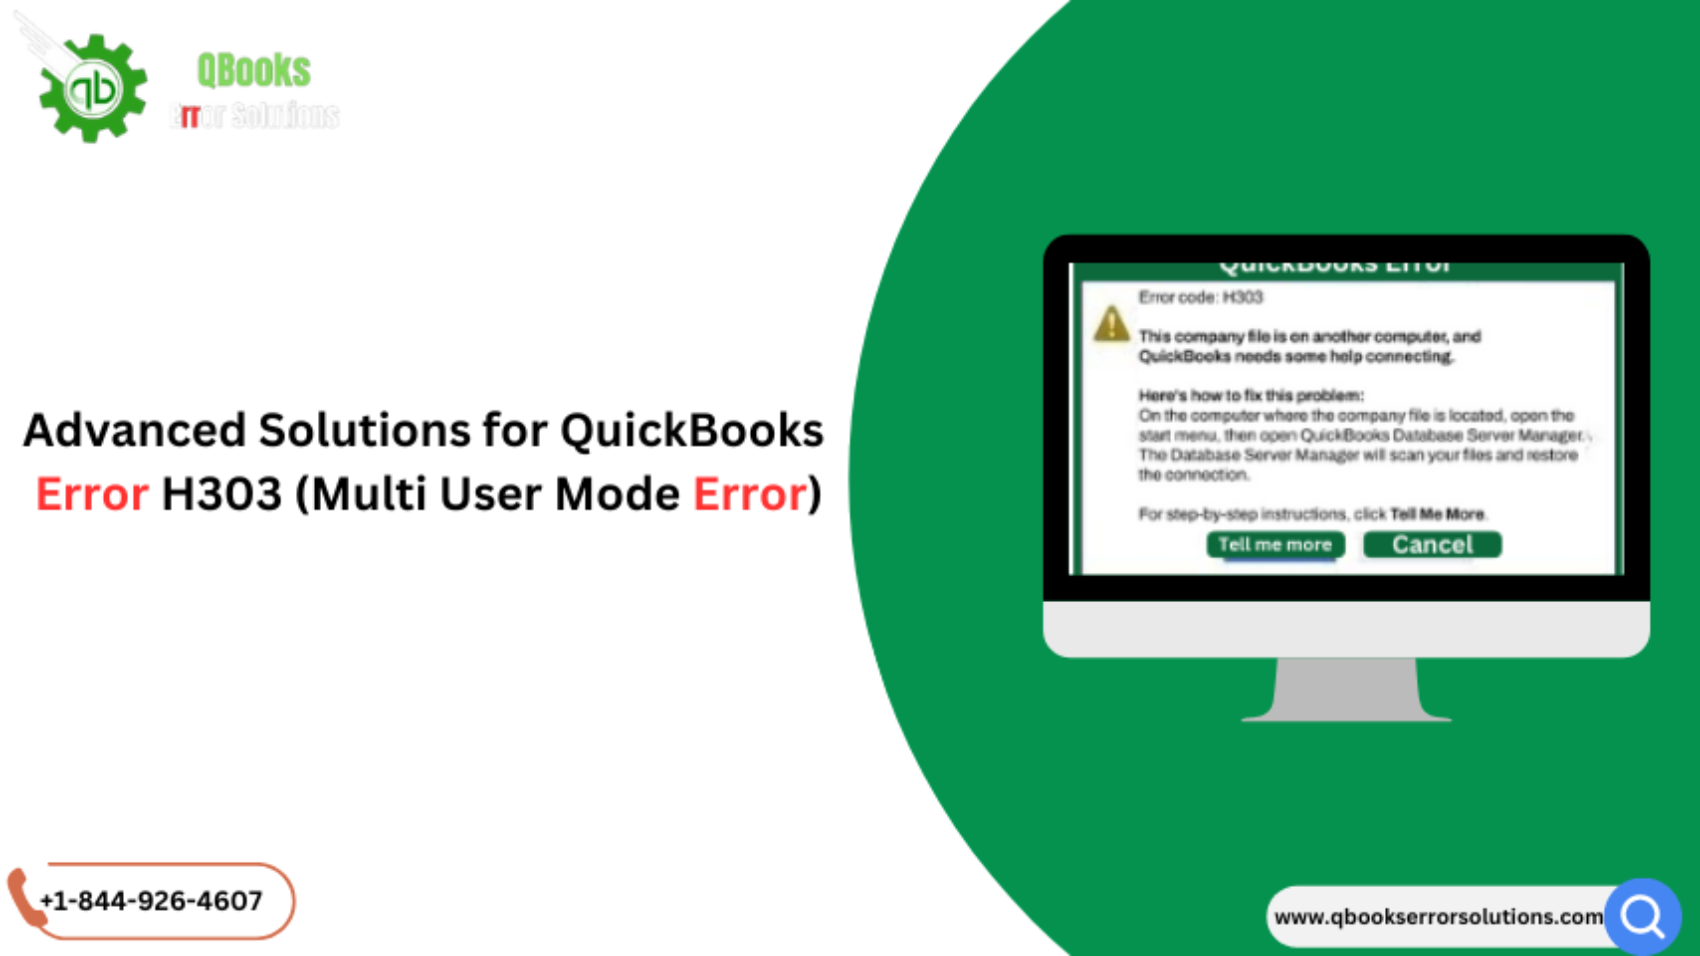
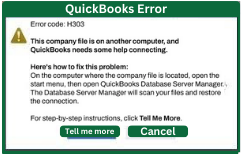
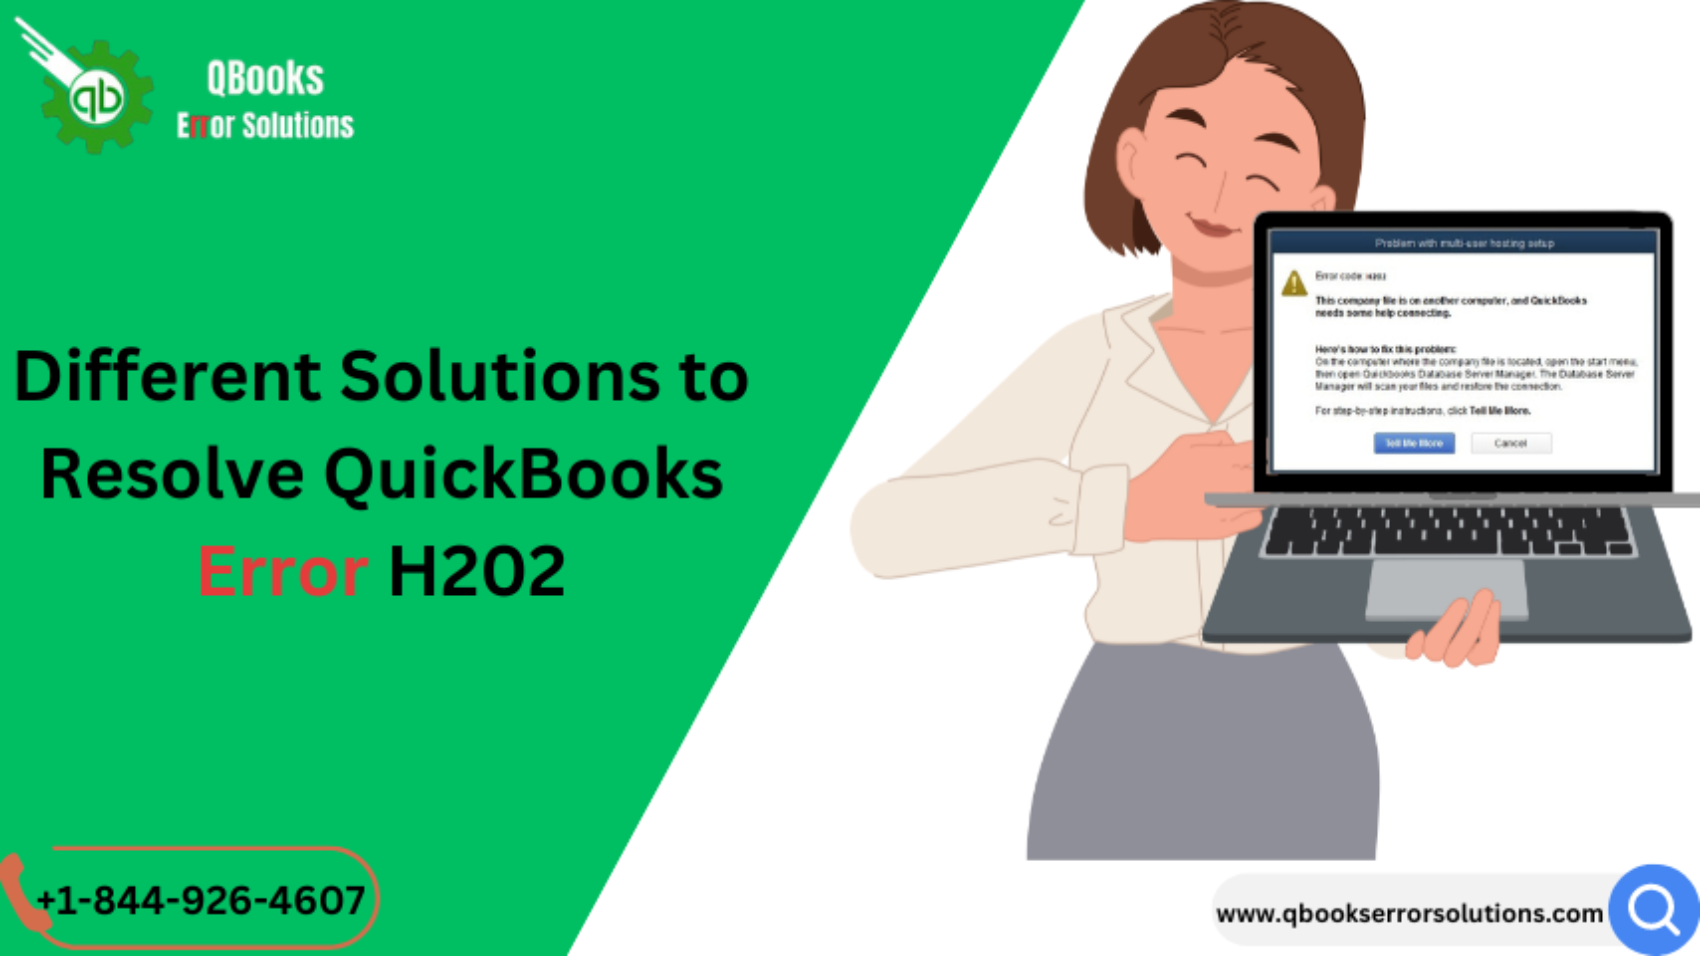
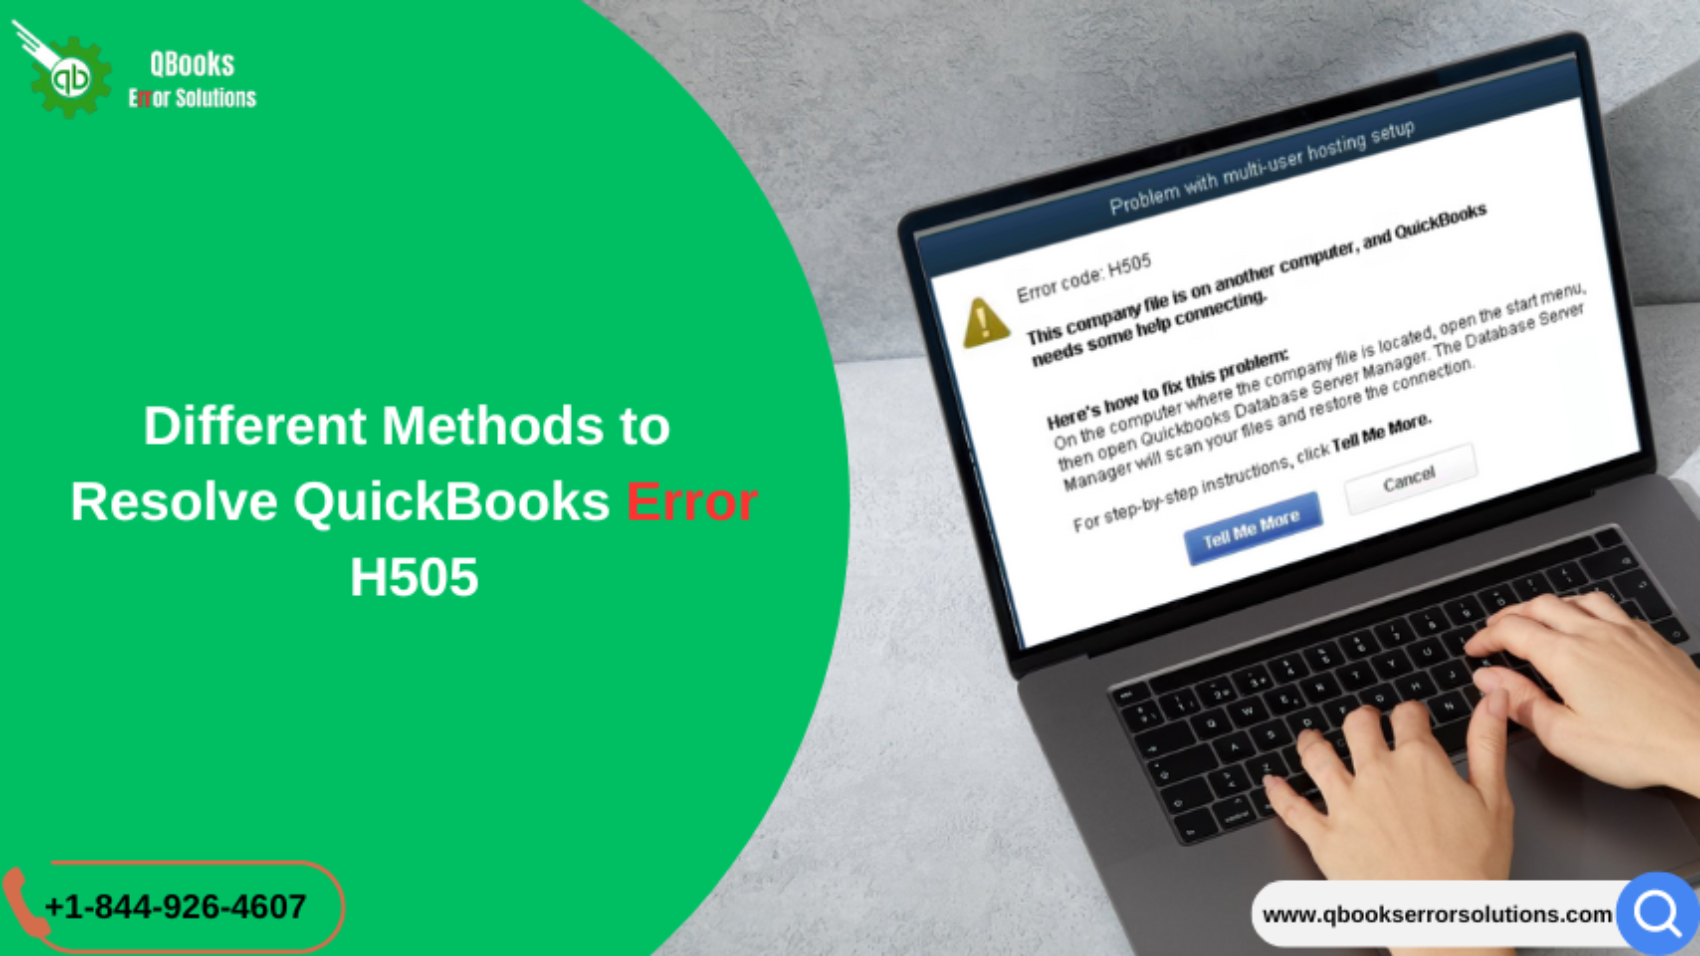
H series indicates that the errors such as Error codes H101, H202, H303, H505 are related to hosting setting problems. QuickBooks Error H505 is a multi-user mode error indicating that the software and company file is not connected on another computer system. This issue often arise due to incorrect hosting, blocked communications both way, crashed .ND files, or main QuickBooks services not responding. The error message refers that the server hosting the company file is not accessible, preventing multi- user functionality. Usually the error code H505 displays with a warning stating ‘ This company file is on another computer, and QuickBooks needs some help.’

This error normally occurs when a user tries to access files which is stored on another computer and QuickBooks fails to access as there is a network -related issue.  It tells that something is blocking you from accessing multi user files located on the server of other system. The error occurs when one or more users are set to QuickBooks, in multi user mode it is important that the files which are computer readable like Word can be configured to act as a host.

QuickBooks Error H505

Reasons for QuickBooks Error H505

As the Error H505 is occurred, generally, due to problems encountered in multi- user mode functionality. This error refers to the issue with hosting configuration, typically stemming from various network and setup issues.

It’s important to understand the causes behind the errors so that optimal solutions are generated with diagnosing and resolving the error, making sure that access is smooth to the QuickBooks. Let’s look at some key causes briefly:-

  • Host Configuration is incorrect – Hosting configuration is required to setup a connection with other system. If the configuration is incorrect, thus, error occurs.
  • Firewalls blocking– The Error H505 can also occur if it blocks the ongoing and outgoing communications. It disrupts the network connection.
  • Damaged or incorrect. ND files- Network descriptor or network data files (.ND files) which is required to access the company files in QuickBooks. Error occurs when file is damaged or misconfigured.
  • DNS settings problem-  If the correct DNS is not stated , the path of connectivity will disrupt resulting in issues between workstation and the server.
  • QuickBooks services not responding – If the essential services like QBDBMgrN or QuickBooksDBXX is not running then also it will cause.

You may also read: How to fix QuickBooks Error 15276

Symptoms of QuickBooks Error H505

Due to generation of errors while executing QuickBooks in multi- user mode, the system faces many disruptions in performance and efficiency. These disruptions are caused by the Error H505 which has hampered the functional capacity of QuickBooks system. Because of these symptoms the firm’s or businesses who are using them in multi- user environment faces problem. By identifying these symptoms we can cure the error which efficient remedial steps. Lets look at the symptoms which are occurred by the Error H505:

  • Switching issues- Due to this error users are unable to switch from single-user to multi-user mode. It’s problematic for the businesses where multiple employees have to access the company files within an organisation.
switch-to-multi-user-mode
  • Error message- An explicit message in a dialog box indicating the QuickBooks Error H505 with a statement is appeared shows that this error is prevailing in the system.
  • Performance problem- There is problem in the performance of the system. Functionalities of the software doesn’t work, no connection, slow performance, frequently crashes and freezing of the system.
  • Connectivity Issues – There are noticeable problems with network connection, preventing proper communication between the server and workstations.
  • File accessibility – The Error H505 will resist you to open or access any file on another system.

Users may also read: Troubleshooting QuickBooks Banking Error 179

Troubleshooting Steps to Fix QuickBooks Error H505

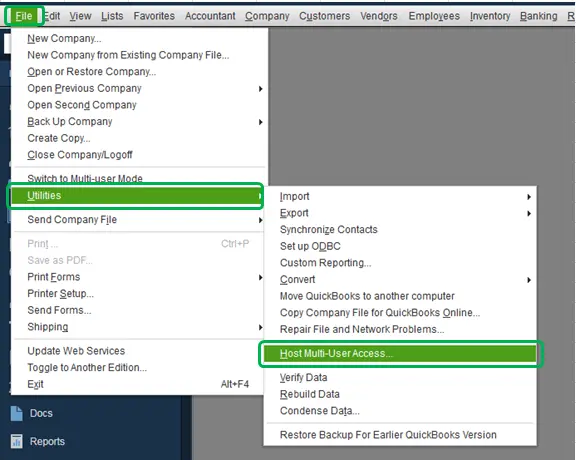
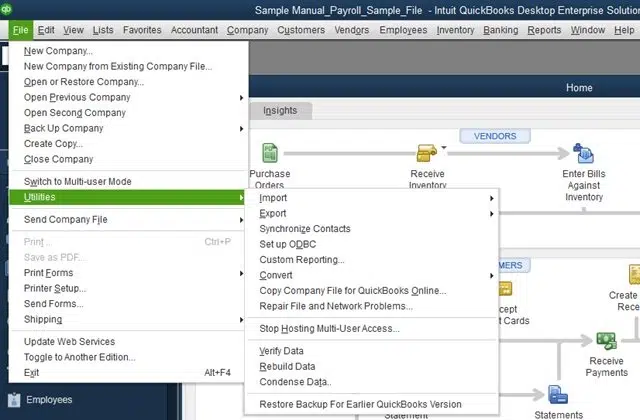
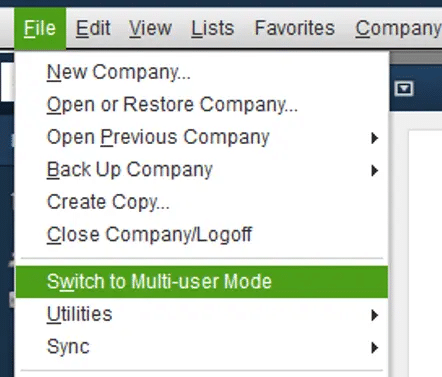
1: Verify hosting settings

  • Check if the hosting is turned off on each working systems and only enabled on server side computer.
  • At last, go to file > Utilities to check the hosting status.
Verify-Data-Image.jpg

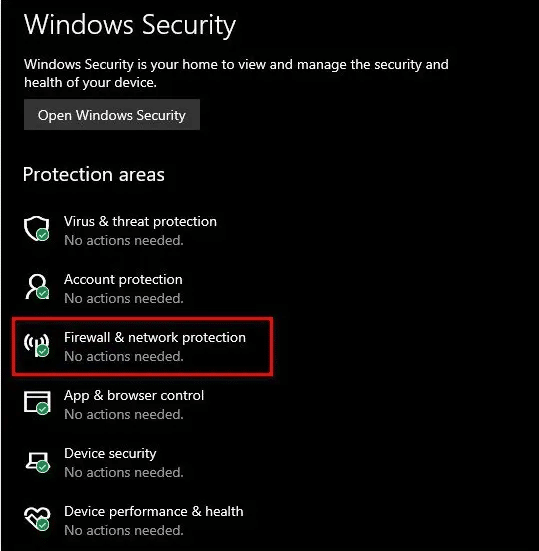
2: Checking and Configuring Firewall Settings

  • Open Control panel and direct to system and security.
  • Click on windows firewall and select the Advanced settings.
Windows-Firewall-setting
  • Set inbound and outbound rules for communication to avoid blocking.
  • Check that the ports 8019, 56728, 55378-55382 are open.

Read this also: How to Resolve QuickBooks Online Error code 1000?

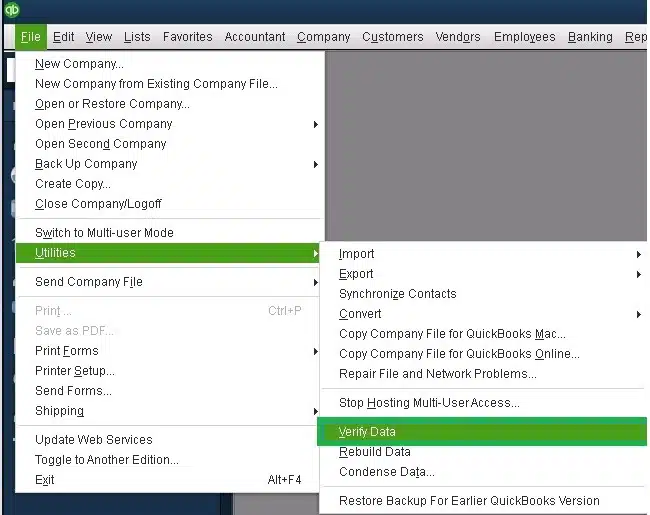
3: Review and Repair .ND files

  • Locate .ND file in QuickBooks installation directory.
  • Next step, right click .ND file corresponding to company file and rename it.
  • Add .old at the end of file name.
  • Now again you need to open QuickBooks to recreate file automatically.

4: Check QuickBooks services

  • The very first step is to open run dialog box,
  • And then press windows+R.
Windows-R-keys
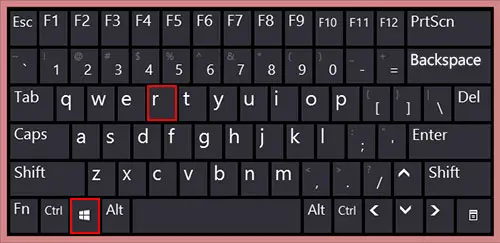
  • After that type services.msc and click enter.
Type-services.msc
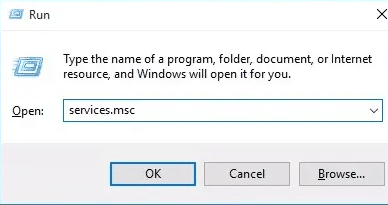
  • Locate QuickBooksDBXX and QBCFMonitorService .
  • Make sure if these services will start automatically.

Check also: Fixing QuickBooks Error Code 108

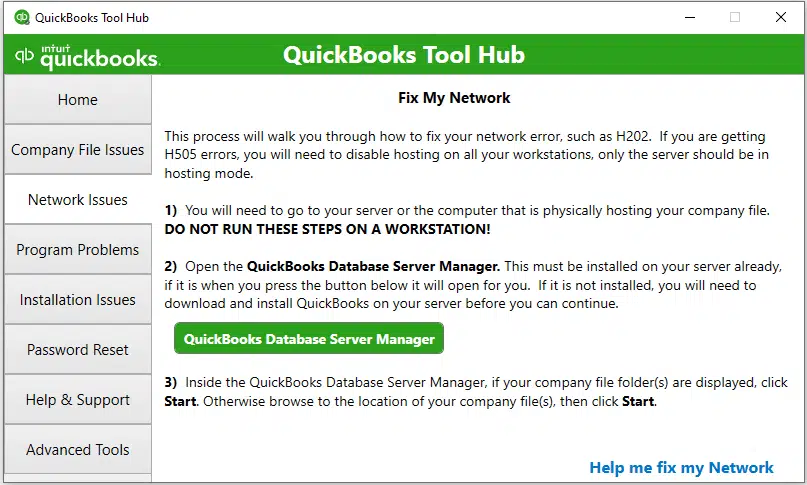
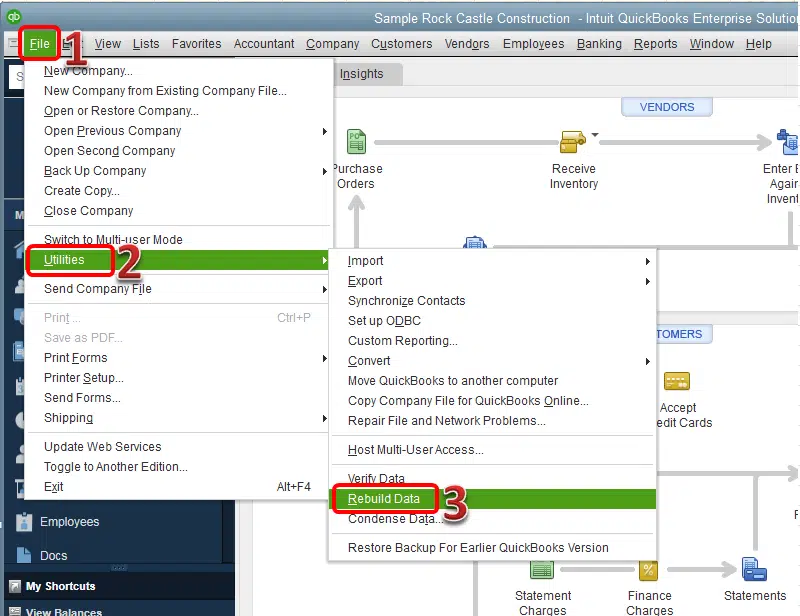
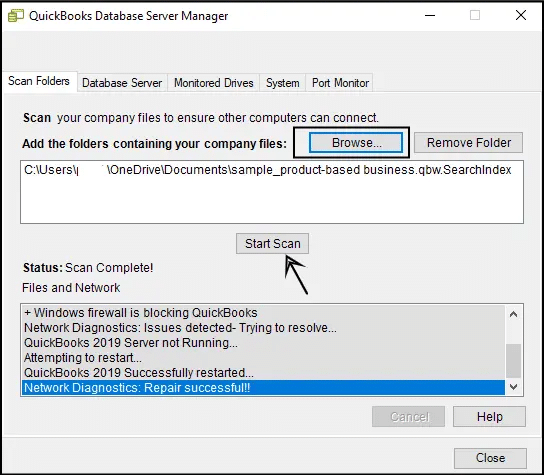
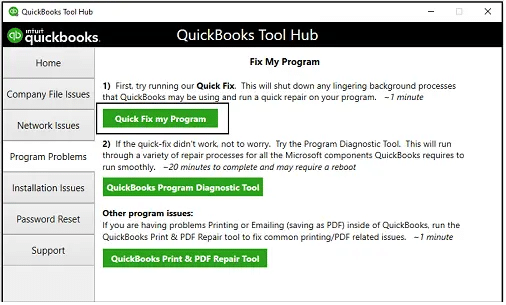
5: Use QuickBooks File Doctor Tool

QuickBooks-file-doctor-from-tool-hub-Screenshot-Image.png
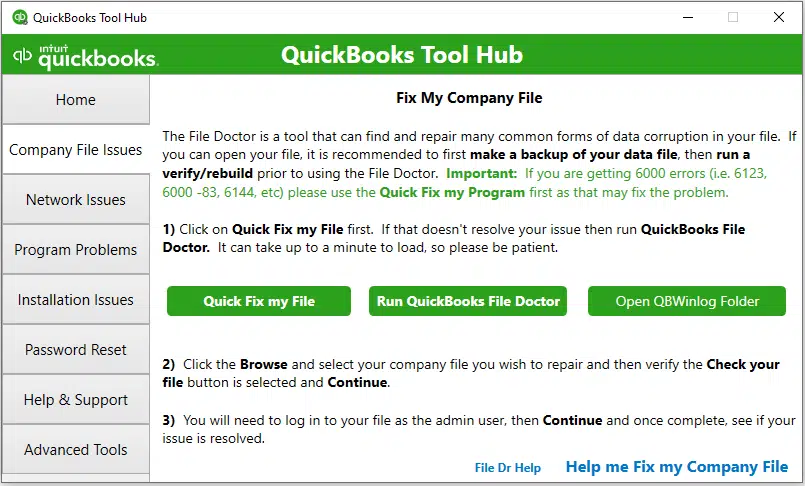
  • Open tool hub and now select Company file issues.
  • Run QuickBooks File Doctor Tool. It will diagnose and fix the problem of network and file.

6: Configure DNS SETTINGS

  • First you need to open control panel and navigate to Network and Sharing Centre.
  • Next click on network connection and go to properties.
  • After that Select Internet Protocol(IP) version 4 (TCP/IPv4) and then Click on properties.
  • At last check if obtain DNS server address automatically is selected and configure it correctly.


Winding up!

QuickBooks Error H505 can disrupt business operations as it acts as an obstacle in various operations where the software is required. It hinders multi- user activities access to the company files. By following the above steps we can overcome the problem and analyse the symptoms. If the error is still there, it’s better to reach out the QuickBooks support at toll-free number +1-844-926-4607 for further assistance.

Related articles:

How to Resolve QuickBooks Online Error 350?

Methods to Troubleshoot QuickBooks Online Error 400

Easy Guide to Fix 502 or 350 error messages

How to Resolve QuickBooks Error Code H101

How to Resolve QuickBooks Error Code H101?

QuickBooks error H101 is primarily a network related error that occurs when QuickBooks Desktop tries to switch in multiuser mode but due to network error it cannot connect to the server where the file is been requested. It is a specific error which usually indicates that multi-user hosting setup connection is not established properly or there is a problem in the network settings. QuickBooks Error H101 is one of the H series errors, other H series error are H101, H202, H303, and H505.

H series errors in QuickBooks refers to error which are occurred due to hosting problems. QuickBooks multi-user mode allows more than one user to access the same Company File at one time, to help make collaboration much easier in a business setting. For example, for a Business with lots of departments like accounting, sales, inventories etc. Further in this article we will go through the causes of errors, symptoms and how to resolve them.

What Causes QuickBooks Errors H101?

Hosting Configuration is Incorrect

The most common cause of QuickBooks Error H101 is incorrect configuration settings. In the multi-user environment, only the server computer should be able to set host to multi-user mode. If the workstations are set to host, it will hinder, leading to Error H101.

You may also read: How to Troubleshoot QuickBooks Error 15276?

Firewall Blocking Communication

Security software and Firewalls play a critical role in protecting the network, however, sometimes they may block the communication required for QuickBooks to function properly in multi-user mode. If the QuickBooks ports or executable files are blocked, the software will not be able to connect to the server, thus causing error.

Setting problems in DNS

Here the QuickBooks Error H101 occurs when DNS (Domain Name System) settings are incorrect or misconfigured. Because of this, efficiency of workstations gets obstructed, and the functioning of network services are not as smooth as required.

Check the related article: Methods to resolve QuickBooks Banking Error 179

QuickBooks Database Server Manager (QBDBMgrN) is encountering issue

Network-Issues-tab-QuickBooks-Database-server-manager

QuickBooks Database Server Manager is an essential service which allows  QuickBooks to access the company file which is stored on server. QuickBooks won’t switch to multi-user mode if the service is not configured or ran correctly.

Damaged or Missing .ND Files

In QuickBooks, .ND (Network Data) files are important to access company files over a network. These files facilitate multi-user mode by allowing the software to communicate with the server itself. If the .ND files are corrupted or missing , QuickBooks cannot establish a connection, hence Error H101 occurred.

Services are not started

QuickBooks services like QuickBooksDBXX and QBCF is not implemented.

IP Address is not reachable

Due to the computer is not able to ping the host computer means IP Address is not reachable. There is no connection between the host and user computer, this, results in Error H101.

Check also: How to Resolve QuickBooks Online Error code 1000?

Symptoms of QuickBooks Error H101

When the QuickBooks Error H101 occurs, we may experience several system symptoms which results in degradation of QuickBooks system performance. Additionally, users may experience themselves unable to open the company file which is stored on another computer as network issue is there, so there is further disrupts in workflow and productivity of the businesses. By identifying these symptoms early, users can take necessary steps to troubleshoot and rectify the error accurately.

 Let’s look at some symptoms of QuickBooks Error H101:

  • If the users are trying to switch to QuickBooks to multi-user mode, they may encounter an error message preventing the transit.
switch-to-multi-user-mode
  • The QuickBooks displays an error message which states “This company file is on another computer, and QuickBooks needs some help connecting.”
  • QuickBooks may crash frequently, which results in disruption of workflow of the businesses.
  • The QuickBooks software may run slower than usual working. This impacts the productivity of work.

Solutions for Fixing QuickBooks Error H101

Addressing QuickBooks Error H101 includes series of targeted solutions which is design to rectify network and configuration issues. This error prevents software from entering multi-user mode. The solution for Error H101 is to ensure that QuickBooks can communicate across the networks, thus restoring multi-user mode functionality. By following these solutions users can effectively troubleshoot and resolve the Error H101, minimizing disruptions and maintaining efficient workflow. Let’s quickly grasp the solutions:

Solution 1: Updating the QuickBooks to latest version

  • First you need to ensure that the QuickBooks are updated to the latest version.
  • For this, you need to go to Help > Update QuickBooks Desktop.
Updating-QuickBooks-Image
  • Click on Update Now and then select Get Updates.
  • By editing the host file we can resolve connectivity issues. Navigate the path to ‘ C:\Windows\System32\Drivers\Etc’.
  • Open the host file with Notepad as administrator and add IP address and server name at the bottom of the file (for example, 192.168.1.100 SERVER01’).
  • At end Save and close the file.

Read also: Fixing QuickBooks Error Code 108

Solution 2: Verifying Hosting settings

  • Make sure that only server is set to host multi-user mode.
  • Next step, open QuickBooks on each workstation, navigate to File > Utilities,
Stop-Hosting-Multi-User-Access
  • Ensure that Stop Hosting Multi-user Access is not selected on any workstation, only server should host multi-user mode.

Solution 3: Use QuickBooks File Doctor tool

QuickBooks-Tool-Hub-Icon.jpg
  • Open and Select Company File issues.
  • Run the QuickBooks File Doctor Scan and repair any issues, especially Error H101.

Similar blog: How to Fix QuickBooks Online Error 350?

Solution 4: Check Services

  • On server, check the QuickBooksDBXX and QBCFMonitorService are running.
  • Now open run dialog box by pressing Windows+R
  • And then type services.msc. Press enter key.
Type-services.msc_-1
  • Make sure that services are turned automatic. Start if they are not running. 

Solution 5: Configure firewall settings

  • Properly configured firewall as it can prevent from blocking QuickBooks.
  • Open control panel.
  • Go to System and security> windows firewall.
Windows-Firewall-setting
  • Click on advanced settings .
  • Create inbound and outbound  rules for QuickBooks port(8019,  56728, 55378-55382) and executable files (QBDBMgrN.exe, QBW32.exe, QBupdate.exe and QBDBMgr.exe).

Check this also: How to Troubleshoot QuickBooks Online Error 400?

Solution 6: Ping the Server

For checking network connection, open command prompt on each work station and type ping [your server name] for example, ping SERVER 01. Successful response shows good connection whereas as bad response, bad connection.

At last, We conclude that QuickBooks Error H101 is a network issue which requires proper configuring of files and verifying network settings which ensures server hosting company file is set up correctly. By following these steps we can troubleshoot and resolve the errors, ensuring QuickBooks switches to multi-user mode. You can refer to qbookserrorsolutions.com for further information or you can connect through helpline number +1-844-926-4607.

Easy Resolution of QuickBooks Unable to Backup Company File Error

Easy Resolution of QuickBooks Unable to Backup Company File Error

QuickBooks is an accounting financial tool which is used to keep an account of business transactions, income and expenses, employees remuneration, real time inventory management and tax filling functions. QuickBooks being an essential tool for managing finances in many businesses, occasionally encounters errors that can disrupt operations. One such problem arises when “QuickBooks unable to backup company file error”.

This article aims to give a comprehensive guide to effectively resolve these error and also you can get professional help from QuickBooks Error Support who with their impeccable services can assist your businesses in resorting the errors effectively.

QuickBooks-Unable-To-Backup-Company-File

Why QuickBooks is Unable to Backup File Error?


The QuickBooks unable to backup the company file error occurs when users try to create a backup of their company file. Many error codes can generated with the message, including QuickBooks Error 6xxx, unrecoverable errors, Error C=272, and Error C=343. Other errors include Error 3371 which could not initiate license property, Error H202 which refers to network issues in switch multi user mode in QuickBooks, Error 6123 which tells about lost company files in QuickBooks, and Error 1603 which show updation problems.

You may also read: What is QuickBooks Tool Hub?

Why Does the QuickBooks Backup Error Occur?

  • There are many factors which can contribute to the occuring of the QuickBooks backup error:
  • Company file is Damaged – Corrupted or damaged company file can not assist in backup process.
  • Name Length of File- Character s exceeding 65 in the company file name can cause errors.
  • Size of the File- If the file size is exceeding QuickBooks handling Capacity, it can cause errors in Backup.

These errors can be resolved through troubleshooting. But to still resolve them we need to follow some instructions. Let’s look at QuickBooks Backup error solutions:-

Solution 1: Using an External Hard Drive for Backup

  • Try to use an external hard drive which sometimes by overcome the issue of local drive problems.
  • First open the QuickBooks and go to file menu.
  • Now you have to select Save Backup or Copy.
  • Choose Backup copy and click Next.
QuickBooks-Backup
  • Opt for Local backup and click Next.
  • Select Save and then choose the destination folder on the external drive.
  • Complete the process and check if the error persists.

Read also: How to Fix Missing Employee in QuickBooks Desktop Payroll?

Solution 2: Company File Name Check

Follow the given instruction

  • One should ensure that company file name should not go beyond 65 characters. If do, follow the steps:
  • Set the location of company file in QuickBooks folder.
  • Check for the file which is causing error, right – click and select the rename.
  • Write a name less than 65 characters
  • Try to backup the file again.

Solution 3: Using verified and rebuild tools

  • To address data integration issues, QuickBooks have built in tools.
  • Go to Utilities menu of QuickBooks.
Rebuild-data-utility-Screenshot.png
  • Now select rebuild data option and follow the promp
  • Select verify data from the same menu, after rebuilding.
  • When no issues occurs, try backup again.

Check similar blog: Procedure to Merge list Entries in QuickBooks Desktop

Solution 4: Relocation of the Company File

Relocating the file to different location can resolve backup problems.

  • Go to the location where you have stored company file.
  • Right click on the file and select copy option.
  • Paste thes copied file either on the desktop or some location where you can access the file.
  • Now open the QuickBooks and try to backup again the file.

By following these solutions we can resolved the QuickBooks company file problems, which helps to perform data integration and backup.

Additional Tips and Considerations

The additional steps you can take to ensure data backup other than this in QuickBooks:

  • Regular Updating the software: You need to ensure that QuickBooks is timely updated with the latest version available Updating the software includes removing patches, troubleshooting and debugging of problems occurred due to updation.
  • Using Data Cleanup tools: Timely cleaning up the data of the QuickBooks reduces the chances of encountering errors which was due to unnecessary data stored.
  • Seeking help from the experts: If you are not able to resolve the problem, hand on the problem to experts as they will take and resolve the problem easily. QuickBooks error solutions is one platform for all your solution to recover the files.

Conclusion!


QuickBooks error management requires professional dealing and lot of expertise. For instance, managing the QuickBooks unable to backup the company file error can be which can be mess up. Though a systematic approach can be implemented to resolve the errors effectively. However sometimes DIY approach can’t be success so you need to seek to QuickBooks Support professional, they helps like With there tailored services and professional support, businesses can focus on growth rather than bogged by technical glitches. Do not hesitate to contact us through our live chat and dedicated helpline number: +1-844-926-4607.

Recommended to read:

Troubleshoot Backup Company File issues in QuickBooks Desktop?

Methods to Update QuickBooks Desktop to the Latest Release

Set up Folder and Windows Access Permissions to Share Company Files

Using the QuickBooks Desktop at Multiple Locations

How to Use QuickBooks Desktop at Multiple Locations?

Multi user mode of QuickBooks is an advanced feature in the software. It gives you the freedom to use QuickBooks Desktop at multiple locations. Once switched to the multi user mode, the systems are classified into the server system, which acts as the Host, and the Workstations, comprising of the other systems. This feature is pretty unique and Intuit has done a great job in keeping it devoid of any technical errors. So, how to use it? No worries as we are here to assist. Just wind up through the full length of this blog.

What are the steps to use QuickBooks Desktop at multiple locations?

The walkthrough to use the multi user mode is simplified as follows:

Step 1: Mapping the Network Drive

The initial process requires mapping of the Network Drive in Windows. This involves the below mentioned set of steps:

  • Start using the Windows key on the keyboard on the bottom left corner.
  • Following this, you need to go for “This PC” and open the same.
  • The next step involves choosing  the option for Mapping network drive.
  • Herein, you should make choice for an unused drive and later click on Browse.
  • The next move requires heading for network location. This harbours the Company files.
  • Go for the Ok option and this should follow with a click on Finish.
  • The final step requires Reopening of the Company file by means of the mapped drive.

You may also read: How to Fix Missing Employee in QuickBooks Desktop Payroll?

Step 2: Setting systems for multi user mode and the folders with Company files

This step involves the pointers as below:

  • From the Start tab in Windows, the File Explorer needs to be opened.
  • Immediately, search for the Company file folder, then right-click the same
  • Then proceed by opting for the Properties which should then follow by choosing Sharing and the Share Add options.
  • Afterwards, go for the “QBDataServiceUser” file in accordance to the QuickBooka version installed on the system.
  • Finally, you need to accord permission levels for users as “Full Control”.
  • When all the steps are being successfully done, make a choice for “Share”

As the Systems and the Folders are rightly set for use in the multi user mode, you can initiate the hosting as per the following instructions.

Step 3: Enabling Hosting of Company files

This simple process is:

  • Firstly, make a choice for File, and from the drop-down options, go for Utilities.
Stop-Hosting-Multi-User-Access
  • Herein, the choice for hosting multi user access needs to be made, followed by a click on Yes.

Read also: How to Troubleshoot Backup Company File issues in QuickBooks Desktop?

Step 4: Setting up QuickBooks Database Manager

This needs installation of the Database Manager on the main system. And once that has been done, the next process is:

  • Opening File menu in QuickBooks.
  • Herein, making a choice for switching to multi user mode
switch-to-multi-user-mode
  • Clicking on Yes, and then the Ok option on the setup window.
  • Now head for Company and here you need to choose the users as per your requirements that you want to be part of the multi user access.
  • Go for Users, and then opt for setting up Users and Roles
  • Final step is to choose Yes.
  • Once that is completed, you host the Company file and the Workstations can access the server.

Conclusion!

The purpose of this article was to disseminate the advantages of an astonishing feature of QuickBooks – The multi user mode. This can help users in using QB Desktop at multiple locations without any breach of privacy or other ancillary security issues. Resolution of QuickBooks queries is always our main focus and if you have any, you can always communicate the same to our QuickBooks Support team. We can be communicated by means of the dedicated helpline +1-844-926-4607. Another alternate that can be used for establishing contact is using the Live chat option.

Recommended to read:

Update QuickBooks Desktop to the Latest Release

Set up folder and Windows Access permissions to share Company Files

Methodologies to Resolve IIF Import Error in QuickBooks Desktop

How to Troubleshoot QuickBooks Error Code H303

How to Troubleshoot QuickBooks Error Code H303?

In recent times, QuickBooks users have encountered many issues in the multi-user mode whenever multiple workstations are trying to establish connection with the server system. These errors comprise of QuickBooks Error H202, H303, H505 and other such errors. In this discussion, our focus shall be the absolute troubleshooting of QuickBooks Error H303. We shall also be going through the various causes that may lead to such errors.

So, continue reading till the end to get a thorough knowledge regarding fixing of Error H303.

QuickBooks Error H303

What causes contribute to QuickBooks Error H303?

There is a comprehensive list of factors that can result in QuickBooks multi user error H303. Some of these are listed below:

  • One of the major causes of this multi user mode error is the blocking of the network by the firewall
  • Another factor can be damaged Network files having .ND extension
  • The internet connectivity may not be smooth
  • Host configuration is not done properly
  • The DNS might be incorrectly set or there might be some mismatch in the port numbers.
  • Some kind of damage caused to the Company file might also be a possibility.

You may also read: How to Fix QuickBooks Error 15276?

How to identify QuickBooks Error H303?

Such a multi user error in QuickBooks can be recognized by the advent of the following events:

  • System experiences frequent lagging or crashing
  • Unable to host the Company file in the multi-user mode
  • QuickBooks shuts down all of a sudden when the multi user mode is being accessed.

Methods for solving QuickBooks Error code H303

You can implement the following methods for the effective resolution of QuickBooks Error H303. The methods are:

Method 1: Running QuickBooks File Doctor Tool

  • You first need to terminate all the background programs and then download QuickBooks Tool Hub from the Intuit website.
QuickBooks-Tool-Hub-Icon.jpg
  • Get the program installed by double-clicking the downloaded file.
  • You can then run QuickBooks Tool Hub and after that go for the Company File Issues option.
  • From here, you need to Run QuickBooks File Doctor and then Browse for your Company file.
QuickBooks-file-doctor-from-tool-hub-Screenshot-Image.png
  • After making the choice of the Company file, you need to click on Next.
  • Wait for the process to end and again check with the multi user mode.
  • If still the error shows, go for the next method.

You must read: Troubleshoot QuickBooks Error Code 179

Method 2: Run QuickBooks Database Server Manager

Follow the below given points:

  • Initially run the QuickBooks Tool Hub and immediately go for the Network Issues tab.
  • You can subsequently go for the QuickBooks Database Server and initiate the option to Start Scan.
QuickBooks-database-server-manager-Start-Scan
  • This tool shall automatically resolve firewall related issues.

Method 3: Stop and Restart Multi user configuration

Incorrect Host settings can also be a major reason behind QuickBooks Error code H303 when trying to open the multi user mode. The steps to get your host settings configured are:

  • Go for the launching of QuickBooks and then hit the File menu.
  • This should be followed by a click on Utilities and then a click on the option to Stop Hosting Multi User Configuration.
Stop-Hosting-Multi-User-Access
  • You should then restart the Hosting, by going to the File menu and clicking on Host Multi User Configuration option available in the Utilities section.

Read also: How to Resolve QuickBooks Online Error 1000?

Method 4: Making corrections in the Firewall settings

Incorrect Firewall configuration may also contribute to QuickBooks Error code H303. To get these sorted out, you need to perform some simple steps:

  • Your first step should be a click on the Control Panel and then you should open Windows Firewall settings.
Windows-Firewall-setting-1
  • The next step should be a click on the option to Allow a program through firewall
  • You simply need to add QuickBooks in the list of exceptions and then save the changes.

Method 5: Incorporating the correct ports in the Firewall settings

The steps are discussed in the following lines:

  • Go for the Start menu and after that hit on Windows Firewall.
  • Then, make a jump to the Advanced Options menu, followed by a click on New Rule.
  • Subsequent to that, you need to go for the Port option and choose “Next”.
  • Depending on the version of QuickBooks you are using, you need to incorporate the correct ports. The relevant ports are mentioned below for your reference:
    • For QuickBooks 2020: 8019, XXXXX
    • For QuickBooks 2019: 8019, XXXXX
    • For QuickBooks 2018: 8019, 56728, 55378-55382
    • For QuickBooks 2017: 8019, 56728, 55373-55377
  • It is pertinent to note that XXXXX refers to the dynamic port number.
  • After typing in the port number, you are supposed to click on Next, and then choose the option to Allow the Connection. Then, hit Next again.
  • Now, go for marking of all the Profiles then choosing Next.
  • You then need to create a new rule namely QBPorts(year) and then hit on Finish once you are done.

Similar article: How to Fix QuickBooks Error Code 108?

Method 6: Change the Company file’s location

Moving the Company file to another location can also resolve QuickBooks Error H303. The process involves:

  • Heading to the QuickBooks folder and then to the folder containing the Company files.
  • Here, you need to identify the Company file leading to Error code H303.
  • Then, simply right-click the file and copy it from the source location.
  • Now, you can go to your Desktop and paste the file there.
  • Next time when you open QuickBooks, you need to open this file copied on the Desktop.
  • This has fixed the QuickBooks multiuser error H303 in many cases.

Conclusion!

This blog covered all the essential information crucial for troubleshooting QuickBooks Error H303. In instances of any queries or confusion, you can straightaway give our QuickBooks support experts a call at our dedicated helpline +1-844-926-4607, or as an alternative, you can also connect with us through the Live chat, always accessible on our website.

Important topics:

How to Resolve QuickBooks Online Error 350?

How to Troubleshoot QuickBooks Online Error 400?

How to Resolve QuickBooks Payroll Error PS032

How to Resolve QuickBooks Payroll Error PS032?

Payroll errors are common in QuickBooks and they have created many issues for users by delaying work submissions and even leading to the loss of data. This article focuses on QuickBooks Error PS032. Just like the other payroll error codes belonging in this category, this error appears when you try to access your payroll. An error message appears stating that QuickBooks has issues while installing the updates for the Payroll Tax Table. But you need not worry because this article will help you in fixing QuickBooks Payroll Error PS032.

An overview of QuickBooks Error PS032 and its Causes

This payroll error appears as an error message stating “QuickBooks is facing trouble while installing payroll update’. Some of the noteworthy errors of this error are:

  • The presently installed tax tables are outdated or are damaged.
  • QuickBooks Subscription may be lapsed or expired.
  • The Company files may be facing corruption
  • Farewell misconfiguration could also be one of the possible causes of QuickBooks Error PS032.

You may also read: How to Fix QuickBooks Error 15276?

Essential Pre-requisites before troubleshooting QuickBooks Error PS032

Before proceeding with the troubleshooting of Error code PS032, you need to ensure the following pointers:

  • Payroll subscription should be active
  • QuickBooks Company files need to be necessarily backed up.
  • Latest Billing information should be updated in the payroll account.

Methods for fixing Error code PS032

This section will help you resolve this payroll without any technical difficulty. So, keep reading!

Method 1: Checking the status of QuickBooks payroll subscription

The first method requires you to make it certain that the QuickBooks subscription is fully active and not expired. For this, the steps to follow are:

  • You should first launch QuickBooks as an admin.
  • And this should proceed with a click on the Employees menu, followed by the My Payroll Service option
  • You should then go for the option to Manage Service Key
  • Now, check the Service Name and followed with Status
  • Herein, the status should be Active
  • You then need to click on the Edit option for checking the Service key
  • Incorporate the key in case its not correctly mentioned
  • Then, hit on Next and unmark the option to Open Payroll Setup
  • Finally, you need to click on Finish.

Users may also read: Troubleshoot QuickBooks Banking Error 179

Method 2: Updation and Activation of QuickBooks

It should be cross-checked that QuickBooks is updated to the newest version and also activated. If this is not the case, then you should do the same. The process for the same is:

  • First of all you need to run QuickBooks and then press the F2 key to reveal the Product Information window.
  • Beside the license number, Activated status should be showing up. Otherwise, click on Help and after that, choose the option to Activate QuickBooks Desktop.
  • You should then get the program registered and once that is done, you should update QuickBooks by a click on Update QuickBooks Desktop option in the Help tab.
Updating-QuickBooks-Image
  • Finally, you can go for the Update Now option, followed by a click on Get Updates option.
  • This will initiate the downloading of the update. You can later open QuickBooks and this will start the installation of the update.

Method 3: Using Quick Fix My Program

QuickBooks Tool Hub is an incorporation of multiple troubleshooting features to resolve QuickBooks Error PS032. One such feature is Quick Fix My Program. The steps for using the same are:

  • First, make sure that all the background programs are closed in the background
  • Then you should go to Intuit website and download the setup file for QuickBooks Tool Hub. Then, install the same.
quick-fix-my-program-from-tools-hub
  • You can subsequently open the tool and go for the Program Problems tab.
  • From here, you should directly choose the “Quick Fix My Program” option.

Must read: How to Resolve QuickBooks Online Error code 1000?

Method 4: Updating Payroll Tax Table

One of the most common causes of QuickBooks Payroll Error PS032 is when the tax tables are not updated to the latest version. The same can be updated as follows:

  • You first need to run QuickBooks and after that go for the Employees tab.
  • Now, go for the Get Payroll Updates and followed by that, click on Download Entire Update option.
  • This should be followed by a click on “Download Entire Update”.
  • This process should successfully update QuickBooks Payroll Tax Table.
Update Payroll tax table

Method 5: Renaming the CPS Folder

A simple change in the name of the CPS folder can potentially resolve QuickBooks Error PS032. The steps for the same are:

  • Go to the QuickBooks folder and then to the Payroll folder.
  • You now need to identify the CPS folder and right-click on it.
  • Now, choose the Rename option and change the name of the folder.

Related article: What is QuickBooks Online Error 108?

Method 6: Disabling the User Account Control (UAC)

The process for turning off the UAC is:

  • Go to the Control Panel first and from there choose the User Account Control option
  • Then you need to shift the slider to the Never Notify option.

Method 7: Renaming the ecml file

The procedure for renaming this file to troubleshoot QuickBooks Error PS032 is:

  • Go to the QuickBooks folder and look for the EntitlementDataStore.ecml file and once it is identified, you need to get it renamed.
  • Just add “.old” at the end of the file name and this should do the trick.
  • Next time when you open QuickBooks Payroll, a new ecml file shall be created.

Conclusion!

These strategies to fix QuickBooks Error PS032 should effectively resolve the error on your system. If you need any technical help, you can call our QuickBooks support experts any time by giving us a call at the helpline +1-844-926-4607. Another option to connect with us is through the Live chat option.

More similar topics:

How to Resolve QuickBooks Online Error 350?

How to Troubleshoot QuickBooks Online Error 400?

Methods to Fix QuickBooks Error 3371

How to Fix Bank Error 102 and 105 in QuickBooks Online

How to Fix Bank Error 102 and 105 in QuickBooks Online and QuickBooks Self-Employed?

One of the best characteristic of QuickBooks is that it allows banking operations without any need for manually opening the banking website. But in some cases, certain issues related to the bank can be encountered by users. This blog shall discuss two such errors – QuickBooks Error 102 and 105 encountered in QuickBooks Online and QuickBooks Self Employed.

Keep reading the blog till the conclusion to fix Error 102 and 105.

What is QuickBooks Error 102 and 105 in QuickBooks Online and QuickBooks Self Employed?

In most of the cases, Error code 102 and Error code 105 are observed due to some issues at the bank server, or some server maintenance going on at the bank’s end. This leads to a temporary disruption of the connection, manifesting in the form of Error 102 and 105. Although these errors, most of the times, can fix in 24 hours, if it still remains, it can be resolved using some manual solutions discussed in the subsequent section.

You may also read: What is QuickBooks Error 15276?

Causes behind QuickBooks Error 102 and 105

These banking errors can occur due to the following reasons:

  • Web browser related issues
  • Server maintenance going on at the bank end
  • Network connectivity is not smooth.

Solutions to handle Error 102 and 105

Banking errors, including QuickBooks Error 102 and 105, can be resolved by performing the following solutions:

Solution 1: Updating the bank transaction manually

For QuickBooks Online users:

  • The first step requires signing in to QuickBooks Online account.
  • This should be followed by a move to Transactions.
  • Now, go for the Bank Transactions option.
  • Afterwards, you need to click on the Update option.

For QuickBooks Self-Employed users:

  • In the beginning, go for signing in to your QuickBooks Self Employed account.
  • Followed by that, choose the profile icon and afterwards go for Bank accounts.
  • Click on the Refresh all option.
  • This should effectively contribute towards the resolution of the error.

Related article: How to Resolve QuickBooks Banking Error 179?

Solution 2: Check the bank website

Sign in to your bank account through the official bank website. If the website is not accessible, the next step should be reaching to your Bank or Credit card company to get the issue resolved from their end. Also, you should go for reviewing of the account page, transactions and account history.

Solution 3: Using the Incognito mode to sign in

Sometimes, a browser related issue can also evoke QuickBooks Error 102 and 105 in QuickBooks Online and QuickBooks Self Employed. It is recommended to try accessing QuickBooks Online in the Incognito mode of your browser. Although the same can be accessed through the browser menu, below are mentioned the shortcuts for the same:

  • Google Chrome – Ctrl + Shift + N
  • Mozilla Firefox – Shift + Ctrl + P

That should fix the error(s).

In the scope of this discussion, our focus was on QuickBooks Error 102 and 105 and we highlighted the causes and troubleshooting steps to resolve these QuickBooks banking errors using some simple steps. Pertinently, most of the banking errors are temporary in nature and get resolved automatically once the bank server maintenance is done. However, in the other cases, where the errors are due to other causes, getting them fixed can be slightly tricky. If you are still facing the error and need technical support for the same, you can call our QuickBooks Support experts at the helpline +1-844-926-4607. One more walkway of reaching us is through the Live chat option on the website itself.

Recommended to read:

How to Fix QuickBooks Online Error code 1000?

Fixing QuickBooks Error Code 108

How to Resolve QuickBooks Online Error 350?

Different Solutions to Resolve QuickBooks Error H202

Different Technical Methods to Fix QuickBooks Error H202

Multi-user mode is an advanced feature in QuickBooks which allows many users to work on the same Company file in QuickBooks at the same time. But in some cases, this feature can face problems that can appear in the form of different error codes like QuickBooks Error H202. It belongs to the HXXX series, all errors in which are related to the multi-user mode issues in QuickBooks. This article will focus on the various walkways to fix Error Code H202. So keep reading!

QuickBooks-Error-H202

Inference of QuickBooks Error H202

This QuickBooks Error appears as you try switching to the multi-user mode. This issue means is mostly caused by some intrusion in the multi-user mode disrupting the connection to the server. The error appears as “Error code H202 This Company file is on another computer and QuickBooks requires help connecting”.

You may also read: Fixing QuickBooks Error 15276

Causes of QuickBooks Error H202

The reasons of this error can be many, but the most common ones are:

  • Multi-user mode setup is facing issues
  • Hosting configuration is incorrectly set up
  • Firewall is blocking your connection
  • There is a DNS issue
  • Network file with .ND extension may be suffering from some damage.

Resolve the multi-user mode QB Error H202

This multi-user mode error can be easily resolved by following the solutions explained below:

Solution 1: Using QuickBooks Tool Hub

For using this troubleshooting feature, you are supposed to first download the Tool Hub from the Intuit site. Then follow the below given steps:

QuickBooks-Tool-Hub-Icon.jpg
  • This will initiate the installation and you should be patient until this process reaches a conclusion.
  • Once install is over, you can launch the Tool Hub program.
  • Then hover to Network issues and click on the same. Then make a choice for QuickBooks Database Server Manager.
Network-Issues-tab-QuickBooks-Database-server-manager
  • Now, you need to go for the option to “Start Scan” if the folder for the Company files is visible, else you can manually choose if after clicking on Browse, and finally click on Start Scan.
QuickBooks-database-server-manager-Start-Scan
  • This process shall allow QuickBooks Database Server Manager to make repairs as well as firewall permissions.
  • You can subsequently launch QuickBooks on the workstations to check if this corrects QuickBooks Error H202. Simply go to File and then to the option “Switch to Multi-user mode”.
switch-to-multi-user-mode

Must read: How to Troubleshoot QuickBooks Banking Error 179?

Solution 2: Use the QuickBooks File Doctor Tool

QB File Doctor is a useful tool to resolve Company file related errors. It is one of the sub features of the QuickBooks Tool Hub and if you have already installed the Tool Hub in the previous solution, then using this too is pretty easy. The steps for the same are:

  • Run the QuickBooks Tool Hub and then go for the Company File issues tab.
  • Now, you need to run the QuickBooks file Doctor Tool and initiation of its operation may take some minutes. Wait till then and then Browse for the company file which is inciting Error H202 when trying to run it in the multi-user mode.
QuickBooks-file-doctor-from-tool-hub-Screenshot-Image.png
  • Click on the option to Check your file and Network and hit on Continue.
  • Type in your admin password and following that click on Next
  • Now, you should try to access the multi-user mode on your workstations.

Solution 3: Checking the services on the Server computer

  • Open the Server system and after that open Run. Now, type in Servces.msc in Run and hit Enter. The Run window can be opened using the Win + R shortkeys.
Type-services.msc-in-Run-Box
  • In the Service Window which appears on screen, look for QuickBooksDBXX and double tap on it. XX represents your version.
  • Now, you need to choose the Automatic option in the Startup Type.
  • It should be made sure that the Service status is in active state. If not, click on Start option to get it going.
  • Now, you are supposed to go to the Recovery tab and choose the option to Restart the Service for – First failure, Second failure, and Subsequent failures.
  • Now, choose the Apply option at the bottom of the window and hit on Ok.
  • You should go for the repetition of these steps for QBCFMonitorService as well
  • You should then run QuickBooks on the workstations, then head for File, and then to the option to Switch to Multi-user Mode.

Check also: How to Resolve QuickBooks Online Error code 1000?

Solution 4: Incorporation of services to Windows admin group on the server

It is pertinent to grant the admin permission s to QuickBooksDBXX and QBCFMonitorService on the server system. For this the steps are:

  • Open the Windows Explorer using Win + E keys.
  • Now, identify the Company file folder and right-click on the same. Then choose Properties.
  • Go for the Security tab and then go for Advanced.
  • Opt for QuickBooksDBXX and choose the edit option. Then allow the following settings:
  • Read Extended Attributes
  • Create Files/Write Data
  • Traverse Folder/Execute File
  • List Folder/Read Data
  • Read Attributes
  • Write Attributes
  • Write Extended Attributes
  • Read Permissions
  • Create Folders/Append Data
  • Do the same for QBCFMonitorService also.
  • Then, you also need to establish sharing permissions for the Company files. The steps are:
  • Go to File Explorer, and followed by that right-click the Company file folder.
  • Choose Properties and after that go for Sharing. Click on the Share Add option.
  • Now, opt for QuickBooksDBXX and hit on Full Control and hit on Share.

Solution 5: Pinging the Server from Workstation

Connectivity can be checked by pinging the server. The process is:

  • From the Start menu, go for Network and Sharing Center. Then choose the option for Changing advanced sharing settings.
  • Then, you can enable network discovery in the Network Discovery and File and Printer sharing.
  • Next, you need to obtain server name. It can be done as follows:
  • First, go to Windows Start menu and access the Run window. For this you can directly use Win + R keys.
  • Then type in “cmd” and hit Enter to open the command prompt.
  • When the command prompt does show up, you need to enter “ipconfig/all” and press the Enter key.
  • From the details that appear in the Command prompt, check the Host Name in the IP configuration. The name of the server should appear on the right side.
  • Note it down.
  • You now need to go again to your workstation and open the Command prompt using the same steps as mentioned above. Open Run and type in cmd and then Enter.
  • In the Command prompt, type in “ping [your server name]”, then hit the Enter key. The server name is the same which you noted down in the previous step.
  • Do the same for all the workstations
  • If there is no packet loss, then al is good. Otherwise, in case of packet loss, restart your router and if that doesn’t fix this packet loss issue, then you need to check with your internet service provider.

Conclusion!

With that, the article on how to fix QuickBooks Error H202 comes to a close. We are hopeful that it served the purpose. If you need any technical help, you can straightaway call out QuickBooks support experts at +1-844-926-4607 or if that doesn’t transpire, then you can reach us our via the Live chat option.

Similar articles:

How to Fix QuickBooks Error Code 108?

Methods to Resolve QuickBooks Online Error 350

Troubleshooting QuickBooks Online Error 400

How to Fix QuickBooks Error PS038 when running Payroll

How to Troubleshoot QuickBooks Error PS038 when Running Payroll?

QuickBooks has proven to be an excellent accounting program with capabilities over-exceeding the expectations of its users. It has evolved into a game changer in the accounting sector. One of the most important domains in which this software has made major strides is the payroll management. But while you leverage the payroll features of this program, you may come across different forms of technical error codes. QuickBooks error code PS038 is one such error of the series “PSXXX” and this error is usually observed as you run the payroll.

Read this blog so as to learn more about this error, getting a firm grasp of its sources and the advanced strategies to fix QuickBooks Error PS038.

QuickBooks-error-PS038

When is QuickBooks Error Code PS038 observed?

This payroll error can be encountered in the following instances:

  • When you try to run payroll
  • Download updates for the tax table
  • In case the paychecks get frozen at Online to Send option.

You may also read: How to Fix QuickBooks Error 15276?

What causes QuickBooks Error PS038?

The primary suspected causes of this error are listed as follows:

  • The tax table installation is not done correctly
  • Old stuck paychecks may be existing
  • QuickBooks has not been updated since long to its newer versions
  • The Company file has lost its data integrity and needs to be rebuilt.

Troubleshooting steps to fix QuickBooks Error PS038

This payroll error can be resolved if you carefully implement the steps discussed in this segment. Each of these solutions has been heretofore tried and tested by our QuickBooks experts and these have proven effective in resolving QuickBooks Error PS038. So, keep on reading!

Step 1: Updating and backing up QuickBooks data

Steps to update QuickBooks Desktop

The first pre-requisite is to make sure that QuickBooks is updated to the newest release. For this, the easy steps are:

  • Launch your QuickBooks program as usual and hover your mouse on the Help tab at the top menu.
  • You then need to click on the same, and this will unveil a list of dropdown options.
  • From these options, you need to choose the option to Update QuickBooks Desktop.
Updating-QuickBooks-Image
  • Then, go for the Update Now option, also make sure you choose the Reset Update checkmark before you head to the Get Update option.
  • Clicking on Get Update option will initiate the download process. After that is done, you need to open QuickBooks again and click on Yes on the install prompt which appears on screen. This shall complete the installation of QuickBooks update.

Steps to create backup of QuickBooks data

As the update is done, you then need to go for the creation of your QuickBooks data. The steps for the same are:

  • Run QuickBooks and move to File menu.
  • From here, an option to Switch to Single User mode should be visible. Click on it
  • Now, go for the File menu again and click on Backup Company option.
  • Followed by this, you should click on the option to Create Local Backup
  • The, choose the Local Backup option, followed by clicking on Next.
  • This shall take you to the window for Local Backup. Herein, you need to choose Browse and select the destination for saving the backup file.
  • Also you can choose the number of backups. Within “Online and Local Backup” section, choose Complete Verification option. This shall verify the integrity of the backup file to check if everything is alright.
  • You should then hit on Ok.
  • Finally, you need to go for “Save it Now” option and then click on Next.
  • This finalizes the creation of the backup of Company file in QuickBooks.

Must read: Troubleshoot QuickBooks Banking Error 179

Step 2: Sending payroll or Usage data

For this, the points to be followed are:

  • Head to the Employees tab and then choose the option for My Payroll Service.
My-payroll-Services-Image.png
  • After this, your next choice should be a selection of Send Usage Data. Just in case this option is not appearing on the screen, head for the Employees tab and followed by that, choose the option to Send Payroll Data.
  • Subsequent step is to hit on the option to Send/Receive Payroll Data, and then choose the Send All option.
  • Once asked for, you need to type in the correct Payroll Service Pin here.

Step 3: Identifying any stuck paychecks

Identification of stuck paychecks requires you to proceed as follows:

  • First of all, you have to go for the Edit menu and there, click on the Find option.
  • Here go for the Advanced option and then the Choose Filter menu.
  • Head to the Detail section within the Filter menu and choose Summary only option.
  • You should then retract your path to the Filer list and go for the selection of Online Status option.
  • Hit on Online to Send option and then choose Find.
  • Herein, you are required to check and note down the number of matches in the Find section.

Check also: How to Resolve QuickBooks Online Error code 1000?

Step 4: Verify and Rebuild data

Another crucial step for the troubleshooting of Error PS038 is verification of the data integrity of Company file and in case of any integrity issues, rebuilding the Company file. The steps to be followed are:

  • First step is to go to File menu, and then Utilities, and finally to Verify data option.
Naviagate-Utilities-Option-Screenshot.jpg
  • Using this option, you should verify the data integrity of your Company file(s).
  • In case of any issues related to the data integrity, you should use the Rebuild data tool available in the Utilities tab in the same list containing the Verify data option.
  • Use this tool and get the Company file rebuilt. You can again go for the Verify data tool for cross checking if the Company file integrity is not compromised.

Step 5: Toggling the stuck paychecks

This step requires you to do the following:

  • You first need to go for the old paychecks that are stuck. Then, choose the Paycheck Detail option.
  • Go for the Review Paycheck section and therein, within Earnings, you need to incorporate earnings list in the shape of the previous item in the list
Review-Paycheck-Image.png
  • With that, Net Pay Locked notification will pop up and you need to choose No.
  • There should be no alteration in the tax amount and net pay. Once ensured, hit on Ok.
  • You should click on Yes on any message related to Past Transaction.
  • Then, choose the Save and Close option and follow by clicking on Yes on the Recording Transaction message.
  • You should then reopen your paycheck and choose the Paycheck Details option.
  • Go for the deletion of the earnings items incorporated in the early steps of this troubleshooting walkthrough in the Earnings section.
  • Again, no change should be made in the tax amounts and the net pay. Then hit on Ok.
  • These steps should be repeated for every paycheck which is stuck and identified earlier.
  • Once done, you should again start with downloading of the tax table update.
  • Now, while opening Payroll, Error PS038 should no longer be appearing.

Read also: Fixing QuickBooks Error Code 108

That’s it!

This discussion wraps up at this point. We incorporated all the details related to QuickBooks Error PS038, which include its causes and the various troubleshooting steps to fix PS038. Payroll related issues are not uncommon in QuickBooks and you can come across such errors at any time. If you are seeking future assistance to tackle such issues, you can subscribe to our unprecedented QuickBooks Support Services. We are reachable at the helpline 1-844-926-4607 or through the Live chat option on our website.

Recommended to read:

How to Resolve QuickBooks Online Error 350?

How to Troubleshoot QuickBooks Online Error 400?

QuickBooks Error code -1, 0 in QuickBooks Desktop

Upgrading QuickBooks to QuickBooks 2024 Pro, Premier, Accountant and Enterprise

How to Upgrade QuickBooks Desktop to QuickBooks 2024 (Pro, Premier, Accountant and Enterprise)?

One major factor which drives accountants towards the different products of QuickBooks is that Intuit comes up with updates and versions every now and then to keep the accounting program free from technical errors and glitches. This year around too QuickBooks 2024 has been launched already and this is already driving QuickBooks users towards upgrading to the newer version. This blog shall offer inputs on the advantages experienced when you upgrade QuickBooks Desktop 2024 for QuickBooks Pro, Premier and Enterprise versions. Let’s dive in to know more.

Major Advantages to upgrade QuickBooks Desktop 2024

QuickBooks 2024 has integration of advanced features facilitating automation of daily accounting tasks, tracking of payments and invoices and prepayments, upgraded security, and a myriad of other features. The benefits subsume the following:

  • Enhanced management of financial operations and cash flows
  • Transactions can be recorded even using the Google Chrome
  • You can get together in collaboration with your team members for easy sharing of data and accounting files.
  • Enhanced speed of operations and productivity enhancement as compared to the predecessor versions
  • Compatibility with Windows 10, allowing you to keep a track of accounting processes with QuickBooks Desktop 2023.

You may also read: Fix Missing Employee in QuickBooks Desktop

System Requirements for QuickBooks 2024

The best part about QuickBooks 2024 is that it has optimized system requirements. The system requirements are tabulated below:

QuickBooks 2024 System Requirements
Operating SystemWindows 10 is supported by MS Windows 8.1 and the updated version of the same is recommended.Windows Server 2012 (or R2), Windows Server 2016 or Windows Server 2019.The following Operating systems are Not-Supported:Windows 8.1Windows 10 S modeWindows 11 IOT, and Linux
Processor2.4 GHz processor is required
RAMMinimum of 4 GB RAM is required and 8 GB of RAM is recommended
StorageRecommended disk space is 2.5 GB.Extra space is mandated for user data files
DVD Drive4x DVD-ROM drive
Internet ConnectionQuickBooks Payroll and Online features require Internet access and 1 Mbps is the recommended speed for the same
License and CredentialsProduct registration is necessitated
Screen ResolutionThe required resolution is 1280×1024 or higher Optimized for Default DPI settings
Requirements of DesktopOne workstation monitor supported plus up to 2 extended monitors
Server RequirementsWindows Server 2016Windows Server 2019Windows Server 2022 (Regular or Small Business Server)
Browser RequirementsGoogle Chrome

Presently installed release of QuickBooks Desktop
The steps for checking the current release of QuickBooks on your system is as follows:
You first need to run QuickBooks as an admin
You then need to pres and hold the F2 key on your keyboard. This should open the Product Information Window.
Herein, you can check the version of your QuickBooks, which can include:
QuickBooks 2024 R1
QuickBooks 2023 R7_25
QuickBooks 2022 R9_74
QuickBooks 2021 R13_19

Important Points to Note before upgrading to QuickBooks 2024

The necessary pointers that should be kept in mind before commencing the upgrade process are mentioned below:

  • Make a thorough check on the minimum system requirements mentioned in the above section.
  • Make sure to create a backup of your QuickBooks files to prevent loss of crucial data.
  • Go for the verification and rebuilding of your Company files to check and fix any file integrity issues.
  • Ensure you temporarily turn off your antivirus and firewall while the upgrade to QuickBooks 2024 is in progress.

Also read: Procedure to Merge list Entries in QuickBooks Desktop

Walkthrough to Upgrade to QuickBooks Desktop Pro, Premier and Accountant 2024

There are multiple strategies that can be used for upgrading to QuickBooks 2024. These are discussed as follows:

Automatic Update method

The steps for automatic update are mentioned below:

  • At first, you need to launch your existing QuickBooks version then go for the Help tab.
  • Now, herein, you need to identify and choose the option to Update QuickBooks Desktop.
Updating-QuickBooks-Image
  • An update window shall open and here you should click on the Update Now option.
  • This should be followed by a click on Get Updates.
  • When the download is done, you need to open QuickBooks and this will install the update automatically.

Manual Update method

Manual method involves downloading of the setup file for the update directly from the official website of Intuit. The process involves the following steps:

  • The initiation step if to open the compatible web browser, preferably Google Chrome and type in the URL of Intuit and open the site
  • After opening the site, go to the Download section and search for the latest available upgrade of QuickBooks 2024 and download the file.
  • You can then open you download section and open the same downloaded file to get it installed on your computer.
  • After successful completion, you can run QuickBooks and the program should be installed to the latest version.

Must read: Set up Folder and Windows Access Permissions to Share Company Files

Steps to upgrade to QuickBooks Desktop Enterprise to the newest version

To get the QB Enterprise version set up to the latest version, the steps to be followed are:

Step 1: Getting your Company files ready for the update

  • Run QuickBooks and then you need to go for the Company menu.
  • From here, choose Users, followed by a selection on Edit the Admin User.
  • Here, you should remove all the special characters from the name and ensure the extension as .qbw.
  • Now, you can run QuickBooks again and following that, go for the File tab<Utilities<Verify Data.
Naviagate-Utilities-Option-Screenshot.jpg
  • This will verify the Company file for any data integrity issues. If the same are identified, you need to use the Rebuild Data option in the same Utilities option.

Step 2: Installing the latest QuickBooks Enterprise version

Follow the below steps to Install latest QuickBooks Enterprise version

  • For this, the first step you need to follow is to download the newest version of QuickBooks Enterprise from Intuit.
  • Then, you can open the file to initiate the Install process.
  • Herein, the next step should be the selection of Server Install, followed by choosing Database Server and QuickBooks Application.
  • Wait till the installation is complete.  You should afterwards open the Company file in the newly installed version of QuickBooks.
  • Follow by signing in to your account as an Admin.
  • If all is fine, you should uninstall the old version of QuickBooks in the Control Panel.

Also check: Resolve IIF Import Error in QuickBooks Desktop

Step 3: Configuring Network and Server settings

The steps to get your network and server settings configured are mentioned as under:

  • You first need to click on Windows Start menu and then go for Programs.
  • Now, click on QuickBooks and choose QuickBooks Database Manager.
Network-Issues-tab-QuickBooks-Database-server-manager
  • You can then choose the option to Scan Folders and you should incorporate the folder containing the QuickBooks Company files. Finally, get the file scanned and then close Database Server Manager.

Step 4: Getting QuickBooks installed on the Workstations

  • For this you should uninstall QuickBooks from the workstations from the Control Panel.
  • This can be done by heading for Add or Remove Programs and making a choice for QuickBooks Desktop Enterprise. Now, get the program uninstalled.
  • The next step should be the installation of the latest version of QuickBooks Desktop Enterprise on the workstations. You can make a choice between Server Install or Express as per your convenience.
  • You can finally sign in as an admin and get QuickBooks Desktop Enterprise 2024 going on your system.

Related blog: How to Set Up Firewall and Security Settings for QuickBooks Desktop?

Steps to Upgrade QuickBooks Desktop within the Rightworks hosting environment

Being the owner, you have the prerogative of installing QuickBooks. However, for Standard users, this installation is possible only for the user and not for others.

The steps for installing QuickBooks for Rightworks account owners and admins are:

  • First step involves signing into Rightworks My Account using the correct email and password.
  • You can choose Users and then opt for the particular user for which the license is to be applied.
  • In the User Detail page, you are supposed to choose Apps to install.
  • Opt for the correct QuickBooks version and choose the Install option.

The steps for installing QuickBooks for Rightworks standard users are:

  • First, sign in to Rightworks using the email and password.
  • Then opt for Apps to install and search for the QuickBooks version to be installed. Choose the app.
  • Click on Install App option.

Use of Discovery Hub for upgrading to QuickBooks 2024

The process is:

  • First run the Discovery Hub and herein, you need to choose the option to Upgrade to QuickBooks 2024.
  • You then need to click on Proceed for commencing with the upgrade process. Now, choose Upgrade Now option.
  • You can choose “Keep old version on my computer” if you want both the version on the same system (Old and the new one) or else you can keep it blank.
  • Go for the upgrade.

Conclusion!

This blog explained methods to upgrade you current QuickBooks version to QuickBooks 2024, including QuickBooks Pro, Premier and Enterprise versions. If you need technical support for the process, you can anytime connect with our experts through the helpline +1-844-926-4607, or the other option is to get in contact with us using the Live Chat option.

Recommended to read:

How to Deposit Payments in Undeposited Funds Account in QuickBooks?

How to Easily Recover Data in QuickBooks Online?

Fixing QuickBooks Error: The Attempt to Log in with the Username Admin Failed