
Multi user mode of QuickBooks is an advanced feature in the software. It gives you the freedom to use QuickBooks Desktop at multiple locations. Once switched to the multi user mode, the systems are classified into the server system, which acts as the Host, and the Workstations, comprising of the other systems. This feature is pretty unique and Intuit has done a great job in keeping it devoid of any technical errors. So, how to use it? No worries as we are here to assist. Just wind up through the full length of this blog.
What are the steps to use QuickBooks Desktop at multiple locations?
The walkthrough to use the multi user mode is simplified as follows:
Step 1: Mapping the Network Drive
The initial process requires mapping of the Network Drive in Windows. This involves the below mentioned set of steps:
- Start using the Windows key on the keyboard on the bottom left corner.
- Following this, you need to go for “This PC” and open the same.
- The next step involves choosing the option for Mapping network drive.
- Herein, you should make choice for an unused drive and later click on Browse.
- The next move requires heading for network location. This harbours the Company files.
- Go for the Ok option and this should follow with a click on Finish.
- The final step requires Reopening of the Company file by means of the mapped drive.
You may also read: How to Fix Missing Employee in QuickBooks Desktop Payroll?
Step 2: Setting systems for multi user mode and the folders with Company files
This step involves the pointers as below:
- From the Start tab in Windows, the File Explorer needs to be opened.
- Immediately, search for the Company file folder, then right-click the same
- Then proceed by opting for the Properties which should then follow by choosing Sharing and the Share Add options.
- Afterwards, go for the “QBDataServiceUser” file in accordance to the QuickBooka version installed on the system.
- Finally, you need to accord permission levels for users as “Full Control”.
- When all the steps are being successfully done, make a choice for “Share”
As the Systems and the Folders are rightly set for use in the multi user mode, you can initiate the hosting as per the following instructions.
Step 3: Enabling Hosting of Company files
This simple process is:
- Firstly, make a choice for File, and from the drop-down options, go for Utilities.
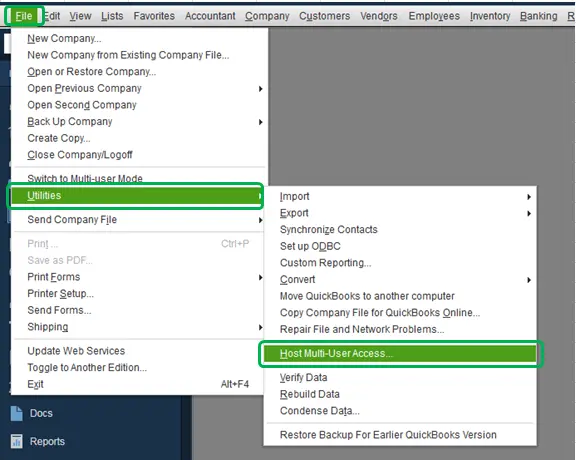
- Herein, the choice for hosting multi user access needs to be made, followed by a click on Yes.
Read also: How to Troubleshoot Backup Company File issues in QuickBooks Desktop?
Step 4: Setting up QuickBooks Database Manager
This needs installation of the Database Manager on the main system. And once that has been done, the next process is:
- Opening File menu in QuickBooks.
- Herein, making a choice for switching to multi user mode
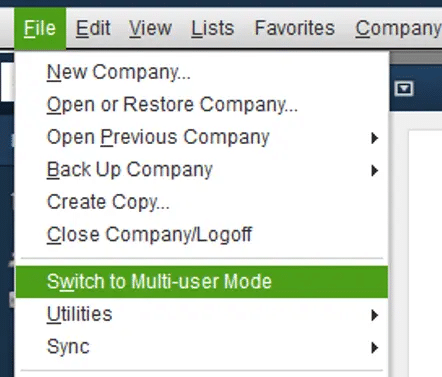
- Clicking on Yes, and then the Ok option on the setup window.
- Now head for Company and here you need to choose the users as per your requirements that you want to be part of the multi user access.
- Go for Users, and then opt for setting up Users and Roles
- Final step is to choose Yes.
- Once that is completed, you host the Company file and the Workstations can access the server.
Conclusion!
The purpose of this article was to disseminate the advantages of an astonishing feature of QuickBooks – The multi user mode. This can help users in using QB Desktop at multiple locations without any breach of privacy or other ancillary security issues. Resolution of QuickBooks queries is always our main focus and if you have any, you can always communicate the same to our QuickBooks Support team. We can be communicated by means of the dedicated helpline +1-844-926-4607. Another alternate that can be used for establishing contact is using the Live chat option.
Recommended to read:
Update QuickBooks Desktop to the Latest Release
Set up folder and Windows Access permissions to share Company Files
Methodologies to Resolve IIF Import Error in QuickBooks Desktop