
The article give a reflection on ‘How a QuickBooks user can Import QBO file Into QuickBooks Desktop/ workstation’. QBO or QuickBooks Online file contains data set related to banking statement of an organization stored in QuickBooks Database. This Database is generated when the user QuickBooks bank feed in View section relates to online banking system of his bank. The transactions are simultaneously generated by the bank itself and can be downloaded in electronic form. Thus, QuickBooks is facilitating all types of business needs.
Importing QBO file is necessary as the data instantly gets in the QuickBooks records without doing manual entry of each record in workbook. To know more about importing QBO file into QuickBooks desktop, read the quick guide thoroughly, else you can seek experts help.
Need for importing QBO files:
- Keep your records upgraded.
- Each record is accounted, no omissions.
- Viewing the transactions and performing operations have become easier.
- Elimination of manual entry in QuickBooks.
- No error while transmitting bank information.
- Reconciliation features has prevented data loss in QuickBooks.
How often it is required to import QBO file into QuickBooks Desktop?
- Normally the transactions of the bank are generated either at the accounting year or periodically (monthly or quarterly depending on the user requirements).
- It is recommended by the users itself to generate the bank statements frequently so that can keep track record of all clients efficiently.
- Accountants make short term financial reports such as balance sheets, profit and loss account, cash flow statements, expenses and incomes account with these electronic documents.
- The bookkeeping in QuickBooks, thus, becomes easier.
Method to Import QBO file into QuickBooks Desktop
Procedure to import a QBO file:
- Login into QuickBooks Desktop.
- Click on File menu > select Utilities.
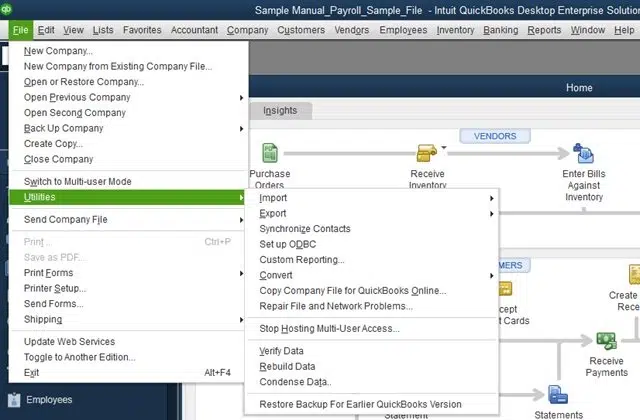
- Click on Import option and select ‘Web Connect Files’.
- Select downloaded QBO file from institution i.e. bank has provided.
- Select ‘Use an Existing QuickBooks Account’ > Bank Name > click on Continue button to see all transactions.
- Your QBO file data is imported.
- For checking record, click on ‘Transaction List’.
- You will see payee column is null, preset settings i.e. rules to autofill the column.
Methods to make Rules for Importing of .QBO file
Method 1
The process for making Rules for Import of .QBO file are:
- Click on Rule > from drop down menu select ‘Manage Rules’.
- Select Add New and type name of rule.
- In Description Field, select from memo ‘Common Contains’.
- Rename and click on ADD to enter payee name.
- From Category, type Accounting Field and click save.
To change rules:
- Select the Rule to change.
- From Action Column, select ‘Edit Rule or Delete Rule’.
- Edit is to rename it and delete is to remove a particular rule not required.
Method 2
- Login to QuickBooks Online, then under Banking Section, select existing account.
- At top-right side of the QuickBooks, an upload option is available.
- Browse and look for .QBO file to open. Review the file items such as date range ID and name to check if the file is right. Click Next.
- Review the transactions from Review section.
- Checklist to merge vendors and segregate transactions.
Importing .QBO file in Windows and Mac
Here are the steps to import .QBO file in Windows and Mac:
Windows:
Before you begin to import .QBO file, check if there is yellow strike icon is Turned ON, which is virtual direct download feature used to download new transactions. If you are importing .QBO file, then its better to turned off for convenience.
- Open QuickBooks and Select lists menu.
- Tap on Chart of Accounts.
- If yellow strike occurs, skip to import.
- Click on Edit > select Bank Feed Settings.
- Turn OFF all online services.
- Repeat until yellow strike icon disappears.
- Now follow import. QBO steps.
- Open File menu, then Utilities.
- Click Import to select ‘Web Connect Files’.
- For import, choose a .QBO file.
- Select existing user account.
- Go to data, then Continue button.
- Go to transactions list for Review.
MAC:
Unlike windows has yellow striking icon, Mac OS has a blue ball icon, which is also required to Turned OFF.
- In QuickBooks, go to lists menu.
- Click on Chart of Accounts.
- Click on Edit > select Online Settings.
- Turn OFF and click on Save & OK button.
- Repeat until blue ball icon disappears.
- Now follow import. QBO steps.
- Open File menu, then Utilities.
- Under import click on ‘Web Connect Files’ option.
- After this, choose a .QBO file for importing task.
- Select existing user account.
- Go to data, then Continue button.
- Go to transactions list for Review.
Conclusion
The Quick Guide to Import QBO file into QuickBooks Desktop provides a comprehensive information regarding how you can import and make Rules for .QBO file. QBO file being an important file which contain bank statement of transactions of a particular period is required to import for ease of accessing data in QuickBooks. This is required in all type of business; big or small. Thus we came across steps for importing in Windows and for Mac users.
If you need any technical assistance feel free to contact QuickBooks support services or call us at +1-844-926-4607.
Recommended to read:
How To Convert Your QuickBooks File Into An Older Version?
How To Use QuickBooks Desktop At Multiple Locations?