
Multi-user mode is an advanced feature in QuickBooks which allows many users to work on the same Company file in QuickBooks at the same time. But in some cases, this feature can face problems that can appear in the form of different error codes like QuickBooks Error H202. It belongs to the HXXX series, all errors in which are related to the multi-user mode issues in QuickBooks. This article will focus on the various walkways to fix Error Code H202. So keep reading!

Inference of QuickBooks Error H202
This QuickBooks Error appears as you try switching to the multi-user mode. This issue means is mostly caused by some intrusion in the multi-user mode disrupting the connection to the server. The error appears as “Error code H202 This Company file is on another computer and QuickBooks requires help connecting”.
You may also read: Fixing QuickBooks Error 15276
Causes of QuickBooks Error H202
The reasons of this error can be many, but the most common ones are:
- Multi-user mode setup is facing issues
- Hosting configuration is incorrectly set up
- Firewall is blocking your connection
- There is a DNS issue
- Network file with .ND extension may be suffering from some damage.
Resolve the multi-user mode QB Error H202
This multi-user mode error can be easily resolved by following the solutions explained below:
Solution 1: Using QuickBooks Tool Hub
For using this troubleshooting feature, you are supposed to first download the Tool Hub from the Intuit site. Then follow the below given steps:
- Go to your Download folder and open the downloaded .exe file for QuickBooks Tool Hub.
- This will initiate the installation and you should be patient until this process reaches a conclusion.
- Once install is over, you can launch the Tool Hub program.
- Then hover to Network issues and click on the same. Then make a choice for QuickBooks Database Server Manager.
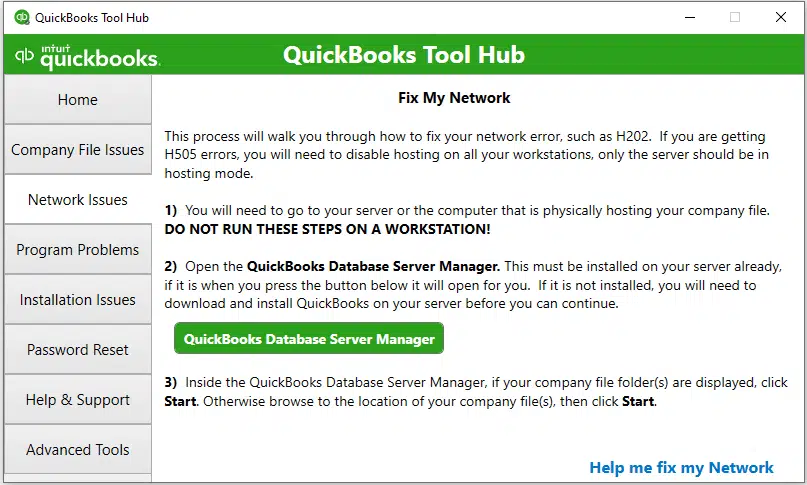
- Now, you need to go for the option to “Start Scan” if the folder for the Company files is visible, else you can manually choose if after clicking on Browse, and finally click on Start Scan.
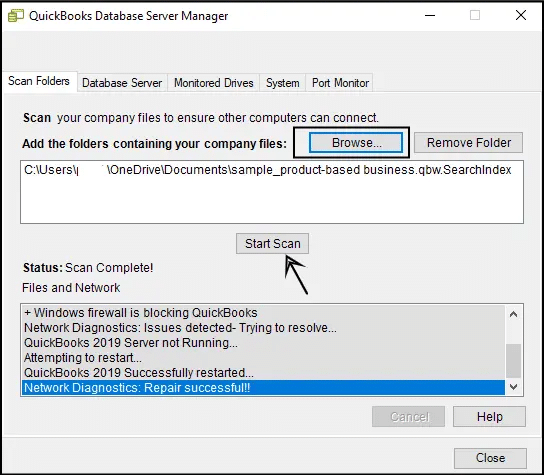
- This process shall allow QuickBooks Database Server Manager to make repairs as well as firewall permissions.
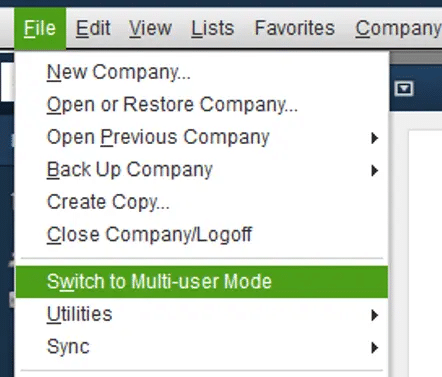
- You can subsequently launch QuickBooks on the workstations to check if this corrects QuickBooks Error H202. Simply go to File and then to the option “Switch to Multi-user mode”.
Must read: How to Troubleshoot QuickBooks Banking Error 179?
Solution 2: Use the QuickBooks File Doctor Tool
QB File Doctor is a useful tool to resolve Company file related errors. It is one of the sub features of the QuickBooks Tool Hub and if you have already installed the Tool Hub in the previous solution, then using this too is pretty easy. The steps for the same are:
- Run the QuickBooks Tool Hub and then go for the Company File issues tab.
- Now, you need to run the QuickBooks file Doctor Tool and initiation of its operation may take some minutes. Wait till then and then Browse for the company file which is inciting Error H202 when trying to run it in the multi-user mode.
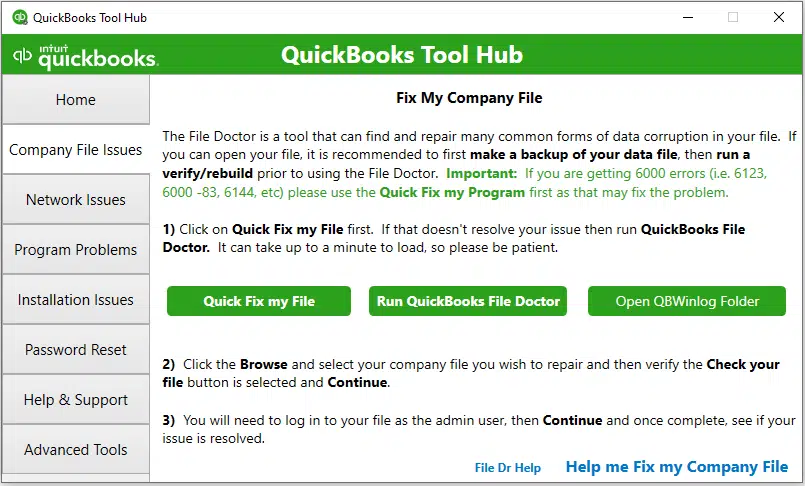
- Click on the option to Check your file and Network and hit on Continue.
- Type in your admin password and following that click on Next
- Now, you should try to access the multi-user mode on your workstations.
Solution 3: Checking the services on the Server computer
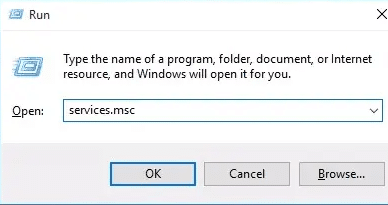
- Open the Server system and after that open Run. Now, type in Servces.msc in Run and hit Enter. The Run window can be opened using the Win + R shortkeys.
- In the Service Window which appears on screen, look for QuickBooksDBXX and double tap on it. XX represents your version.
- Now, you need to choose the Automatic option in the Startup Type.
- It should be made sure that the Service status is in active state. If not, click on Start option to get it going.
- Now, you are supposed to go to the Recovery tab and choose the option to Restart the Service for – First failure, Second failure, and Subsequent failures.
- Now, choose the Apply option at the bottom of the window and hit on Ok.
- You should go for the repetition of these steps for QBCFMonitorService as well
- You should then run QuickBooks on the workstations, then head for File, and then to the option to Switch to Multi-user Mode.
Check also: How to Resolve QuickBooks Online Error code 1000?
Solution 4: Incorporation of services to Windows admin group on the server
It is pertinent to grant the admin permission s to QuickBooksDBXX and QBCFMonitorService on the server system. For this the steps are:
- Open the Windows Explorer using Win + E keys.
- Now, identify the Company file folder and right-click on the same. Then choose Properties.
- Go for the Security tab and then go for Advanced.
- Opt for QuickBooksDBXX and choose the edit option. Then allow the following settings:
- Read Extended Attributes
- Create Files/Write Data
- Traverse Folder/Execute File
- List Folder/Read Data
- Read Attributes
- Write Attributes
- Write Extended Attributes
- Read Permissions
- Create Folders/Append Data
- Do the same for QBCFMonitorService also.
- Then, you also need to establish sharing permissions for the Company files. The steps are:
- Go to File Explorer, and followed by that right-click the Company file folder.
- Choose Properties and after that go for Sharing. Click on the Share Add option.
- Now, opt for QuickBooksDBXX and hit on Full Control and hit on Share.
Solution 5: Pinging the Server from Workstation
Connectivity can be checked by pinging the server. The process is:
- From the Start menu, go for Network and Sharing Center. Then choose the option for Changing advanced sharing settings.
- Then, you can enable network discovery in the Network Discovery and File and Printer sharing.
- Next, you need to obtain server name. It can be done as follows:
- First, go to Windows Start menu and access the Run window. For this you can directly use Win + R keys.
- Then type in “cmd” and hit Enter to open the command prompt.
- When the command prompt does show up, you need to enter “ipconfig/all” and press the Enter key.
- From the details that appear in the Command prompt, check the Host Name in the IP configuration. The name of the server should appear on the right side.
- Note it down.
- You now need to go again to your workstation and open the Command prompt using the same steps as mentioned above. Open Run and type in cmd and then Enter.
- In the Command prompt, type in “ping [your server name]”, then hit the Enter key. The server name is the same which you noted down in the previous step.
- Do the same for all the workstations
- If there is no packet loss, then al is good. Otherwise, in case of packet loss, restart your router and if that doesn’t fix this packet loss issue, then you need to check with your internet service provider.
Conclusion!
With that, the article on how to fix QuickBooks Error H202 comes to a close. We are hopeful that it served the purpose. If you need any technical help, you can straightaway call out QuickBooks support experts at +1-844-926-4607 or if that doesn’t transpire, then you can reach us our via the Live chat option.
Similar articles:
How to Fix QuickBooks Error Code 108?