Learn the steps to set up firewall and security setting for QuickBooks desktop.
QuickBooks is a very well-known accounting software. This software has been designed by keeping in mind that manual labor needs to be reduced, while boosting efficiency and productivity. There can be various problems like connectivity issues or system security blocks communication between QuickBooks and internet. Also, you might have encountered an error stating Windows firewall is blocking QuickBooks.
In this article, we are going to take a detailed look at a step-by-step process of how to set up firewall and security settings for QuickBooks desktop.
You may also read: How to Fix QuickBooks banking error 179?
What is Windows Firewall?
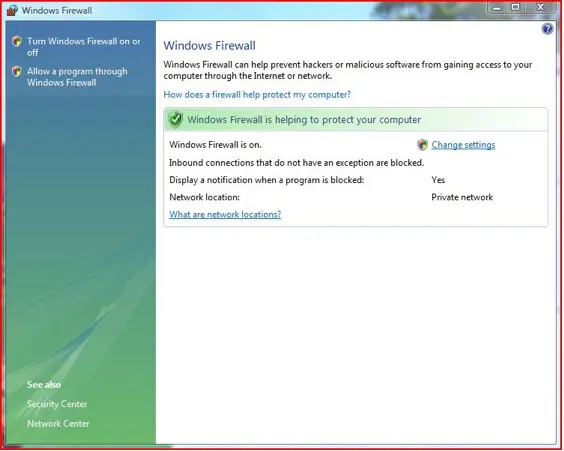
If you are wondering what is windows firewall then remember that it is an application which helps protect a device from virus, malware and other threats. This application is a must have program which should be there on every device. The application runs and blocks all unwanted programs in case it seems threatening. Just because of this it is possible to encounter blocked QuickBooks 2023 firewall ports.
This issue can linger further when various servers are connected to each other. The most basic solution is to update the firewall and configure the settings.
Steps to Set Up Firewall and security settings for QuickBooks Desktop
Here is how you can set up firewall for QuickBooks desktop –
Step 1: Make sure that QuickBooks is not blocked on these ports.
It is possible to amend firewall ports with the help of some applications. Here is what you need to do –
- Click on the Windows button.
- Type Firewall in the search bar.
- Press Enter.
- Click the Windows Firewall option.
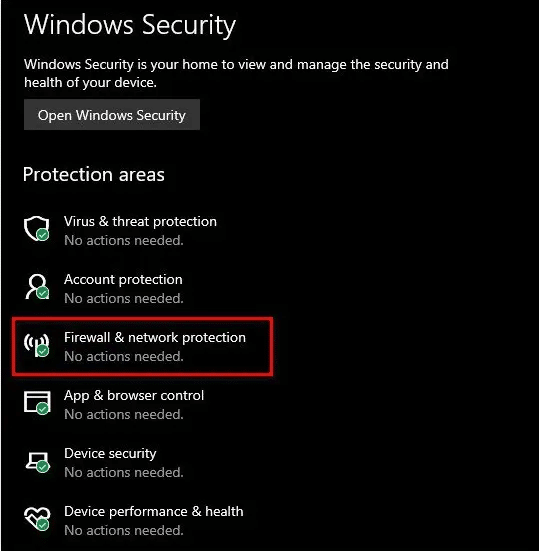
- Select the Advanced Settings button.
- Right-click on the inbound rules field.
- Select New Rule.
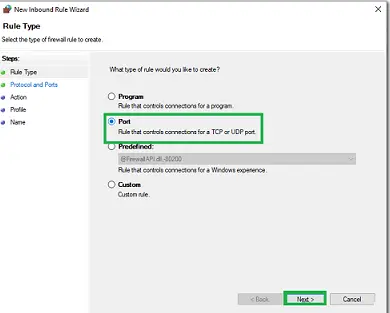
- Click on Port.
- Press Next.
- Choose TCP.
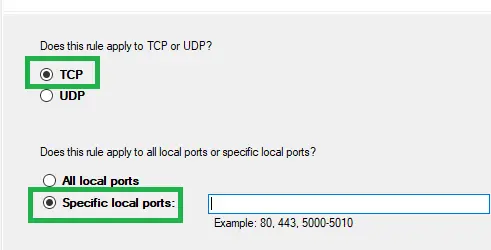
Next you will have to include the relevant port requirements as per the version of your QuickBooks application –
a. QuickBooks Desktop 2020: 8019, XXXXX.
b. QuickBooks Desktop 2019: 8019, XXXXX.
c. QuickBooks Desktop 2018: 8019, 56728, 55378-55382.
d. QuickBooks Desktop 2017: 8019, 56727, 55373-55377.
- Click Next.
- Then click on “allow the connection”.
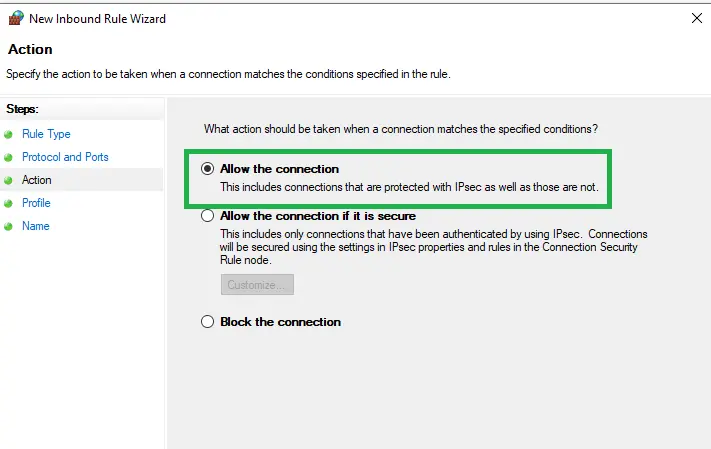
- Again click next.
Once the next window appears mark all the profiles.
- Select next.
- Now you will have to create a rule.
- You should name it in the format of QB ports (year) for easy access.
- Finally click on the finish button.
- Follow all of the above steps again to create outbound rules.
- Restart your computer.
- Access QuickBooks to check if the issue is solved.
Read also: Resolving potential data issues in QuickBooks desktop
Step 2: Remove QuickBooks from Firewall
Even if the QuickBooks ports are working firewall may block it from accessing the internet. So, QuickBooks should be added as an exception –
- Click on windows button.
- Type Firewall in search bar.
- Press enter.
- Select windows firewall option.
- Next, select advanced settings button.
- Right click on inbound rules field.
- Next choose the program.
- Click on next.
- Then click on the program path. Click Browse and choose one executable file (.exe) for QuickBooks.
- Again click Next and select “Allow connection” option.
- Click on next as now you have to frame a rule. Always use the format “QBFirewallException(name.exe)” for easy access.
Now you will have to follow the steps given above to create outbound rules.
- Reboot your device.
- Access QuickBooks to check if the problem is solved.
If you get program files (x86) you may be using 64 bit operating system.
Step 3: Review Anti-virus settings
Now you need to check if the anti-virus is preventing access to the internet. You have to provide access as well as permissions for the QuickBooks program through anti-virus settings or the official website. You will have to contact the technicians in case you are not aware of the steps to rectify the blocking process. Here are the steps to carry out the same –
- Press the windows icon.
- Type settings in the search space.
- Press Enter.
- Select the settings tab.
- Click on the update and security button.
- Choose windows security.
- Click on virus and protection.
- Next click on “manage settings option”.
- Go to the exclusions field.
- Select add or remove exclusions.
- Choose the “Add an exclusion button”.
- From the list select QuickBooks.
- The window defender will not block the tasks anymore.
Check also: Procedure To Merge List Entries In QuickBooks Desktop
Step 4: Start QuickBooks File Doctor from the Tool Hub.
The QuickBooks File Doctor is pretty useful. Users can run it by downloading the tool hub that has different utilities for various errors in one place.
Here are the steps given below –
Download QuickBooks Tool Hub

- Go to the Intuit website and search for the download link for the QuickBooks tool hub.
- Click and begin the download process.
- Save the file to a preferred location on the desktop.
- Go to where you have downloaded QB to the hub file.
- Double-click the quickbooks_tool_hub.exe file to start the installation process.
- If dialog boxes, prompts, and other agreements appear click confirm.
Conclusion
A bad internet connection is what might cause the “Blocking QuickBooks” error. However, if you can follow the steps given above properly then you should be able to solve the problem easily. If you are still unable to configure firewall and security settings for QuickBooks desktop then you can get in touch with customer care. All you need is to connect with us via chat support.
Related articles:
How to Set Up Folder And Windows Access Permissions To Share Company Files?



Leave A Comment