QuickBooks Online is becoming the preferred choice for accountants due to its seamless tracking and managing of the expenses. This accounting program allows recording, editing, and deletion of expenses in QuickBooks Online. To summarize it, management of accounting expenses, which otherwise was a daunting task, has now become extremely easy in QuickBooks Online. If you are new to QuickBooks Online and are unaware of the steps to enter and manage expenses in QuickBooks Online, this blog shall provide you all the information you need without your need of mustering the procedure in bits and pieces. So, keep reading!
You may also read: How To Import Data From QuickBooks Desktop To QuickBooks Online?
Procedure to Record an Expense in QuickBooks Online
The easy steps for recording an invoice in QBO are:
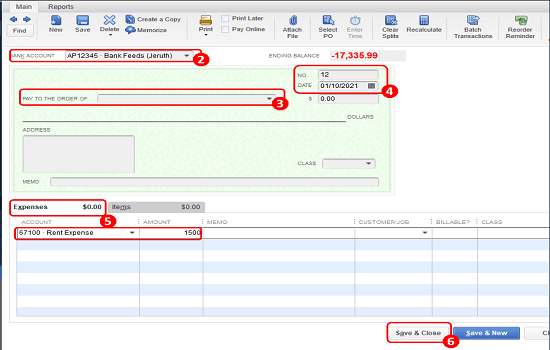
- At first, you need to choose the +New option and soon after, you should make a selection of the Expense option.
- The next step is to go for the Payee field and herein you need to make a choice of vendor. Just in case multiple petty cash expenses are covered under the transaction, you can ignore this field and keep it empty.
- Next step should be making a move to the Payment account field, wherein you need to make a selection of the account used for paying the expense.
- Then you need to go for the Payment date field. Here, you can type in the correct date of the expense.
- For detailed tracking, you can enter a Ref no or Permit no. However, this step is optional and can be ignored as well.
- Then, go for the Tags field. In this field, you need to type in your preferred label for categorization of your money.
- Now, head on to the Category details field and type in the expense info.
- Within the Category dropdown, you should choose the Expense account used for tracking expense transactions.
- You can subsequently type in a description. In the Item details field, type in the particular products and services for itemization of the expenses.
- The next step after this is to type in the Amount and the Tax.
- In a scenario wherein you are planning to bill a customer for the expense, you can make a choice for the Billable checkbox and then type in the Name in the Customer field.
- Once all is done, click on the Save and Close option.
- Also, in the Memo field, you can enter notes which appear in the account register on printed checks and on reports.
Steps for Managing Expenses
Management of expenses encompasses Editing, Reviewing, and Deletion of the expense. These have been individually discussed below:
Process to Edit Expense in QuickBooks Online
It is easily possible to edit an expense as they have already been paid for before entering them in QuickBooks Online. But in case you opt for billing the customer for a particular expense, any edits that you make shall effect the invoice which you are going to send to them in future. The steps to edit the invoice in QuickBooks Online are:
- At first, go for the Expenses option and thereafter click on Expenses.
- The expense to be edited needs to be identified and one found, click on View/Edit option available in the Action column.
- You can now edit the transaction and update the same as per your requirement.
- Finally, click on Save and Close. This will save the edits made by you.
Check also: Resolving QuickBooks Unrecoverable Error in QuickBooks Desktop
Steps to Review Expenses in QuickBooks Online
To review your expense, you can perform the two steps below:
- First step involves you to go to the Reports tab.
- Then, you need to run a report named “Income by Customer Summary”.
Deleting an expense in QuickBooks Online
If you want a particular expense to be deleted, you can go with the following steps:
- At first, click on the Expenses tab and then choose Expenses option.
- Now, you need to find and identify the expense which you want to delete.
- Thereafter, choose the option to View/Edit dropdown under the Action column.
- Now, click on Delete.
- You should click on Yes for confirming the deletion of the particular transaction.
- Note that, the deleted expense disappears from the reports, but its record is still existing in the Audit log file.
Winding Up!
This blog discussed an elaborate walkthrough to Enter and Manage Expenses in QuickBooks Online, encompassing the process to edit, review and delete an expense. If you want technical help, our QuickBooks ProAdvisors for QuickBooks Online and QuickBooks Desktop are just a call away. You can give us a call at +1-844-926-4607 or else you can use the Chat support option to reach us out.
Similar blogs:
How To Recover Lost Data From QuickBooks Auto Data Recovery Tool?