Fix QuickBooks Online Dependent System Error

Walkthrough to Effectively Troubleshoot QuickBooks Online Dependent System Error

Learn the Complete Guide to fix Dependent System Error in QuickBooks Online.

QuickBooks Online is the state of the art accounting program which has ushered astonishing growth of the accounting sector in the U.S. Notwithstanding its brilliant features, this accounting platform has faced different types of technical issues. One of the many issues which we shall be discussing within the purview of this discussion is the Dependent System Error. This error mostly troubles users as they try to print a report or go for exporting of the PDF file. While for some users the issue seemed a temporary problem which got resolved after re-logging into QuickBooks Online.

However, in most cases, the error continues to occur. In this article, readers shall get knowledge about this error and the different ways to get it fixed.

Also read: QuickBooks Tool Hub – Download, Install And Use It To Fix Errors

What are the Solutions to fix Dependent System Error in QuickBooks Online?

Different solutions have proven effective in rooting out this troublesome issue in QuickBooks Online. While clearing the cache has proven effective for many users, other fixes that have fixed the issue include the use of Incognito mode, updating the web browser, or by making slight alterations to the format of the reports. Let us go through each of these one by one to fix Dependent System Error in QuickBooks Online.

Fix 1: Clear cache in the browser

Excess cluttering of cache and temporary files can result in different issues within the browser. This not only effects navigability in the browser, but also opens grounds for different issues, including the Dependent System Error in QuickBooks Online. The process to remove the cache is easy and can be done as follows:

delete-all-the-cookies-files-in-the-browser
  • The first process requires opening of the browser. Let us take an example of Google Chrome.
  • Within the browser, go to More and click on More Tools.
  • This should be followed by a click on the checkbox besides the Clear Browsing Data.
  • You should follow up by clicking on All Time in the time range. As this is done, Place a checkmark on the checkboxes besides Cookies and Other Site Data as well as Cached Images and Caches Images and Files.
  • Then click on Clear data and wait all the way till the process is done.

Fix 2: Switch to Incognito Mode

Many a times, logging into QuickBooks Online in the Incognito mode can fix Dependent system error. This can be done by a simple click on the Menu button and then tap on the Open Incognito Mode option. While this is for Google Chrome, for other users if the option is not open this way, then you can use simple short keys given below corresponding to different browsers used in contemporary times:

BrowserShort key for Incognito Mode
Google ChromeCtrl + Shift + N
Mozilla FirefoxCtrl + Shift + P
Microsoft EdgeCtrl + Shift + P
SafariCommand + Shift + N

When the Incognito mode is open, you can navigate to QuickBooks Online, login, and then perform the same export process or printing process which was previously resulting in dependent system error QuickBooks Online. The error should be bypassed this time.

You may also read: Fixing Potential Data Issues In QuickBooks Desktop

Fix 3: Make changes to the Report format

If you are facing this error while exporting the report in PDF format, you should consider choosing two choice boxes for the smart Page Breaks. This should be followed by repeating page header in “New”. After this, re-perform the same operation to check if dependent system error in QuickBooks Online is fixed.

Fix 4: Update your Browser

You should make sure that the browser you use to navigate to QuickBooks Online is updated to the latest version. This can be done through the browser or by navigating to the official website of the browser. After updating the browser, open QuickBooks Online and login to your browser. You can then try to open the same report or convert it to the PDF and export. This should fix Dependent System Error in QuickBooks.

The current discussion focused entirely on a peculiar error of QuickBooks Online dependent system Error. If you need technical help, it’s just a tap away. All you need to do is click on our chat support option or else you can also access our team of QuickBooks experts.

How to Download, Install QuickBooks Tool Hub

QuickBooks Tool Hub – Walkthrough to Download, Install and Use it to Fix Errors

QuickBooks Desktop has huddled a widespread recognition in the accounting community. This has been possible due to the unimaginable accounting features that have been evolving in the program with every new update. But technical issues also keep evolving due to the complicated framework of this accounting marvel. These issues can be associated with installation-related problems, potential data issues in the QuickBooks Desktop, or issues related to invoice. To keep these in check, Intuit offers a composite umbrella QuickBooks Tool Hub containing different types of features to fix technical errors.

Read the article all the way till the conclusion to get an understanding of the multifaceted functionalities of QuickBooks Tool Hub and the easy process to Download and Install this all-in-one tool.

What is QuickBooks Tool Hub?

QuickBooks-Tool-Hub-Icon.jpg

QuickBooks Tool Hub is a free to use repository of different tools to address variegated errors encountered in QuickBooks. It can fix Company file errors, Installation errors, update errors, network issues and technical issues that lead to sudden crashing and glitches while working on the accounting program. It is an all-in-one tool to effectively resolve all your QuickBooks problems at the click of a button.  In addition to troubleshooting contemporary unsolvable issues, QuickBooks Tool Hub can also be used to Reset Password and Clean Install QuickBooks.

Recommended to read: Different Techniques To Troubleshoot QuickBooks Banking Error 179

Different Tools in QuickBooks Tool Hub

Some of the noteworthy tools of QuickBooks Tool Hub along with their description are listed in the table below:

ToolDescription
QuickBooks File Doctor Tool  Troubleshoots Company files and fixes Potential data issues in QuickBooks Desktop
QuickBooks Install Diagnostic Tool  Resolves Installation and update issues in QuickBooks Desktop
QuickBooks Clean Install ToolUsed for uninstalling and reinstalling QuickBooks in case of some major irreparable issues
QuickBooks Password Reset Tool  Used to reset a lost password while logging in to QuickBooks
QuickBooks Connection Diagnostic Tool  Rectified any Connection issues.
QuickBooks Refresher  Fixes issues with QuickBooks installation
PDF and Print Repair Tool  Troubleshoots Printing and PDF related issues
Condense Data Tool  Used for compressing the Company file to allow it to be shared over emails.

What types of errors can be fixed using QuickBooks Tool Hub?

Tool Hub can be effectively used for rectifying errors caused due to different sources. Users should feel no hesitation in resorting to this tool considering it to be rolled out by Intuit, the maker of QuickBooks. Recall any technical issue in QuickBooks and if manual steps seem futile, QuickBooks Tool Hub shall automatically diagnose and fix the issue permanently without you having to take any arduous measures. The different types of errors that can be fixed using the Tool Hub include:

QuickBooks Update errors

Updating QuickBooks is necessitated due to new features being added in every new update which rolls out. But users have noticed an array of technical error codes during the update process. These include

QuickBooks Error 12xxx – includes QuickBooks Error 12002, 12007, 12009, 12029, 12031, etc

QuickBooks Error code 15xxx – includes QuickBooks Error 15102, 15240, 15270, 15222, 15276, etc

Company File Issue

Company files constitute the cornerstone of all accounting operations in QuickBooks Desktop. Whatever modifications the user makes on the accounting ­­data are stored in the form of different Company files. There are instances when these files face technical issues that result in the user’s inability to access them. This can lead to a state of panic with an apprehension of potential data loss. But in such cases, you can either backup your Company file, or else, make use of the QuickBooks File Doctor Tool, one of ­the many tools available in the QuickBooks Tool Hub. The errors in the Company file include the following:

  • QuickBooks Error 6xxx – including Error 6000, 6210, 6150, 6000 77, 6177, 6000 83, etc.
  • Unrecoverable error 00000 00000
  • Company File Is Missing or Cannot Be Found
  • QuickBooks Error code C=51
  • QuickBooks Error code 80070057 – The Parameter is incorrect

Network Issues

Fix-my-network-Tool-hub

Network issues in QuickBooks are prominent when you try to establish QuickBooks In the multi-user mode or when connecting the financial institution through QuickBooks. The network issues in QuickBooks generally manifest in the form of Error code H101, H202, H505 and other errors in the Hxxx series. These can be fixed using the different troubleshooting tools available in the Network Issue tab in the left pane of the QB Tool Hub.

Misplaced or Forgotten Password

Reset-password-Tool-hub

QuickBooks Tool Hub is also useful in situations wherein you forget your login password. This can evoke complicated panicking situation. However, Tool Hub has a solution for you. One of its tools, QuickBooks Password Reset Tool can be relied in such cases. The tool automatically facilitates resetting of the password to allow you to create a new one without having to resort to any unsecured third-party tools.

PDF or Printing Issues

Printer issues appear only when you process a printing command but the input fails to transpire as a successful printing output. Printer problems are in most cases related to software aberrations, although hardware problems cannot be ignored. If you are unable to print a PDF, report or invoice in QuickBooks, QB Tool Hub can diagnose and resolve the issues instantly. Within the Tool Hub, QuickBooks Print & PDF Repair Tool needs to be run. It shall effectively rectify the issues at a click of a button.

Minimum System Requirements to run QuickBooks Tool Hub

QuickBooks Tool Hub demands minimalistic system requirements but failure to meet any of these requirements may lead to sudden crashing of the tool while opening or use of any of the troubleshooting features. The necessary requirements include Uninterrupted Internet Connectivity, Microsoft .NET Framework and latest compatible Microsoft Visual C++ Redistributable Package.

How to Download and Install QuickBooks Tool Hub?

QuickBooks Tool Hub is available for free on the official website of Intuit. The download file is named “QuickBooksToolHub.exe” which can then be run to ensure a successful installation of the Tool Hub.

QuickBooks-Tools-Hub-Installation-Screenshot
  • The first step mandates opening the default browser from where you need to navigate to the Intuit website.
  • The Download page needs to be visited, wherein all the downloadable tools by Intuit are available. These include the Tool Hub, which can be downloaded by clicking on the version and then tapping on Download button.
  • You can then proceed to the Download folder, where the file named “QuickBooksToolHub.exe” should now be visible. This can be opened by double-clicking on it. We suggest opening the file as an admin by a right-click on the file, followed by a click on Run as Admin option. The InstallShield Wizard opens with instructions to guide you through with the installation process.
  • During the process, you should make sure to click on “Yes” on the “License Agreement” prompt. A hit on “No” shall immediately halt the installation and close the installer.
  • When it comes to the installation directory, the path chosen should be “C:\Program Files\Intuit\” as this is the default location of QuickBooks folder (If not manually changed). A tap on “Install Now” begins the installation.
QuickBooks-Tools-Hub-InstallationScreenshot
  • QuickBooks Tool Hub can be launched soon after by a simple click on “Launch QuickBooks Tool Hub” checkbox.

Bypassing QuickBooksToolHub.exe blocked error

The download file for QuickBooks Tool Hub is “QuickBooksToolHub.exe”. This file needs to be opened for the initiation of the installation. Some users have been unable to move any further due to the blocking of the process by Windows Defender or any other Firewall Protection Program running in the background.

  • This problem can be bypassed by clicking on More Info option on the error screen.
Windows-Protected-your-syetem-Image
  • This needs to follow up with a click on Run Anyway button.
Windows-Protected-your-syetem-Image
  • This will enforce the installation process. You can then proceed with the installation.

We reach the conclusion of this discussion. This article revolved around QuickBooks Tool Hub and emphasized its features and some common QuickBooks errors solvable by the use of this tool. A detailed walkthrough with easy steps to “Download and Install QB Tool Hub” was also explained. You can share your queries with our QuickBooks experts anytime by reaching us through chat or the helpline number.

How to Fix Potential Issues in QuickBooks Desktop

Fixing Potential Data Issues in QuickBooks Desktop

QuickBooks Desktop has proved to be accounting software par excellence. But it hasn’t been devoid of technical problems. There can be different types of potential data issues one can come across in QuickBooks. Users can mostly come across these issues when they try opening or making alterations to the Company Files. The Company data, although secure, can sometimes get corrupted due to different factors. These include conflicting programs installed lately or a virus infecting the QuickBooks Files. In addition to these causes, there can be multitudinous causes behind the different types of potential data issues in QuickBooks desktop. You can get a clearer picture of these issues, and the common solutions to fix these Company File errors.

Different Types of Potential Data Issues in QuickBooks Desktop

Company File errors are humungous in number. But the most common types of Company data issues generally faced by QuickBooks Desktop users subsume:

  • QuickBooks Error code 6xxx series (For ex. Error code 6150, 1006)
  • Error code H101, H202, H303, and H505.
  • QuickBooks Error code 503
  • QuickBooks Error C44
  • Warning, no such table: schema History
  • Data disk image is malformed.

Causes behind Potential QuickBooks Company File Data Issues

The issues related to the Company File are uncountable, but these errors mostly have many common causes. Frequent causes include:

Cause 1: Damaged Company File

There can be a possibility of damage in the Company File. This could be due to a virus, abrupt Computer shutdown, or due to some recently installed program on the Computer which is preventing the QuickBooks program from connecting to the Company Files.

Cause 2: Data Integrity Errors in the Company File

Company Files can be inflicted by data integrity errors. These can be detected and resolved using the Verify and Rebuild data tool (explained in the later sections of this walkthrough). This is the most common cause of the potential data issues in QuickBooks Desktop.

Cause 3: Data incorrectly entered in the Company File

If the Company File is being modified in an incorrect manner this also causes inaccessibility in opening the File in QuickBooks; thereby directly resulting in different types of Company File errors.

Cause 4: User changed the location of the Company File

Any changes made to the location of the Files also lead to different types of potential data issues in QuickBooks Company Files. You should make sure that the Company File is opened from its original Company folder.

 Cause 5: System shut down all of a sudden

An abrupt shutting down of the computer can profoundly contribute towards the corruption of the Company Files. After the system restart, the Company Files can be inaccessible and QuickBooks shows different types of Error codes.

You can also read: Technical Operations To Troubleshoot QuickBooks Banking Error 179

Fixes for Different Potential Data Issues in QuickBooks Desktop

The different types of Company data errors can be resolved by out-cropping the causes leading to these issues. Users should first emphasize on the inbuilt tools offered in QuickBooks and rolled out by Intuit. If these avenues fail to fix the issues, then only should you prioritize other troubleshooting approaches. To make things uncomplicated for you, the following strategies can be implemented in the same order, giving precedence to the first troubleshooting methods.

Method 1: Run Verify and Rebuild Data Tool

Potential data issues in QuickBooks Desktop are most of the time attributable to Data Integrity problems. QuickBooks comes with an integral utility with the name “Verify and Rebuild Data Tool”. The “Verify Tool” scans the Company File for any data integrity issues. The “Rebuild Tool” attempts to fix those data integrity issues.

Rebuild-data-utility-Screenshot.png
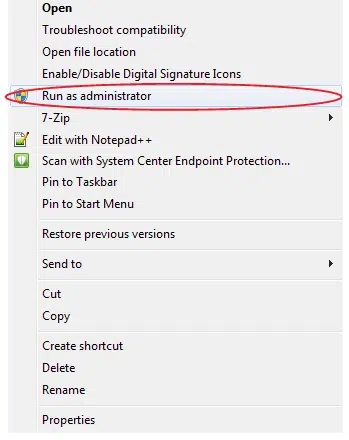
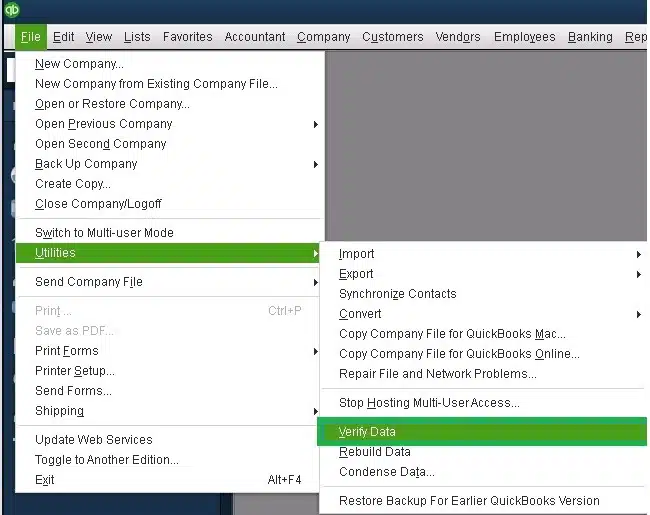
  • The first move should be to close all the existing QuickBooks windows and any other open programs running in the background. After that, you should run the QuickBooks Desktop as admin by simply right-clicking the QuickBooks Desktop and clicking on “Run as Administrator”.
Run-as-Administrator-Image.png
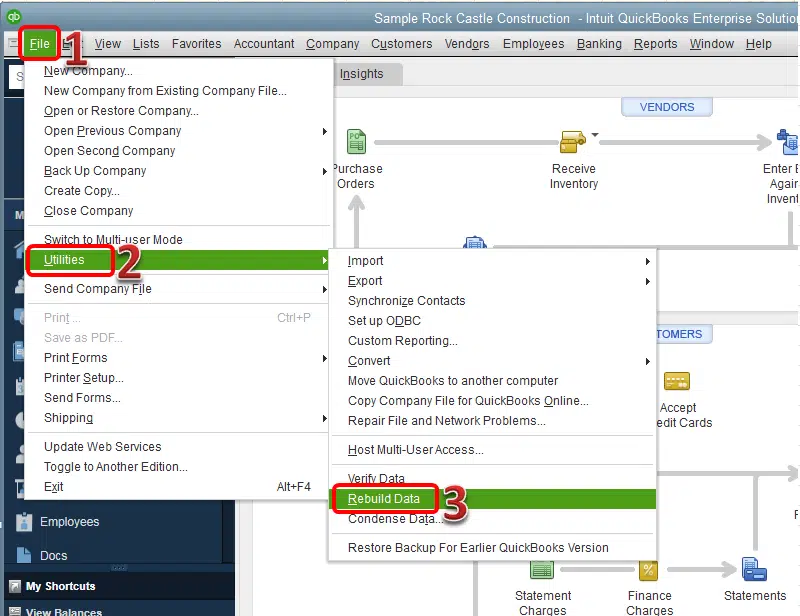
  • When QuickBooks opens, hover over the File menu and go for Utilities. After that, go to the Verify data option and start the process. If the Company File is inflicted by issues, a message shall appear stating Data Integrity issues.
Verify-Data-Image
  • Now, you need to go to the File menu, and then the Utilities section. Now, click on Rebuild data option. This shall first ask you to create a backup of the Company File. Go for the backup creation and save the qbb file to a suitable location on the Computer. After that, you should re-open the Rebuild tool to start the Rebuilding process. It shall take a while.
Utilities-Verifying-the-Data-or-Rebuild-Data
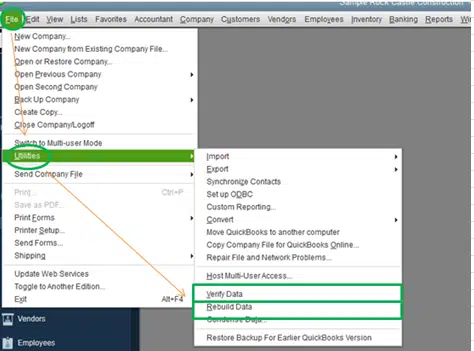
  • When the process is done, a message box shall pop up stating “Rebuild has completed”.
  • Now, you can re-verify the Company File using the Verify tool. If it still identifies the integrity issues, then go for the Verify data option once again. This process can take 2-3 attempts till the Verify tool does not show any error.
  • Now, you can try to open the same Company File. This should resolve potential data issues in QuickBooks Desktop.

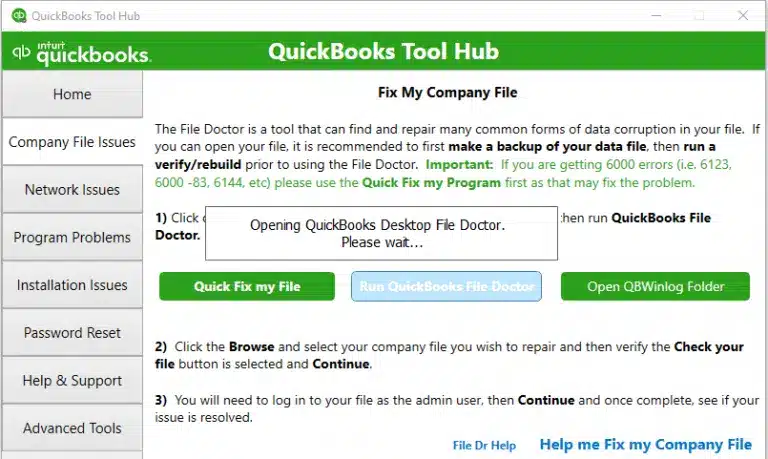
Method 2: Run QuickBooks File Doctor

QuickBooks File Doctor feature can fix different types of potential data issues in Company Files. This tool comes within the QuickBooks Tool Hub, which is the gateway to reach this utility.  

  • From the official website of Intuit, you need to first download QuickBooks Tool Hub.
QuickBooks-Tool-Hub-Icon.jpg
  • Install the tool and run it.
  • In the left pane, look for Company Issues, and here, click on QuickBooks File Doctor.
QuickBooks-file-doctor-from-tool-hub-Screenshot-Image.png
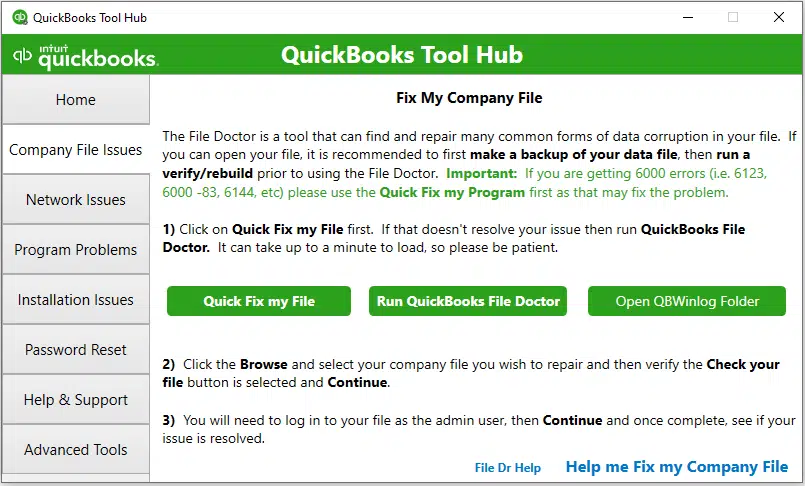
  • Go for the Browse tab, choose the Company File, and initiate the scan.
  • When it is done, visit QuickBooks and try the same operation with the Company File again. This should do away with the potential data issues in QuickBooks Desktop.

Method 3: Restore Company File Backup

If the Company File issues still appear, the Company File backup (if created earlier) should be restored. This can easily bypass the issues and instantly resolve potential data issues in QuickBooks Desktop.

  • You require to run QuickBooks, wherefrom the next move should be the File menu.
  • This should follow up with a click on Open or Restore Company and then Restore Company Backup option.
Open-or-Restore-a-company-file-Image.png
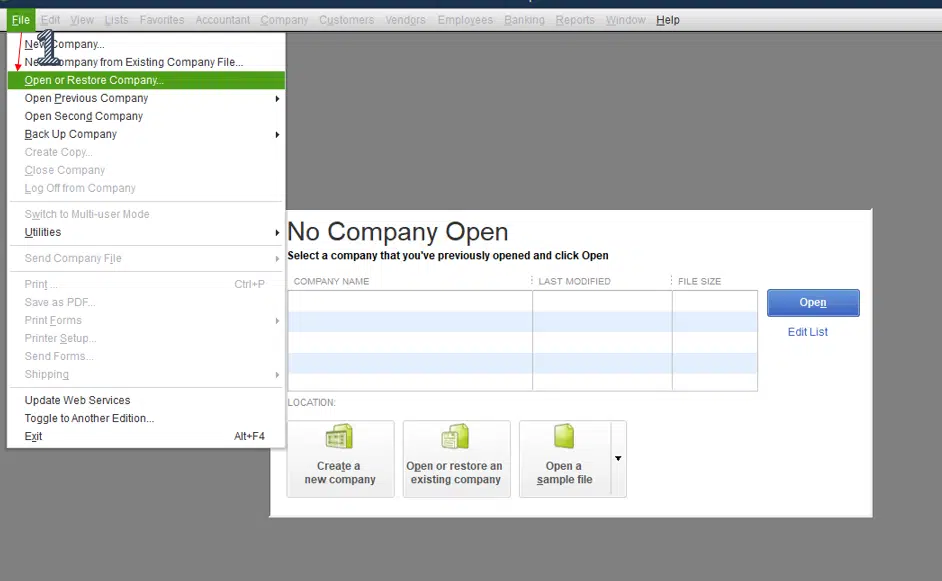
  • Look for the File to restore and choose the destination as the Company File folder. Save the File there and keep the extension as “.qbw”.
  • You can now try opening this restored Company File in QuickBooks.

Method 4: Rename ND and TLG File

This approach is not directly related to the Company File data, but it can help to bypass QuickBooks Company File errors. To proceed, you first need to go to the Company File folder in the QuickBooks folder which should be followed by right-clicking the files with the same name of the Company Files but with the TLG and ND extensions. Rename both the files and change their names. This shall incite QuickBooks to create these Files afresh. This resets the previously set Network and log configurations that may be leading to potential data issues in QuickBooks Desktop. This approach should also resolve potential data issues in QuickBooks Desktop.

Our QuickBooks ProAdvisors are available for your Support.

The blog discussed different methods to help you resolve potential data issues in QuickBooks Desktop. While the most workable approach is the use of the Verify and Rebuild Tool, this walkthrough apprised readers of other viable methods that have proven effective in many cases. If you need any technical assistance, feel free to call our QuickBooks ProAdvisors at qbookserrorsolutions. We are reachable through chat and helpline both.

Learn to Fix QuickBooks Banking Error 179

Learn the Technical Operations to Troubleshoot QuickBooks Banking Error 179

QuickBooks facilitates easy banking operations for its users. But many users have experienced peculiar problems when establishing connection with their financial institution. One common error that needs special attention is QuickBooks Error 179. This error shows when the users try to connect their bank through QuickBooks. This issue also prevents users from getting access to their account data.

This issue is mostly caused due to the mistakes committed by the user. These can include missing entries, balance sheet not being updated, presence of negative entries in Bills and invoices, and other reasons. Multiple logins into the bank account can also result in this error. Go through this illustrative blog to get a complete understanding of QuickBooks Error code 179 and different ways to fix this banking error.

Main signs that indicate QuickBooks Error 179

This error may show different types of signs. Although this may not be the case always, but in most cases one or more of the following signs can reveal. These include:

Major reasons leading to QuickBooks Error 179

Missing Bank Transactions Error (Error code 179) in QuickBooks can be caused due to different reasons. The principle causes subsume the following:

    • The credential details entered to log into QuickBooks are wrong.

    • Lists have missing entries.

    • Company file has erroneously entered transactions.

    • The QuickBooks account is logged in through different systems.

    • Negative values in the bills.

Solutions to resolve QuickBooks Error code 179

QuickBooks Banking error 179 can be rectified by performing the following operations:

Operation 1: Sign out from the bank website on all devices

Multiple systems logging into the same bank account through QuickBooks is generally the main cause of QuickBooks Error 179. So, you should consider logging out of the bank account on all the other devices. After that, try logging in to QuickBooks and connect to the bank account again. If this fails to be an effective fix, try the next operation.

Operation 2: Try logging in using correct credentials

    • Go to the web browser.

    • In the browser, open the Incognito mode from the menu.

    • Now, type in the QuickBooks Online URL.

    • Press the Enter key to open the page.

    • Advance to the login page.

    • In the login screen you need to type in the login details carefully. Now, login to the QuickBooks account.

    • Try logging in to the bank account through QuickBooks.

Operation 3: Delete Temporary Files, Cookies and Cached Images

Temporary files are created by applications for holding data as the main permanent file is being updated. Too much accumulation of temp files can result in different types of issues, including QuickBooks Error 179. To take care of this issue, clear the temporary files as follows:

  • Open the Web browser and there, you need to click on Tools.
  • Now, go to Settings option and after that head for the Privacy
  • Place a check mark on the Time Range and also check mark Cookies, Site Data, and Cached Images and Files.
  • Upon choosing the files, click on the Delete
  • Also, click on start and type “Temp”. Press Enter to open the temporary files.
  • Choose all the files in this folder and click on Delete.
Clearing-cache-data-folder-of-Microsoft-Internet

Operation 4: Go for updating of Login Credentials of the bank

Incorrect login information on bank login screen can prevent you from accessing the bank account through QuickBooks. For this change the credentials and then try logging in once again.

    • Open the browser and go to QuickBooks Online.

    • From here, visit the Banking menu.

    • Opt for the correct bank account and click on Edit.

    • Advance to the Edit Sign-in Info option and make the changes to the credentials.

    • Click on Update.

Operation 5: Try the QuickBooks File Doctor

QuickBooks File Doctor can be resorted in case the solutions discussed till now fail to rectify the issue. Perform the steps as follows:

    • Go to Intuit and download QuickBooks Tool Hub.

    • Go for the installation of the tool and when that is done, run it.

    • As QB Tool Hub opens, go to Company issues tab.

    • Then choose the QuickBooks File Doctor tool.

QuickBooks File Doctor Tool

    • Opt for the Company file and start the scan.

    • This should fix any aberrations and in the company file. You should also check for any network issues using the File Doctor tool.

Operation 6Reconnect to the bank after some time 

If all the troubleshooting guidelines fail to offer you any respite, then QuickBooks Error 179 could be most probably due to back-end server maintenance. For this, either contact your bank, or try logging in to the bank again after some time.

Operation 7: Download Bank Feeds manually from the bank website 

This is a bypass solution and not a permanent fix to QuickBooks Error code 179. It requires you to access your banking website through the browser and then download the Bank Feeds directly. Later, you can incorporate those to QuickBooks.

Bidding Adieu on a Supportive Note!

This blog addressed the issue QuickBooks Error Code 179 observed when you connect to the Bank through QuickBooks. The troubleshooting operations explained within this blog should help you resolve the error.